
Think of bleed for printing as your design’s safety net. It’s a small, extra margin of your background colour or image that deliberately extends beyond the final trim line of your print. This simple but crucial step is what guarantees a professional, edge-to-edge finish, completely eliminating any risk of ugly white borders after cutting.
Understanding the Core Concepts of Print Bleed
Ever painted a wall and used masking tape to get a crisp, clean edge? You’d naturally paint a little bit over the tape. When you peel it off, you’re left with a perfect line. That’s exactly how bleed works in printing.
Printers don't cut one sheet at a time; they cut huge stacks with industrial guillotines. Because of the immense pressure, tiny mechanical shifts are unavoidable. By extending your design into the bleed area, you’re compensating for these micro-movements, ensuring your background covers the entire surface of the finished product.
Whether you're creating sleek business cards, eye-catching flyers for new business marketing ideas, or impactful leaflets for political campaigns, getting the bleed right is non-negotiable. It’s the secret to avoiding costly reprints and making sure every single piece looks polished and professional.
The Three Key Print Zones
To really master bleed, you need to get your head around three distinct zones in your design file. Each one has a critical job to do on the journey from a digital file to a physical print, and they all work together to protect your design’s integrity.
This diagram shows you exactly how the bleed, trim, and safe zones relate to one another.
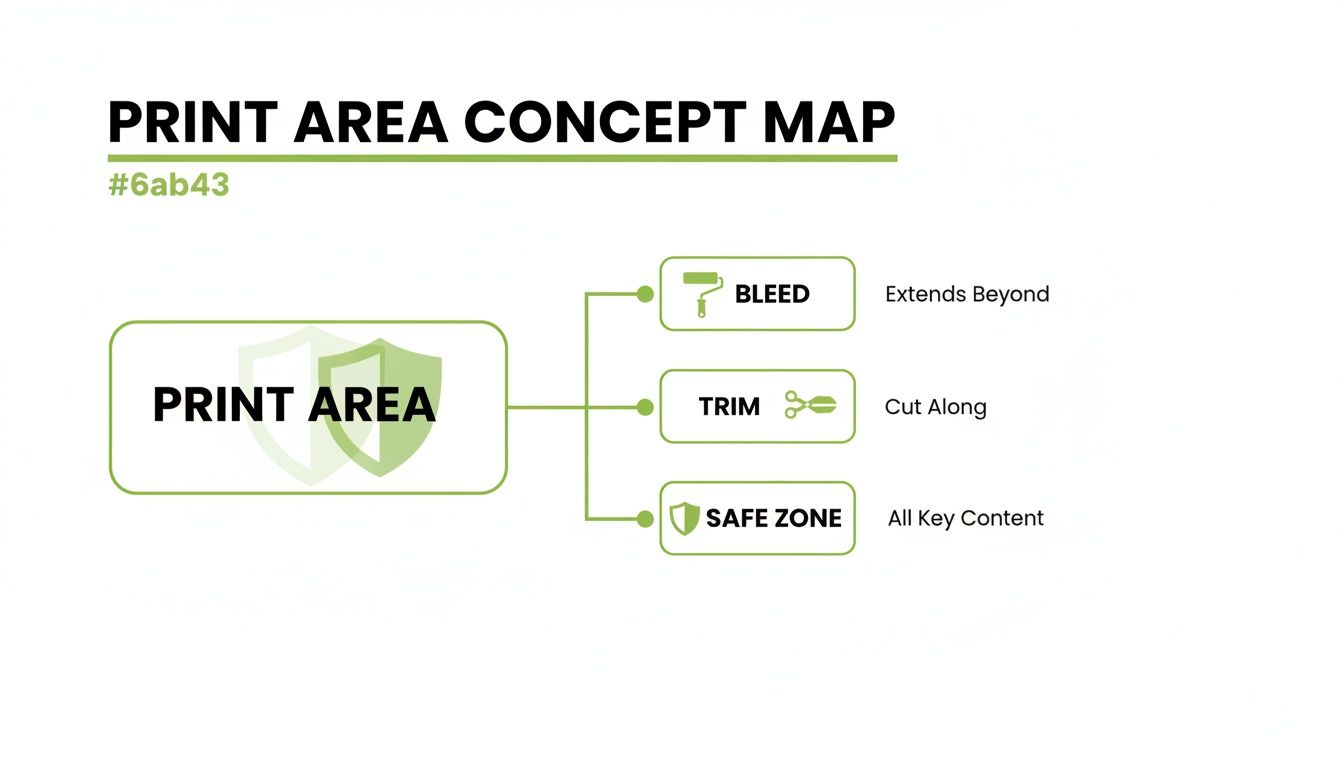
As you can see, the bleed acts as an outer buffer, the trim line is where the cut happens, and the safe zone is the protected inner core for your most important content.
Let's break them down:
- The Bleed Area: This is the outermost section of your design that gets trimmed off. By extending your background images or colours into this area (typically 3mm in the UK), you create a buffer zone for the cutting process.
- The Trim Line: This is the line that defines the final, finished size of your printed piece. It’s where the guillotine is set to cut. For example, an A5 flyer’s trim line is at 148mm x 210mm. You can find more details in our complete guide to the dimensions for a flyer.
- The Safe Zone: Sometimes called the safety margin, this is an inner border where all your critical content like text, logos, and key parts of images must be placed. Keeping everything important inside this zone ensures nothing gets accidentally sliced off during trimming.
By designing with these three zones in mind, you’re essentially giving your printer a perfect blueprint. It clearly shows where to cut while shielding the most vital parts of your message from being lost.
Ultimately, understanding bleed isn’t just about ticking a technical box; it’s a fundamental part of quality control. It's what separates an amateur-looking flyer with a jarring white sliver down the side from a professional marketing piece that truly reflects the quality of your brand.
How Bleed Protects Your Professional Image
Ever wonder how professional prints get that perfect, edge-to-edge colour? It’s not magic, but it is one of the most important steps in print design: it's called bleed. Getting your head around bleed is the key to protecting your brand's professional image on every single thing you print.
When we print your designs, they’re printed on massive sheets of paper. These sheets are then stacked, sometimes hundreds high, and cut down to size with a powerful industrial guillotine. It’s an incredibly precise process, but we’re talking about immense pressure and fast-moving machinery.
Because of this, tiny shifts in the paper stack often less than a single millimetre are simply unavoidable. We call this the trim tolerance, and without bleed, even the tiniest shift can have a very noticeable and unprofessional result.
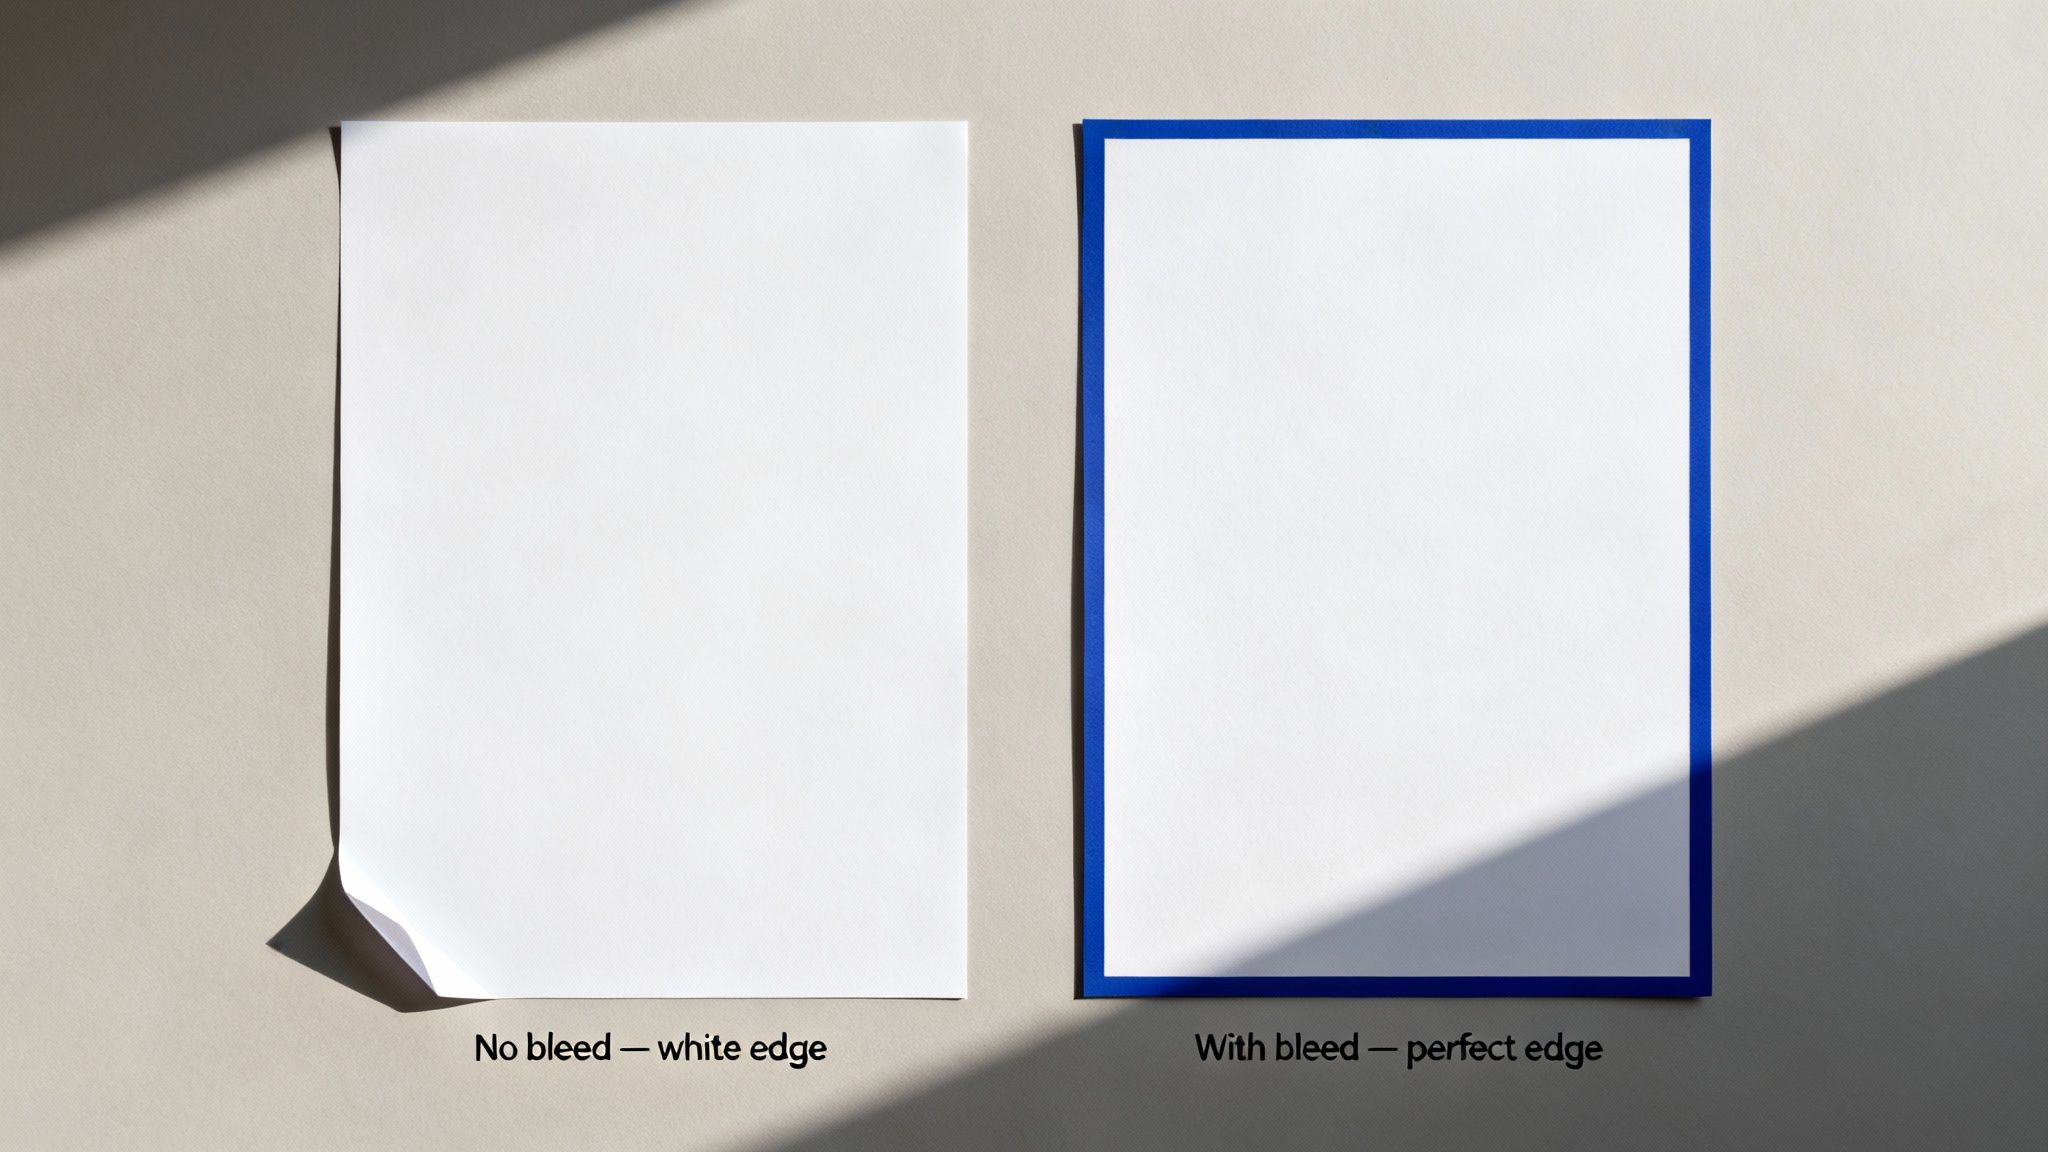
The Risk of Printing Without Bleed
Picture your design stopping exactly at the cut line. If the guillotine blade lands just a fraction of a millimetre outside that line, you’re left with a glaring white sliver of unprinted paper along the edge.
It's a small mistake, but it instantly screams "low-quality print job." It can completely undermine the credibility of your marketing, whether it’s for a nationwide political campaign or a local small business just starting out.
Here’s a quick look at how it all plays out:
| Without Bleed | With Bleed |
|---|---|
| The slightest cutting inaccuracy can leave an ugly white border. | Your design extends past the cut line, guaranteeing edge-to-edge colour. |
| The final product can look cheap, rushed, and unprofessional. | The finished item looks polished, professional, and high-quality. |
| You risk damaging your brand’s reputation for quality. | You protect your investment and reinforce a strong, professional image. |
For organisations like the Advance UK political party, every leaflet has to project confidence. A misprinted flyer with white edges just looks amateur. Likewise, for businesses launching new business marketing ideas, that first impression is everything.
Think of Bleed as Your Quality Insurance Policy
The best way to think about bleed is as an insurance policy for your design. By extending your background colour or image just a little bit beyond the final trim line, you’re creating a buffer zone. This buffer absorbs any minor shifts during the cutting stage.
When the blade comes down, it cuts through this extra "bleed" area. This guarantees that even if the paper moves slightly, the final trimmed edge will still be perfectly covered by your design. The result is a clean, flawless, and professional finish, every single time.
This isn't just a box-ticking exercise; it’s a critical part of managing your brand. High-quality print materials reflect a high-quality organisation. Whether you’re printing appointment cards or detailed brochures, consistency is key. To make sure your first point of contact is perfect, you can learn more about how to print business cards with professional precision in our dedicated guide.
Bleed is the essential buffer that protects your design from the physical realities of the printing process. It's the small step in setup that guarantees a big impact on the final quality, safeguarding your brand's reputation for excellence.
Ultimately, skipping bleed is a gamble you take with your professional image, leaving the final quality of your print run to chance. By setting up your bleed correctly, you take control of the outcome. You ensure that every flyer, poster, and business card you produce is a flawless representation of your brand's high standards and that’s what separates standout marketing from the stuff that gets overlooked.
UK Standard Bleed and Safety Margin Requirements
So, you understand that adding a bleed for printing is your design's best defence against dodgy white edges. The big question now is: how much do you actually need?
While it can vary slightly, there's a widely accepted industry standard here in the UK that works for most print projects. This isn't just a number plucked from thin air; it’s a precise measurement based on the tiny, real-world movements of professional printing presses and cutting machines. Getting this right from the start means your artwork will sail through the production process without a hitch.
For the vast majority of printed materials, the magic number is 3mm.
It’s simple: you just need to extend your background colour or image 3mm beyond the trim line on every single side. For example, if you're designing an A5 leaflet (148mm x 210mm), your final artwork file with bleed included should measure 154mm x 216mm.
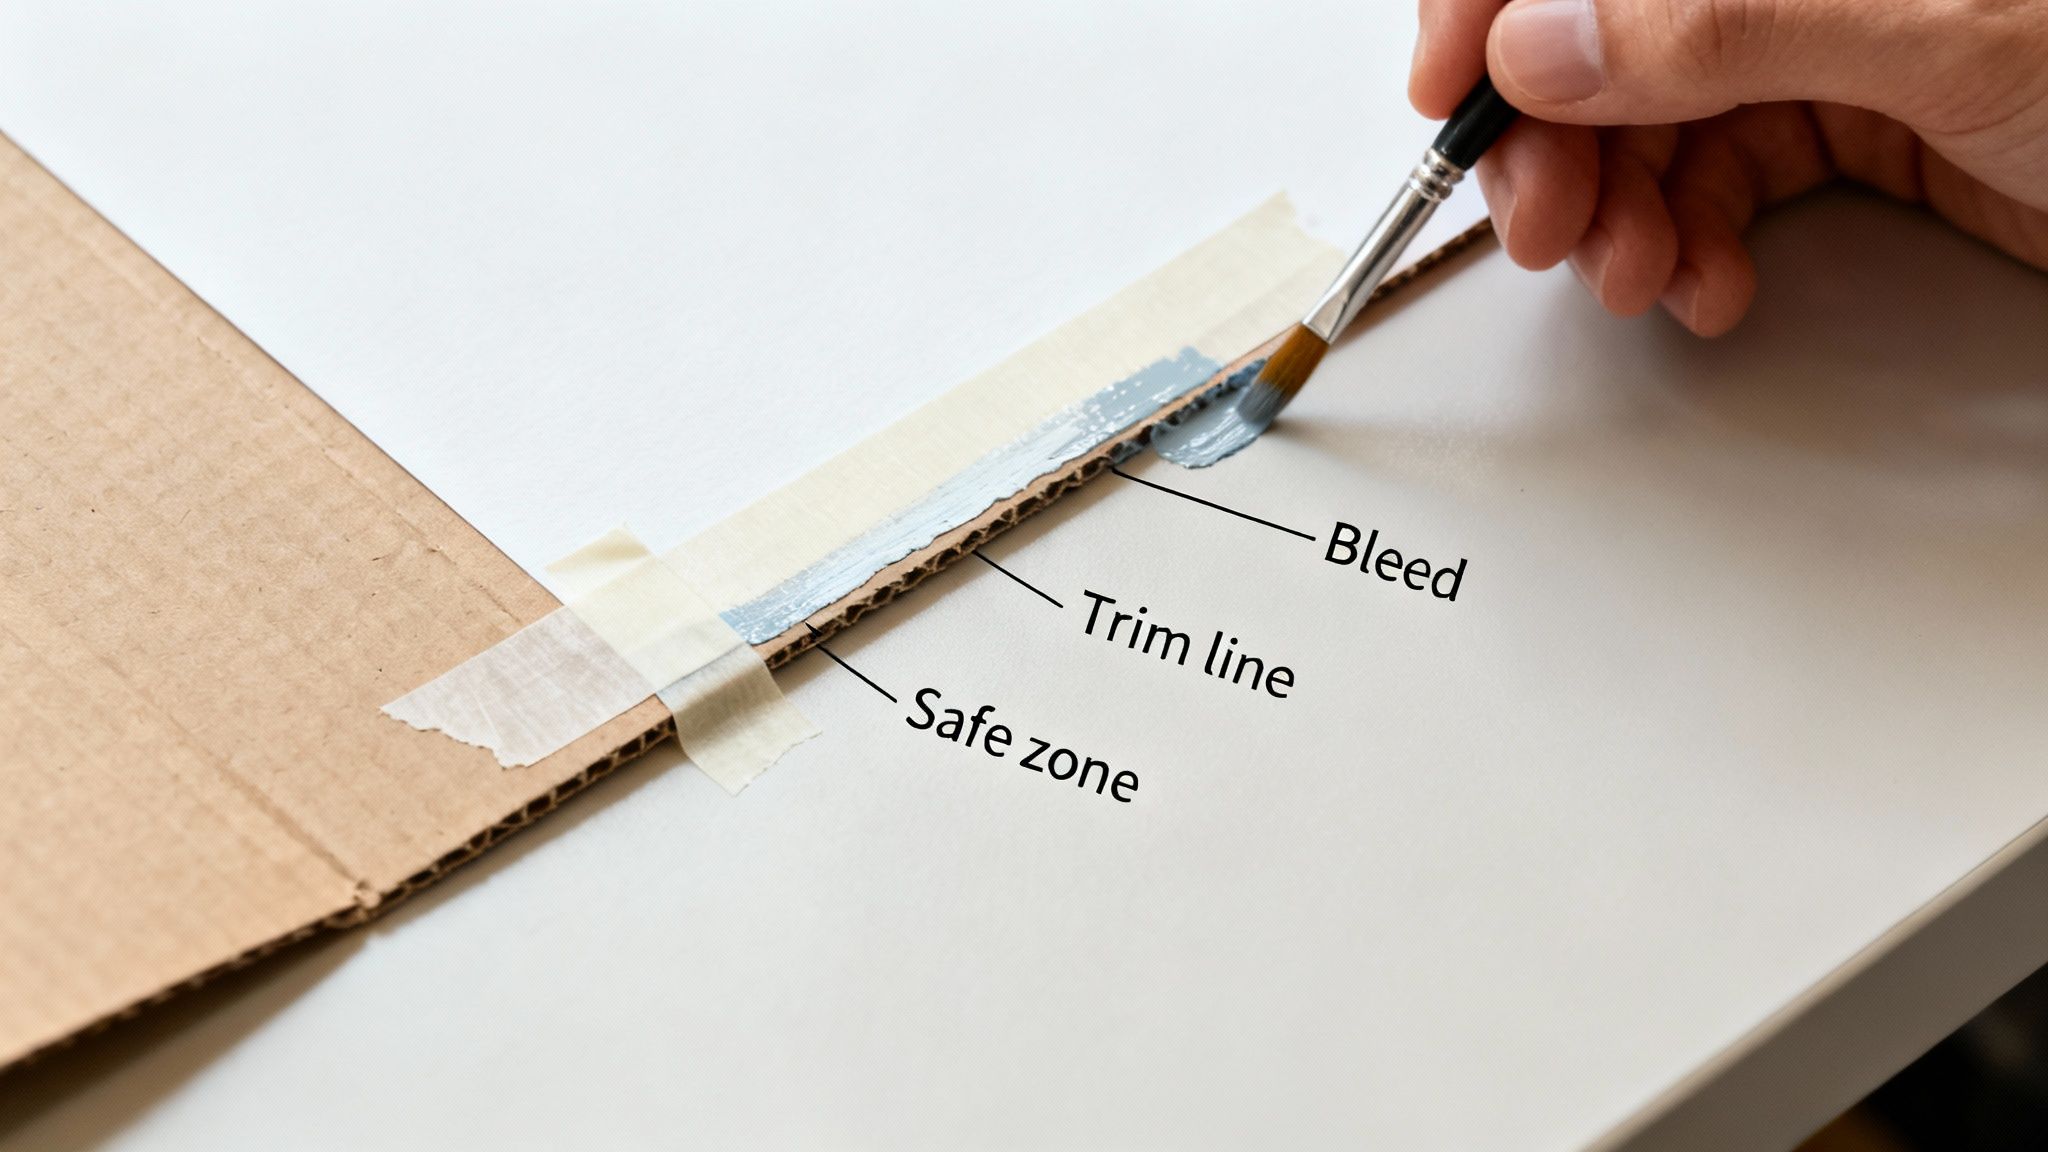
Defining Your Safe Zone
Just as crucial as the bleed on the outside is the safe zone (or safety margin) on the inside. This is the protected area where all your vital bits and pieces logos, text, contact details, and key parts of images need to live. Why? To make sure they don’t get accidentally chopped off during trimming.
Like bleed, the safe zone has a standard measurement. A good rule of thumb is to keep all essential elements at least 3mm to 5mm inside the final trim line. This creates a buffer that guarantees nothing important gets clipped, even if there’s a fractional shift during the cutting stage.
Think of it like a picture frame. The bleed is the part of the photo tucked under the frame's edge, while the safe zone is the main subject—the part you want everyone to see clearly, well away from the borders.
Quick Reference Guide to Bleed Requirements
To make things even easier, we’ve put together a handy cheat sheet with the specific bleed and safe zone requirements for some of our most popular products. While the 3mm rule is a fantastic starting point, some larger items need a bit more breathing room.
| Product Type | Required Bleed (Per Edge) | Safe Zone Margin (From Trim Line) | Common Use Cases |
|---|---|---|---|
| Business Cards | 3mm | 3mm | Networking, contact information, appointment cards. |
| A5 & A4 Leaflets | 3mm | 5mm | Promotional flyers, event handouts, political campaigns. |
| Posters (A3-A0) | 3mm | 5mm | Event advertising, point-of-sale displays, business marketing. |
| Roller Banners | 3mm | 10mm at top, 100mm at bottom | Trade shows, reception areas, conferences, retail promotions. |
As you can see, something like a roller banner has unique needs. That extra-large bottom margin is essential because a chunk of the graphic always stays hidden inside the roller mechanism. For a full breakdown, have a look at our guide on pull-up banner dimensions.
Remember, this table is your go-to for ensuring your designs are print-ready and perfect every time.
Why Do These Standards Matter So Much?
Sticking to these measurements is about more than just following rules—it’s about getting your print job done right, and on time. When your artwork arrives with the correct bleed and safe zone, it can head straight to the presses without any delays.
Files that are missing bleed or have text creeping too close to the edge often get flagged for a manual review. This usually means a bit of back-and-forth while you make revisions and resubmit your artwork, which can slow down your entire project.
By setting up your document correctly from the very beginning, you ensure a smooth, fast process that delivers the flawless results you’re after. No fuss, no delays.
Setting Up Bleed in Popular Design Tools
Knowing the theory behind print bleed is a great start, but the real magic happens inside your design software. Getting the document set up correctly from the very beginning saves a massive amount of hassle and prevents those all-too-common print headaches down the line.
Here, we'll walk you through the practical, hands-on steps for setting bleed in the industry's most popular tools. From Adobe's professional suite to the user-friendly Canva, we’ve got you covered. This guide shows you how to create a new file with bleed and how to add it to a project you've already started, ensuring your designs are perfectly print-ready every time.
Setting Bleed in Adobe InDesign
When it comes to multi-page documents like brochures, booklets, and magazines, Adobe InDesign is the undisputed champion. It’s built from the ground up with print in mind, which makes setting up bleed incredibly simple.
For a New Document:
- Open InDesign and go to File > New > Document.
- In the pop-up window, look for the Bleed and Slug section on the right. You might need to click to expand it.
- Type 3 mm into the top Bleed field. Just make sure the little chain link icon is active this applies the same value to the Top, Bottom, Inside, and Outside edges automatically.
- Set your final document dimensions (like A4 or A5) and click Create. You’ll immediately see a red line framing your canvas. That’s your bleed guide.
For an Existing Document:
Already started your design? No problem at all. Adding bleed later is just as easy.
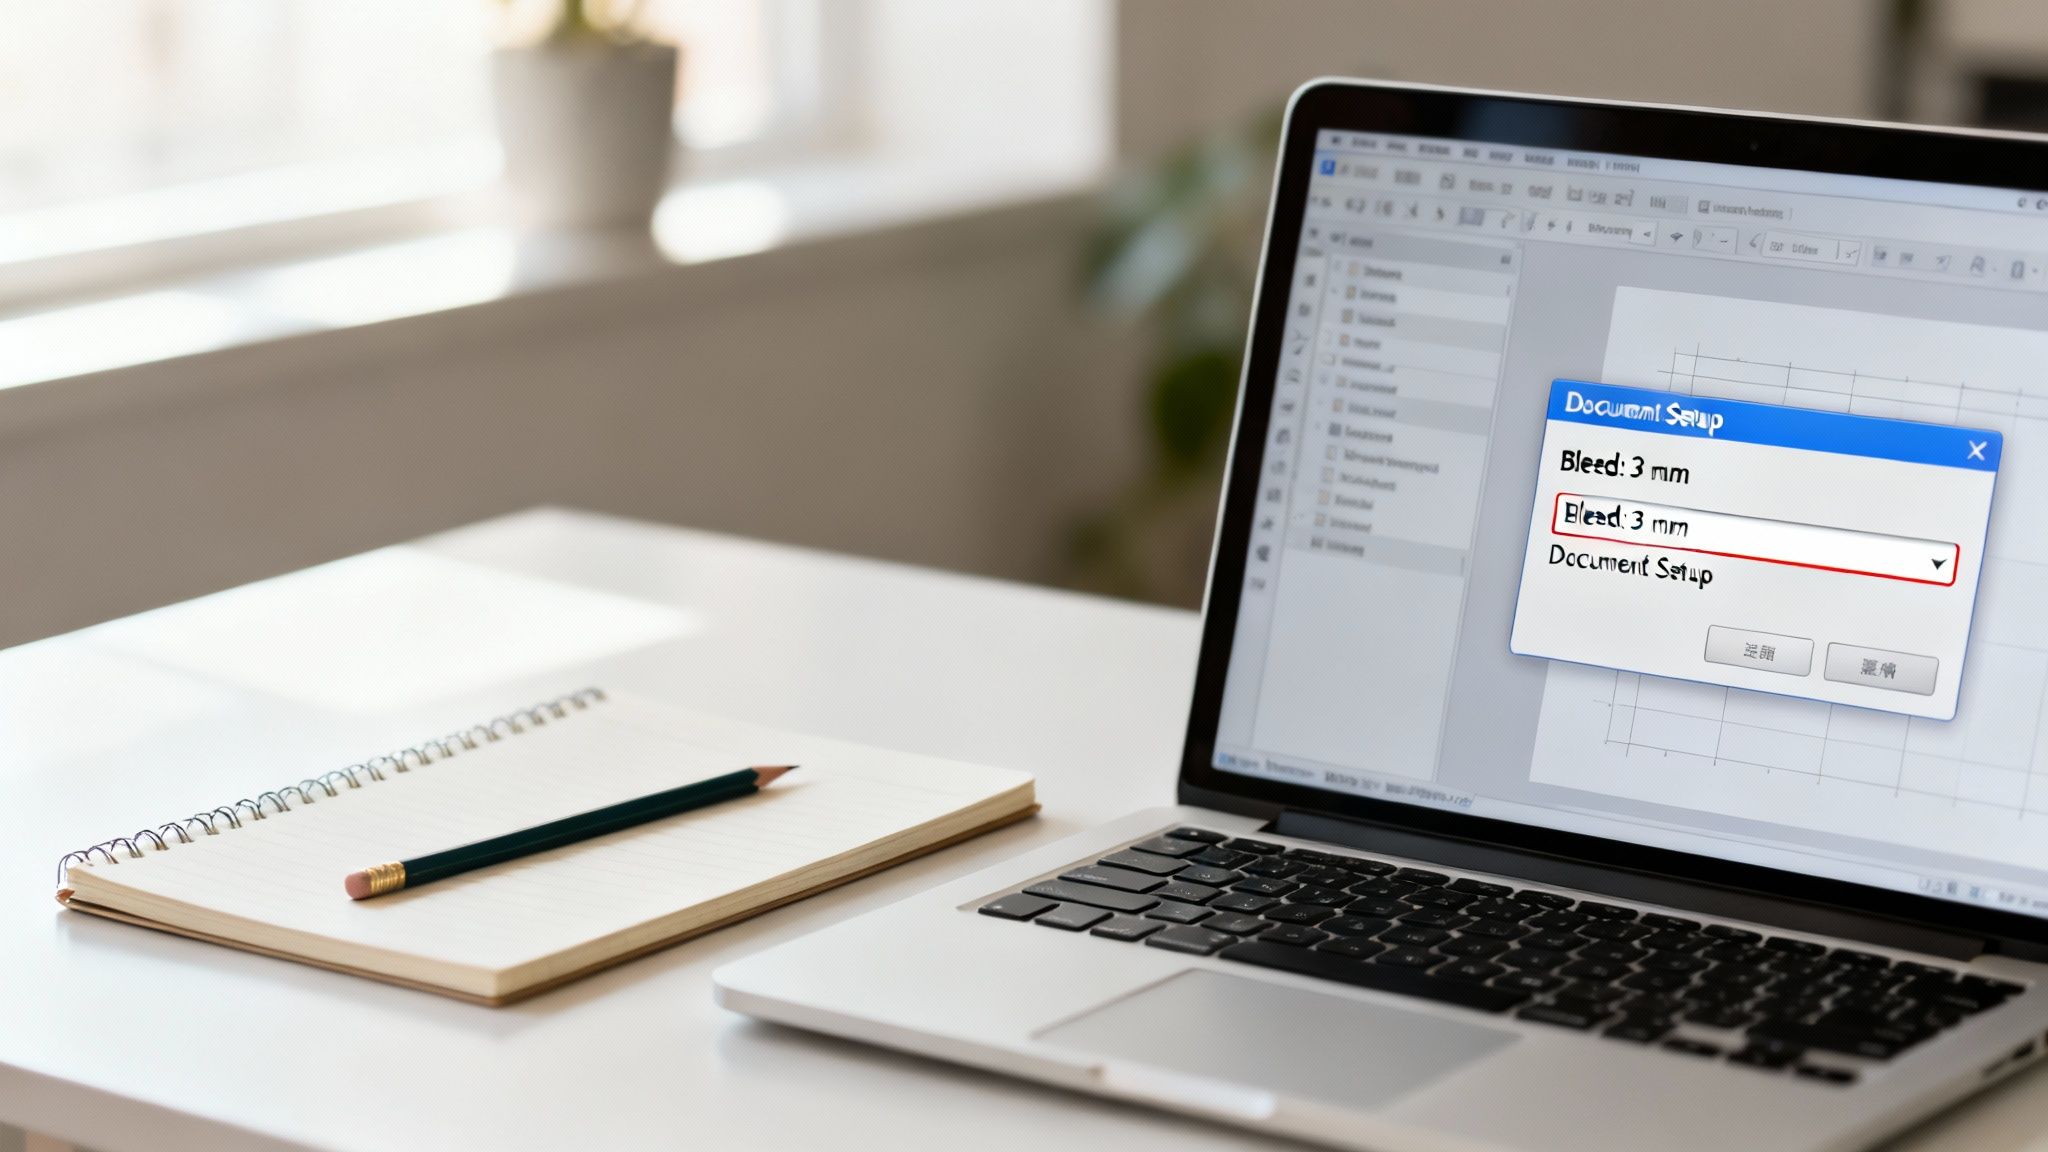
- With your document open, head to File > Document Setup.
- Find the Bleed and Slug section and pop 3 mm into the bleed fields, again ensuring the chain link is active.
- Click OK. That helpful red bleed guide will now appear around your pages.
- Now for the crucial bit: you need to manually extend any background elements be it colours, photos, or graphics all the way out to meet this new red line.
One of the best things about InDesign is how it treats bleed as a fundamental part of the document. Once you've set it, the software remembers those values when you export your final PDF, making the last step of the process virtually foolproof.
Adding Bleed in Adobe Illustrator
For vector-based artwork like logos, icons, and single-page designs such as posters and flyers, Adobe Illustrator is the tool of choice. Thankfully, its bleed setup is nearly identical to InDesign's, giving you a nice, consistent workflow if you use both.
For a New Document:
- Launch Illustrator and click Create New.
- In the setup panel on the right, find the Bleed settings, which are usually just below the dimensions.
- Enter 3 mm for the Top, Bottom, Left, and Right bleed. The linked icon will do its job and apply the value to all sides at once.
- Confirm your other settings and hit Create. A red border will pop up outside your artboard, clearly marking out the bleed area.
For an Existing Document:
Forgot to add bleed at the start? You can add it at any point.
- Just go to File > Document Setup.
- In the window that appears, type 3 mm into the Bleed fields.
- Click OK to apply the changes.
- And just like with InDesign, the final step is on you. Manually stretch your background artwork to fill the new bleed area right up to that red guide.
Managing Bleed in Adobe Photoshop
Because Adobe Photoshop is primarily for editing photos, it doesn't have a dedicated "bleed" button like its siblings. Instead, you have to think ahead and build the bleed area directly into your canvas size. It just takes a tiny bit of maths.
Setting Up a New Document:
- Go to File > New.
- Now, calculate your total document size. For a standard 3 mm bleed, you need to add 6 mm to both the width and height (that’s 3 mm for the left + 3 mm for the right, and 3 mm for the top + 3 mm for the bottom).
- So, for an A5 flyer that's normally 148 x 210 mm, you would set your canvas dimensions to 154 x 216 mm.
- It's absolutely vital to set your resolution to 300 DPI (Dots Per Inch) to ensure a sharp, high-quality print.
To help keep your design perfectly aligned, it’s a good idea to add guides. You can do this by going to View > New Guide Layout and creating guides 3 mm in from each edge to mark the trim line. We also recommend adding another set about 6-8 mm in from the edge to create your safe area.
How to Add Bleed in Canva
Canva has become a hugely popular tool for creating quick, effective designs, especially for marketing materials that need a fast turnaround. It also has a really simple, built-in feature for adding bleed.
Setting Up Bleed:
- When you start a new design or open an existing one, head to File in the top-left menu.
- Select View settings, and then just click on Show print bleed.
- This instantly adds a dotted line around the edge of your design, creating the bleed area (usually the standard 3 mm).
- All you need to do now is make sure any background images or colour blocks are dragged all the way to the outer edge of this new bleed area.
This one-click approach makes preparing a file for print incredibly straightforward. While Canva is a brilliant tool, some more complex jobs like multi-page documents might be better suited to more advanced software. For anyone using other programs, our guide on how to print a booklet from a Word document has some useful tips that can often be adapted for different platforms.
Exporting a Print-Ready File with Bleed Marks
Right, your design is finished, and the bleed area is perfectly extended past the edges. Now for the final, and most critical, step: exporting a print-ready file that actually includes all your hard work. A flawless setup means nothing if the export settings are wrong—this is the moment you tell the software to package the bleed for printing into the final file.
This process bundles your design into a PDF, which is the universal standard for high-quality printing. Getting these settings spot-on ensures our printers receive all the information they need to produce a professional, edge-to-edge result without any frustrating delays.
Key PDF Export Settings for Print
Whether you’re in Adobe InDesign, Illustrator, or another professional design tool, the export process has a few universal settings you absolutely must get right. When you go to save or export your file, you’ll be faced with a dialogue box full of options.
Don’t get overwhelmed. Just look for these key settings to ensure a perfect export:
- PDF Preset: Always choose a high-quality print preset. This is usually called something like ‘High Quality Print’ or ‘Press Quality’. These presets automatically configure things like image compression and colour profiles for professional printing, so you don't have to worry about them.
- Marks and Bleeds: This is the most important bit. You must find and tick the box that says ‘Use Document Bleed Settings’. This tells the software to include that extra 3mm area you so carefully set up earlier.
Think of it like packing a suitcase for a trip. Forgetting to check the 'Use Document Bleed Settings' box is like leaving your passport at home. No matter how well you packed everything else, you won’t get where you need to go.
What About Trim Marks?
In that same ‘Marks and Bleeds’ panel, you'll often see an option to add ‘Trim Marks’ or ‘Crop Marks’. These are very fine lines that sit outside the final trim area, showing the printer exactly where to cut.
While they are essential for printing, here’s a pro tip that will make your life easier: you typically don't need to add them yourself. When you upload a file with the correct bleed to our system, our advanced pre-press software adds these marks automatically with perfect precision.
Adding them manually can sometimes cause issues if they're placed incorrectly. By leaving them off, you simplify the process and remove a potential point of failure. Just focus on exporting with the document bleed settings enabled, and we’ll handle the rest.
Beyond mastering the technical side of bleed, for entrepreneurs focused on ventures like selling coloring books on Amazon, understanding how proper file setup impacts product quality is key to professional success.
Exporting from Canva
Good news for Canva users—the platform makes this process incredibly simple. Once you've enabled ‘Show print bleed’ and extended your design elements, the export steps are a piece of cake.
- Click the Share button in the top-right corner.
- Select Download.
- For ‘File type’, choose PDF Print.
- Crucially, check the box for Crop marks and bleed.
That one click ensures your downloaded file is perfectly prepared for our presses. Getting this final step right is just as important for a simple poster as it is for more complex projects. For great results on larger formats, check out our guide on custom poster printing in the UK.
Common Bleed Mistakes and How to Fix Them
Even with the best of intentions, it’s surprisingly easy to make a small mistake when getting a file ready for print. Knowing the most common pitfalls with bleed for printing is the best way to steer clear of them, making sure your project sails smoothly from submission to production without frustrating delays.
Think of it as a final quality check before you send your artwork our way. Spotting and fixing these frequent slip-ups means you can be confident your final product will look exactly as you pictured it. This is a bigger deal than you might think; in the UK printing industry, improper artwork preparation accounts for up to 15-20% of all production errors. With the digital printing sector valued at £1.4 billion, getting it right first-time is a massive cost-saver.
Mistake 1: No Bleed at All
This is, without a doubt, the most frequent issue we come across. A designer creates a beautiful, edge-to-edge graphic but saves it at the final trim size (for example, exactly 210mm x 297mm for an A4 sheet). Without that extra buffer, any tiny shift during the cutting process will almost certainly leave an unwanted white sliver along one or more edges.
How to Fix It: Easy. Just pop back into your design file and adjust the document setup. Add the standard 3mm bleed on all sides, and then manually extend your background colours, images, or graphics to completely fill this new area.
Mistake 2: The Fake Bleed Frame
We see this one a lot. It’s a common but incorrect workaround for missing bleed, where someone adds a white or coloured border around the design just to make the file dimensions bigger. For instance, adding a 3mm white frame to an A4 document to match the A4-plus-bleed size.
This just doesn't work. The bleed needs to be a seamless extension of your actual design. If the cutting machine shifts and slices into that fake white border, you’ll end up with the very same white sliver you were trying to prevent.
How to Fix It: Instead of adding a frame, you have to stretch the background elements of your design. The colour or image at the edge of your artwork needs to flow right to the outer edge of the bleed guide.
A true bleed is an overflow of your design, not an empty frame around it. It’s your insurance policy, guaranteeing that no matter where the blade falls within its tolerance, it will land on your intended background.
Mistake 3: Critical Content in the Danger Zone
Another major pitfall is placing important bits—like text, logos, or phone numbers—too close to the edge of the page. This content might be inside the trim line, but it’s sitting in what we call the "danger zone," or the safety margin. During trimming, these crucial details can get clipped off, ruining the entire piece.
How to Fix It: Take a good look at your design and make sure all your critical content is sitting comfortably within the safe zone. This is typically at least 3-5mm inside the final trim line. Nudge any text or logos that are creeping too close to the edge back towards the centre.
Mistake 4: Exporting Without Including the Bleed Data
You can have a perfectly set-up document, but if you don't use the right export settings, all that hard work goes to waste. A common mistake is exporting a PDF using a 'Standard' or 'Smallest File Size' preset, which often strips out the bleed information to save space.
How to Fix It: When you're exporting to PDF from Adobe InDesign or Illustrator, always choose a 'High Quality Print' or 'Press Quality' preset. Most importantly, head to the 'Marks and Bleeds' tab and tick the box that says 'Use Document Bleed Settings'. If you're using Canva, make sure you select 'PDF Print' and tick the box for 'Crop marks and bleed'.
Getting your head around bleed is a huge step toward professional-looking print. And while you're at it, it's worth being aware of other common printing mistakes to avoid for a truly flawless finish. By double-checking these four points before sending us your file, you’ll save time, avoid revision requests, and ensure your marketing materials make the powerful impression they deserve.
Ready to create stunning, professional prints without the hassle? At The Print Warehouse Ltd, we make it easy to bring your ideas to life. From business cards to banners, our high-quality printing and simple ordering process ensure you get flawless results every time. Upload your design and start your print project today!

