
Before you even think about printing, you need a solid design, a correctly formatted digital file, and a clear idea of the paper and finish you’re after. It's a process that's part creative flair, part technical prep-work, but getting both right is what ensures your final card is both memorable and professional.
Designing a Business Card That Makes an Impact
Let’s get the design perfected before we dive into print specs. Think of your business card as a pocket-sized brand ambassador; that first impression is everything. Despite all the digital networking tools we have, a physical card is still a seriously powerful piece of marketing. In fact, research shows that a staggering 72% of people judge a company based on the quality of its business card. That makes great design non-negotiable.
Your first big decision? Size and orientation. This choice sets the entire tone for what follows.
Choosing the Right Size and Orientation
The go-to, standard UK business card size is 85mm x 55mm. Sticking with this dimension is a safe bet because it fits perfectly into wallets and standard card holders. It’s familiar, convenient, and a professional choice for almost any industry.
But sometimes, breaking from the norm is exactly what your brand needs to make a statement.
- Square Cards (e.g., 55mm x 55mm): These just feel modern and creative. They work exceptionally well for brands in design, photography, or tech, where their unique shape instantly demands attention.
- Mini Cards (e.g., 85mm x 25mm): Slim and sleek, these are brilliant for minimalist designs where you only want to share the absolute essentials.
Orientation plays a huge role, too. A traditional landscape layout is what people expect and it’s easy to read. A portrait (vertical) layout, on the other hand, feels more contemporary and can guide the eye down the card in a really interesting way. If you’re looking for ideas, browsing through some unique double-sided creative business cards can spark some inspiration on how to use the space effectively.
Common UK Business Card Dimensions
Here’s a quick reference for the most common sizes you'll encounter and what they're typically best for.
| Size Type | Dimensions (mm) | Best For |
|---|---|---|
| Standard | 85mm x 55mm | The classic choice. Fits all standard holders and wallets, ideal for corporate and professional settings. |
| Square | 55mm x 55mm | Creative industries like design, art, and photography. Makes a bold, modern statement. |
| Mini/Slim | 85mm x 25mm | Minimalist brands, event ticketing, or as a stylish tag. Focuses on just one or two key details. |
| Folded | 170mm x 55mm | Businesses needing more space for info, like appointment cards, price lists, or mini-portfolios. |
Ultimately, the right size depends on the story you want your card to tell.
Essential Information to Include
Once you've settled on a format, it’s time to nail down the content. The biggest mistake you can make is clutter. Focus on the essentials and make sure they’re clear and easy to read.
A great business card isn’t about cramming in every possible detail; it's about providing the right details in a clean, accessible way. Less is often more.
Your must-have checklist should always include:
- Your Full Name and Job Title
- Company Name and Logo
- Phone Number
- Email Address
- Website URL
To really elevate your card, look at what makes other designs work. You can find some fantastic design lessons from iconic logos that apply just as well to a business card's layout. A well-placed QR code linking to your portfolio or LinkedIn profile can also be a smart, modern touch that bridges the gap between your physical card and your digital presence.
Setting Up Your File for Flawless Printing
Right, so you've nailed the design. The next part is all about the technical prep, and honestly, this is where a great design can either shine or fall flat. Getting your file settings spot-on is the single most important thing you can do to make sure the business cards you get back look exactly like they did on your screen.
Think of it as a pre-flight check. A few minutes here will save you from costly reprints, frustrating delays, and that sinking feeling when your colours look off or your logo gets chopped. Let’s walk through the essentials to guarantee a perfect print run.
Understanding Bleed, Trim, and Safe Area
These three terms are the absolute bedrock of professional printing. If you get your head around these, you're halfway there. Imagine your business card has three invisible boundaries:
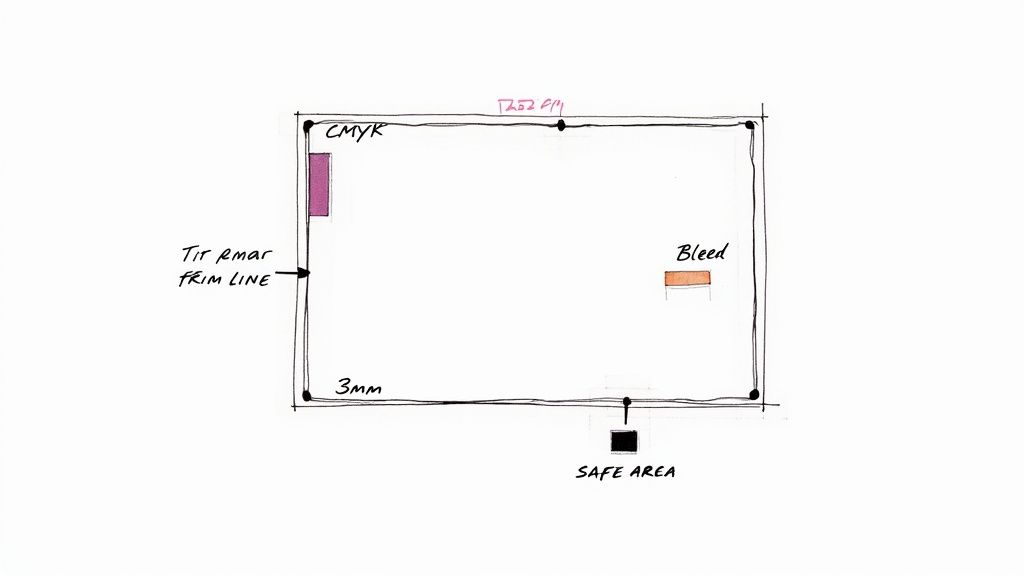
- Trim Line: This is the final edge of your business card where it will be physically cut. For a standard UK card, that’s the 85mm x 55mm line. Simple.
- Bleed Area: This is a little bit of extra background colour or image that extends beyond the trim line—usually 3mm on all sides. Why? Because when a massive guillotine cuts through a stack of hundreds of cards, there can be tiny shifts. The bleed ensures that if the cut is a fraction of a millimetre off, you won't get a jarring white sliver along the edge.
- Safe Area: This is an inner margin, usually about 3-5mm inside the trim line. You need to keep all the important stuff—your name, number, logo—inside this zone. It's the 'safe' zone, protecting vital info from being accidentally clipped during the trimming process.
Getting the bleed and safe area right is non-negotiable for a professional finish. It’s the difference between something that looks polished and something that looks like a rush job.
This quick diagram shows the basic workflow for checking your design before you send it off.

It’s a simple process: confirm your size, check your orientation, and then make absolutely sure every crucial detail is sitting comfortably inside that safe area.
Setting the Correct Colour Mode and Resolution
Two other technical bits can completely change how your final card looks: colour mode and resolution.
Your screen displays colour using light (Red, Green, and Blue, or RGB). A printing press, however, uses ink (Cyan, Magenta, Yellow, and Black, or CMYK). If you design in RGB, the colours will shift when converted for print. That vibrant electric blue might turn into a duller, flatter shade, and bright greens can end up looking a bit muddy. The golden rule is to set your design software’s colour mode to CMYK right from the start.
Finally, let's talk sharpness. Resolution is what keeps your text crisp and your images clear. For print, the industry standard is 300 DPI (dots per inch). Web images are often 72 DPI, which looks fine on a screen but will come out blurry and pixelated on a physical card. Double-check this setting before you even place the first element on your canvas.
When you go to order your business cards in the UK, most printers provide downloadable templates. These are a lifesaver, as they often have all these settings—bleed, safe area, CMYK, and 300 DPI—already configured for you.
Choosing Your Paper and Finishes

The visual design of your business card is only half the story. The moment someone holds it, the feel of the card sends a powerful message about your brand’s quality and attention to detail. Choosing the right paper and finish can turn a simple card into something genuinely memorable.
Your first decision point is the paper’s weight, measured in GSM (grams per square metre). A flimsy card under 300 GSM can feel cheap and disposable. On the other hand, a heavier stock of 350-400 GSM feels substantial, premium, and is far more durable. That added stiffness helps it survive a trip into a wallet or being passed around a room without creasing.
Selecting the Right Card Stock Finish
Beyond just weight, the finish of the card stock completely changes how your colours look and how the card feels in hand. Each option has its own personality, and it’s all about matching it to your brand’s style.
The table below breaks down the most common paper stocks and finishes, helping you decide which option best suits your brand and message.
Paper Stock and Finish Comparison
| Feature | Description | Best For |
|---|---|---|
| Matte | A non-reflective, smooth surface with a modern, sophisticated feel. It's completely glare-free. | Minimalist designs, corporate branding, and cards that need to be written on (like appointment cards). |
| Gloss | A high-shine, reflective coating that makes colours look vibrant and saturated. Think photo prints. | Bold, colourful, or image-heavy designs where you want maximum visual impact. |
| Silk | A smooth, low-sheen coating that sits between matte and gloss. It feels luxurious without being overly reflective. | A versatile, premium choice that suits almost any professional design, enhancing colour without the high glare. |
| Recycled | Made from post-consumer waste, often with a slightly textured, natural appearance. | Eco-conscious brands looking to communicate their commitment to sustainability. |
Choosing the right finish is about more than just looks; it's about creating a tactile experience that aligns with your brand's identity.
For businesses focused on their environmental impact, there are some brilliant eco-friendly options. Exploring choices like 100% recycled business cards aligns your marketing materials with your company’s green values—a detail that often resonates with like-minded clients.
Adding Special Finishes for Extra Impact
If you really want your card to stand out from the stack, special finishes can add a touch of luxury and intrigue. These are the details people notice.
A special finish isn't just a design element; it's a conversation starter. It encourages people to look closer, touch the card, and engage with your brand on a sensory level.
Consider adding one of these popular upgrades:
- Spot UV: This is a high-gloss varnish applied to specific areas, like a logo or pattern. It creates a stunning contrast against a matte or silk background, adding both visual and textural depth.
- Metallic Foiling: Add a touch of elegance with reflective foil in gold, silver, copper, or even holographic effects. It's perfect for highlighting your company name or key design elements and catching the light.
- Embossing/Debossing: This process creates a raised (embossed) or indented (debossed) effect on the paper. It adds a sophisticated, three-dimensional quality that people can't resist running their fingers over.
While these premium touches do add to the cost, the investment can be surprisingly manageable. The average cost for custom business cards in the UK ranges from £0.06 to £0.24 per card when ordering in bulk, making even high-end options an affordable tool for making a killer first impression.
Proofing Your Design Before You Print
You’re almost there. The design is done, the paper is picked, and you’re just one step away from ordering business cards that will make a real impact. But hold on—this final stage, proofing, is probably the most important step of all. It’s your last chance to catch any mistakes before committing to a full print run, saving you from the headache and cost of a reprint.
Whether you get a digital PDF proof or a physical sample in the post, your job is to review it with a fine-tooth comb. Don't just give it a quick glance; look at it like a detective hunting for clues. A tiny typo or a slight misalignment that looks insignificant on screen can become a glaring error on hundreds of finished cards.
Your Essential Proofing Checklist
Before you give your printer the green light, run through this checklist. It’s always a good idea to get a second pair of eyes on it, too—someone else might spot something you’ve missed after staring at the same design for hours.
- Spelling and Grammar: Read every single word out loud. This forces you to slow down. Check names, titles, phone numbers, and email addresses with zero mercy. Is ".co.uk" correct? Is the postcode spot-on? These small details matter.
- Colour Accuracy: Remember the whole CMYK vs. RGB thing? Your proof is where you see the results. Do the colours look right for your brand? Be aware that colours will always look slightly different from screen to screen, but a print proof is the closest you’ll get to the real thing.
- Image and Logo Quality: Zoom right in on the proof. Are your logos, icons, and any photos sharp and clear? There should be absolutely no pixelation or blurriness. Everything needs to look crisp.
- Alignment and Layout: Check that everything is perfectly aligned and sits comfortably within the safe area. Make sure nothing is creeping too close to the trim edge and that the spacing between text and graphics feels balanced.
- Finishes and Special Features: If you’ve ordered something with a special touch, like our classic Spot UV business cards, check that the proof clearly shows where the gloss, foil, or embossing will be applied. For digital proofs, this is often shown as a separate layer or in a contrasting colour.
Think of your proof as the final dress rehearsal. This is your chance to correct any issues before the main performance. Once you approve it, the responsibility for any errors in the artwork shifts from the printer to you.
Once you’ve scrutinised every last detail and you’re completely happy, it’s time to approve that proof. You'll then export your final artwork as a print-ready PDF, double-checking that it meets all the specs for bleed, resolution, and colour mode. This final file is the blueprint for the cards that will soon be representing your business. Taking these few extra minutes for a thorough check ensures they’ll be a perfect reflection of your brand's professionalism.
Do Business Cards Still Matter in a Digital World?
In an age of constant pings and endless LinkedIn requests, you might wonder if the printed business card has finally had its day. The answer is a definite no. In fact, a physical card is more powerful than ever. It cuts through the digital clutter in a way an email signature or a social media connection just can’t.
When you hand someone a well-designed card, you’re creating a tangible, memorable link. It’s a deliberate act of connection that says you’re professional, prepared, and serious about what you do. Long after the meeting ends, that small piece of cardstock acts as a physical reminder of you and your brand.
Make a Statement with Sustainable Choices
The materials you choose say a lot about your company’s values before you even utter a word. The shift towards sustainability in print isn't just a passing trend; it’s a reflection of modern business ethics. Opting for eco-friendly materials shows you’re a forward-thinking, conscientious brand.
Choosing recycled paper stocks or printing with vegetable-based inks can make your card memorable for all the right reasons. It’s a subtle but powerful signal that you’re in tune with what customers care about today, aligning your brand with a positive, eco-conscious message.
Bridging the Gap Between Physical and Digital
While physical cards are here to stay, their role is changing. The UK market has seen a huge shift, with print runs for traditional paper cards dropping by over 70% since the pandemic as businesses explore new ways to network. You can find more on this in these recent digital business card statistics.
But this doesn’t mean physical cards are obsolete. It means they’ve become more strategic.
The modern business card isn't just a static piece of information. It's a gateway that bridges a real-world handshake with your digital presence, using QR codes and smart design to guide new contacts online.
This hybrid approach gives you the best of both worlds. And for situations where paper just won't cut it—think outdoor events, loyalty schemes, or trades where durability is key—alternatives like durable plastic business cards offer a practical, long-lasting solution.
Ultimately, the goal is to use the physical card as a unique and effective starting point for a lasting professional relationship.
Common Business Card Printing Questions
When you get to the pointy end of ordering business cards, a few technical questions almost always pop up. Getting these details right is the difference between a smooth process and a headache, so let’s walk through the most common hurdles people face.
What Is the Best File Format for Printing Business Cards?
Without a doubt, the gold standard is a high-resolution PDF. More specifically, a PDF/X-1a file is what every professional printer wants to see. Think of it as a locked box containing everything your design needs to print perfectly – all the fonts, images, and colour information are embedded right inside.
This is a huge deal. It means the design you spent hours perfecting on your screen won’t suddenly fall apart or look weird when it hits the print queue. While sending a JPEG or PNG might feel easier, they can often lead to fuzzy text or colours that just don't look right, giving your cards a less-than-professional finish.
Always, always export your final design as a print-ready PDF. It's the single best thing you can do to lock in your design and prevent nasty surprises.
How Much Bleed Do I Need for a UK Business Card?
For a standard UK business card (that’s 85mm x 55mm), pretty much every printer will ask for a 3mm bleed on all four sides. The bleed is a small, extra margin of your background colour or image that extends past the final trim line of the card.
So, why is this tiny margin so critical? When business cards are cut, they’re sliced in massive stacks. Even with the best machinery, the paper can shift by a fraction of a millimetre. Without that bleed, any tiny movement could leave a stark white sliver along the edge of your beautifully designed card. That 3mm buffer is your insurance policy for a flawless, edge-to-edge finish.
Can I Use a Design I Made in Canva or Word?
Yes, you can – but you need to be careful. Tools like Canva and Microsoft Word are fantastic for getting ideas down quickly, but they weren't built from the ground up for professional print work. Dedicated software like Adobe Illustrator or InDesign gives you pinpoint control over the things that really matter, like setting the CMYK colour space and managing bleed accurately.
If you are using an online tool like Canva, you can still get a great result by following these steps:
- Start with a Print Template: Always begin with a template made specifically for business cards. This gets your dimensions right from the very start.
- Choose the Right Download Option: When you're ready to export, select the 'PDF Print' option. This setting automatically kicks the resolution up to 300 DPI and converts the colours to CMYK, which is exactly what printers need.
- Don't Forget Crop Marks and Bleed: This is the most important step! You absolutely must tick the box for 'Crop marks and bleed' before you download. This adds the vital guides the printer uses to trim your cards perfectly.
Following these instructions will massively improve your chances of getting a brilliant result from a non-specialist design tool. The core principles of getting your files ready for print are universal and really well explained.
At The Print Warehouse Ltd, we take the guesswork out of it. Our online system lets you upload your artwork with ease, and our automatic checks will flag common issues before they become a problem. It’s all designed to ensure your business cards are printed perfectly, every single time. Get started today!

