
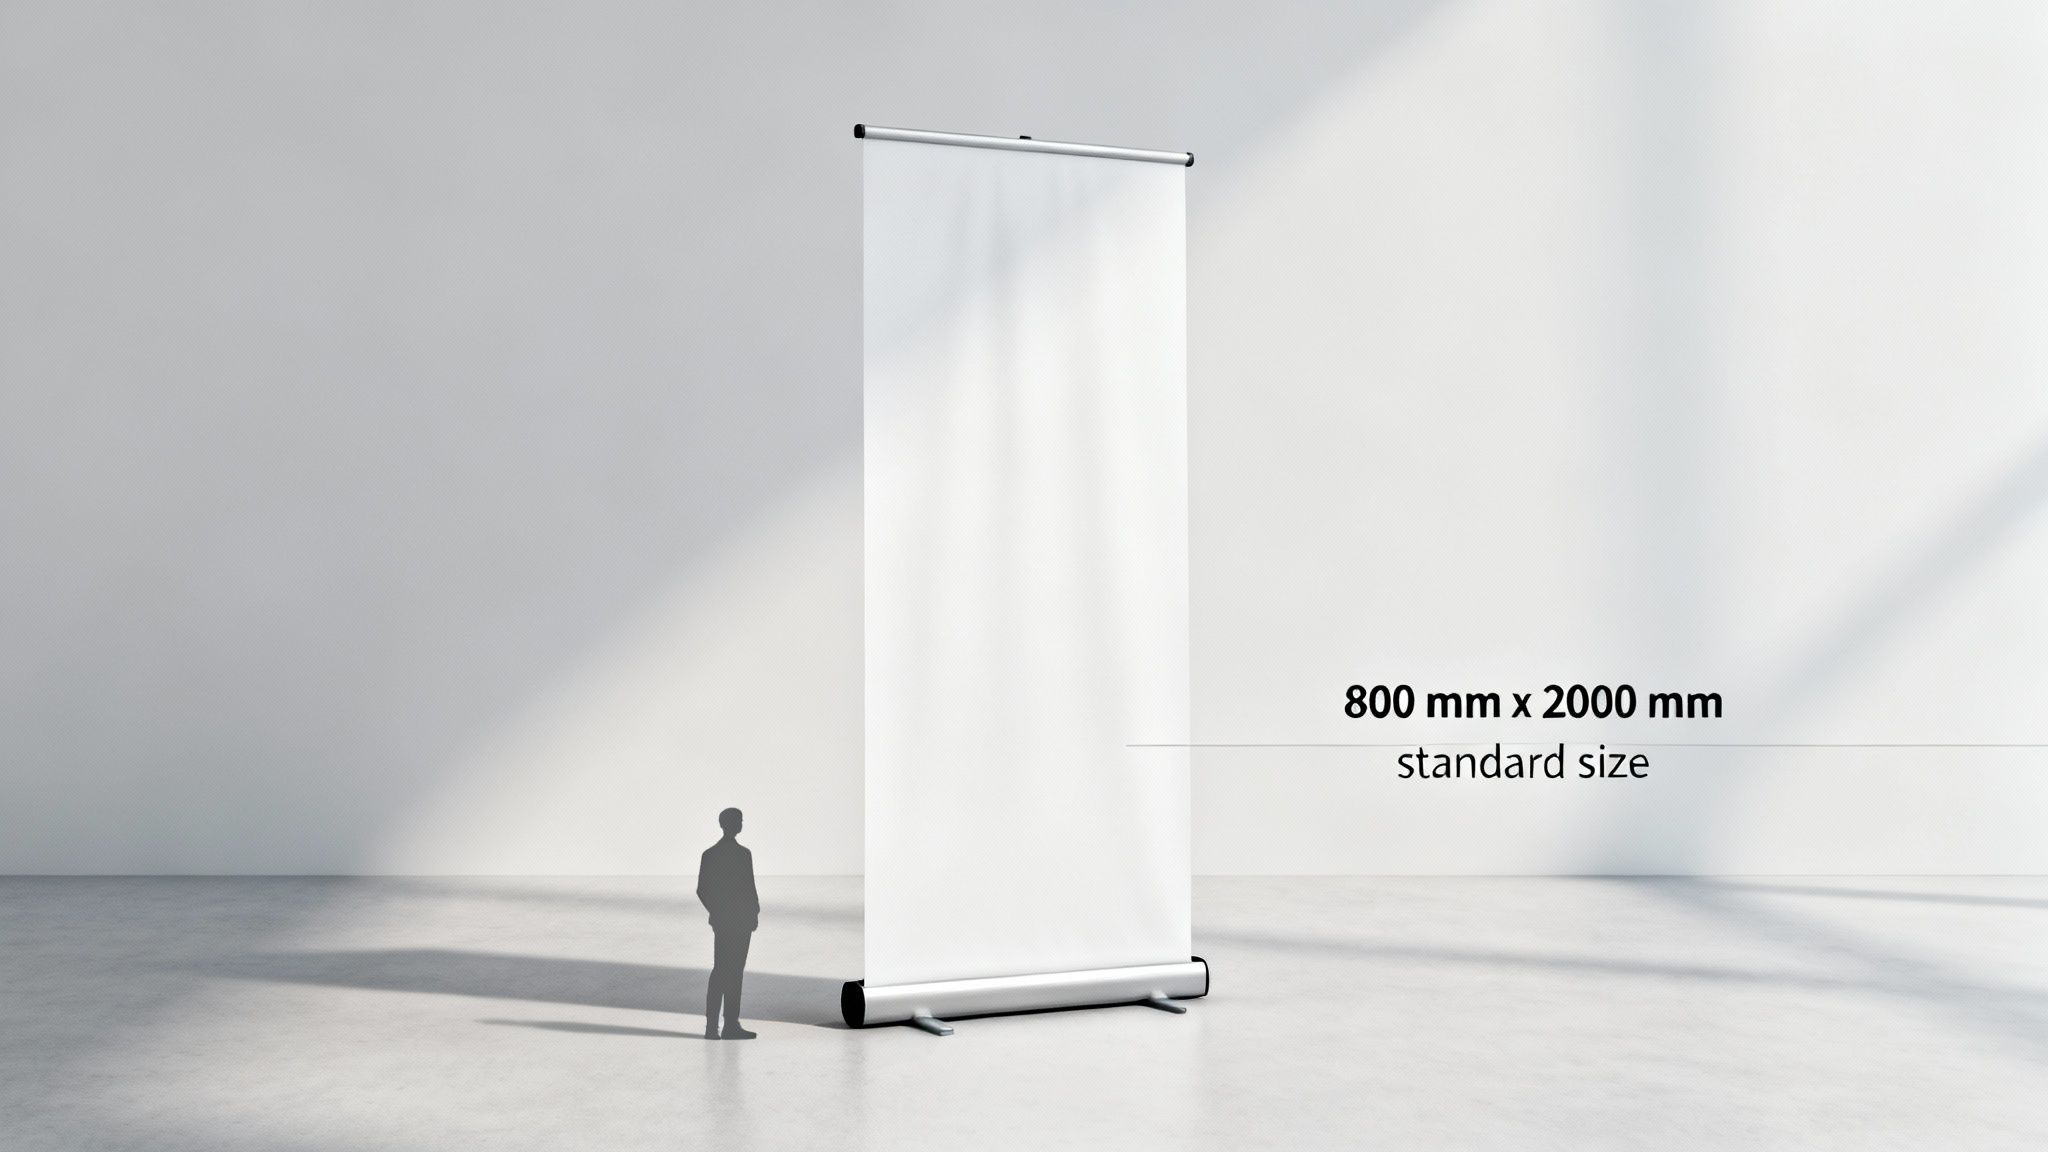
Walk into any trade show or conference in the UK, and you'll quickly spot a favourite. The most common pull-up banner size is, without a doubt, 800mm wide by 2000mm high. This trusty dimension has become the industry standard for a good reason – it strikes the perfect balance between making an impact, being easy to carry, and offering great value.
Why a Standard Banner Size Dominates the UK Market
It’s no accident that one size has become the go-to for UK businesses. When you're juggling options, it’s comforting to know there's a size that just works. This popularity comes down to a simple formula of practicality and promotional punch.
In fact, the 800mm x 2000mm banner makes up over 70% of orders from small and medium-sized businesses gearing up for events. It's big enough to catch someone's eye from 5-10 metres away, yet it packs down small enough to fit in the boot of any standard car. Even better, an estimated 85% of UK exhibition venues recommend this size, so you know it will fit within their stand guidelines.
Key Factors Behind Its Popularity
So, what makes this specific size so popular? It all comes down to three brilliant advantages:
- Maximum Portability: The base is lightweight, and the graphic rolls up neatly into a compact unit. It’s a genuine one-person job to carry and set up in minutes, no tools or fuss required.
- Venue Compliance: Most exhibition halls have rules about booth height and width. The 800mm x 2000mm banner fits comfortably within these limits, saving you any last-minute headaches on the day of the event.
- Sufficient Visual Real Estate: It gives you plenty of canvas for a powerful headline, striking visuals, and your contact details without the design feeling cramped or overloaded.
Think of a well-chosen pull-up banner as your silent salesperson. The standard size is so popular because it's the most versatile and reliable team member you can have, delivering your message clearly and professionally every single time.
Common UK Pull Up Banner Sizes at a Glance
While the 800mm x 2000mm is the undisputed champion, other sizes are fantastic for specific situations. Getting to know the options helps you pick the perfect display for your goal. You can explore a whole range of roller banners to see how these different dimensions look in practice.
Here’s a quick rundown of the most common sizes and what they’re best for:
| Banner Size (Width x Height) | Best For | Key Advantage |
|---|---|---|
| 800mm x 2000mm | General trade shows, retail spaces, events | The perfect all-rounder |
| 1000mm x 2000mm | Creating a small backdrop, wider messaging | More visual impact |
| 1200mm x 2000mm | Exhibition booths, media walls, step & repeat | Creates an immersive experience |
| 1500mm x 2000mm | Large venues, stage backdrops, photo areas | Maximum visibility |
Ultimately, choosing the right size depends on your space and your message, but you can never go wrong with the trusted 800mm x 2000mm as a starting point.
How to Choose the Right Banner for Your Space
Picking the right pull-up banner isn’t just about ticking a box on a size chart; it’s about making your message fit the room. A banner that looks perfect on screen can easily get lost in a cavernous exhibition hall or, just as bad, completely overwhelm a cosy shop corner. The trick is to picture it in its final home and choose a size that feels right for the space and what you’re trying to achieve.
A simple way to think about it is to compare it to photography. Your standard 800mm x 2000mm banner is like a portrait photo – tall, slim, and designed to focus on one strong subject. A wider banner, on the other hand, is your landscape shot. It's broad and expansive, perfect for capturing a whole scene. This little analogy can be a game-changer when deciding if you need a punchy, focused message or a full-on immersive backdrop.
Banners for Bustling Trade Shows
At a busy trade show or exhibition, your number one job is to stand out in a crowd. This is where wider banners really come into their own, acting like portable billboards that carve out a serious brand presence. A standard 800mm banner will do the job, but going wider can completely transform your booth from just another stand into a destination.
- 1000mm Wide Banners: This is a noticeable step up. It gives your key graphics and headlines much more breathing room without eating up your entire stand. It's a great choice for adding that extra visual flair.
- 1200mm Wide Banners: Now we’re talking. You’re essentially creating a mini-backdrop. Pop two of these side-by-side, and you’ve got a seamless graphic wall, perfect for pulling people into your world.
- 1500mm Wide Banners: This is the landscape shot in all its glory. It’s a fantastic option for larger stands, serving as the main backdrop for your whole setup, a step-and-repeat for photos, or even a clever way to screen off a private meeting area.
It’s no surprise that wider pull-up banners, especially those between 1000mm and 1500mm, now make up around 25% of the UK exhibition market. In huge venues like the NEC Birmingham, these larger formats have been shown to drive 55% higher brand recall among attendees. That makes them a powerful investment for any serious exhibitor.
Banners for Retail and Close Quarters
When floor space is a luxury think retail stores, reception areas, or a tight corner at an event you need a different game plan. Here, the slimline banner is your best mate. The goal is to deliver a sharp, impactful message without tripping anyone up.
In a compact space, your banner's job is to attract attention, not block the path. A slim, tall banner draws the eye upwards, making the most of vertical space while keeping walkways clear and inviting.
For these spots, the standard 800mm or even a super-slim 600mm pull-up banner is perfect. They can be slotted in strategically by the entrance, next to a specific product display, or in a waiting area to keep customers engaged without getting in the way. Their tiny footprint makes them incredibly versatile for seasonal promotions or quick announcements.
Matching Size to Your Strategic Goal
Ultimately, the right banner size comes down to what you want it to do for you. Before you commit, ask yourself a few simple questions:
- Where will people be standing when they see it? If they’re across a massive hall, you’ll need to go wider. If they’re walking right past a counter, a standard size will do just fine.
- Is this a solo act or part of a bigger setup? A single banner has to work harder to get noticed, whereas several banners can be combined to create a much bigger impact. Our guide to preparing for exhibitions can help you plan your complete stand.
- How much do I need to say? A simple, bold message looks fantastic on a standard banner. But if you’ve got more detailed graphics or a few points to make, a wider banner will stop your design from looking cramped and chaotic.
By thinking about your venue, your audience, and your message, you can confidently pick a pull-up banner size that doesn't just fit the space—it makes a real impact, turning a simple display into a seriously effective marketing tool.
Mastering Artwork Specs for a Perfect Print
Choosing the right pull-up banner size is only half the battle; submitting flawless artwork is what guarantees a professional result. Navigating technical terms like bleed, trim, and DPI can feel like a minefield, but getting them right is the secret to avoiding costly reprints and frustrating delays.
Think of it as giving your printer the perfect blueprint for your vision. This guide will break down these concepts into simple, actionable steps, demystify the jargon, and make sure your design files are print-ready from the get-go.
The Anatomy of a Print-Ready File
Imagine your banner design is a theatre stage. Your most important elements the logo, headline, and key message need to be in the spotlight, safe from any backstage mishaps. This is where three critical concepts come into play: the safe area, the trim line, and the bleed.
- The Safe Area: This is your main stage. All your critical content must be placed well within this zone to ensure nothing gets accidentally sliced off or hidden by the banner mechanism at the bottom.
- The Trim Line: This is the edge of the stage. It’s the final dimension where the banner will be physically cut. Anything placed right on this line is at risk of being partially clipped.
- The Bleed: Think of this as the off-stage area. It's an extra margin of your background colour or image that extends beyond the trim line. It acts as a safety net, ensuring that even if the cut is a fraction of a millimetre off, you won't end up with an unsightly white sliver along the edge.
Getting your head around these zones is vital for a clean, professional finish. To make sure your artwork is set up correctly, you can learn more about how to print with bleeds and sidestep common mistakes.
Decoding DPI and Image Resolution
When it comes to print, not all images are created equal. The term you’ll hear most often is DPI, which stands for "dots per inch." For something you hold in your hand, like a flyer, a crisp 300 DPI is the gold standard. A massive pull-up banner, however, is a different beast entirely.
Because a banner is viewed from a distance, the human eye doesn’t perceive the same level of detail. This is great news, as it means you can often get a perfect result with a lower resolution.
For a standard pull-up banner size, an artwork resolution of 150 DPI at the final print size is typically more than sufficient. This keeps your file sizes manageable without sacrificing visual quality from a normal viewing distance.
Trying to use a low-resolution image from a website will almost certainly result in a blurry, pixelated mess. To ensure your pull-up banner displays crisp, professional visuals, it's worth learning how to enhance photo resolution for your artwork.
This concept map shows how different banner sizes are suited for specific environments like trade shows, retail spaces, and large event halls.
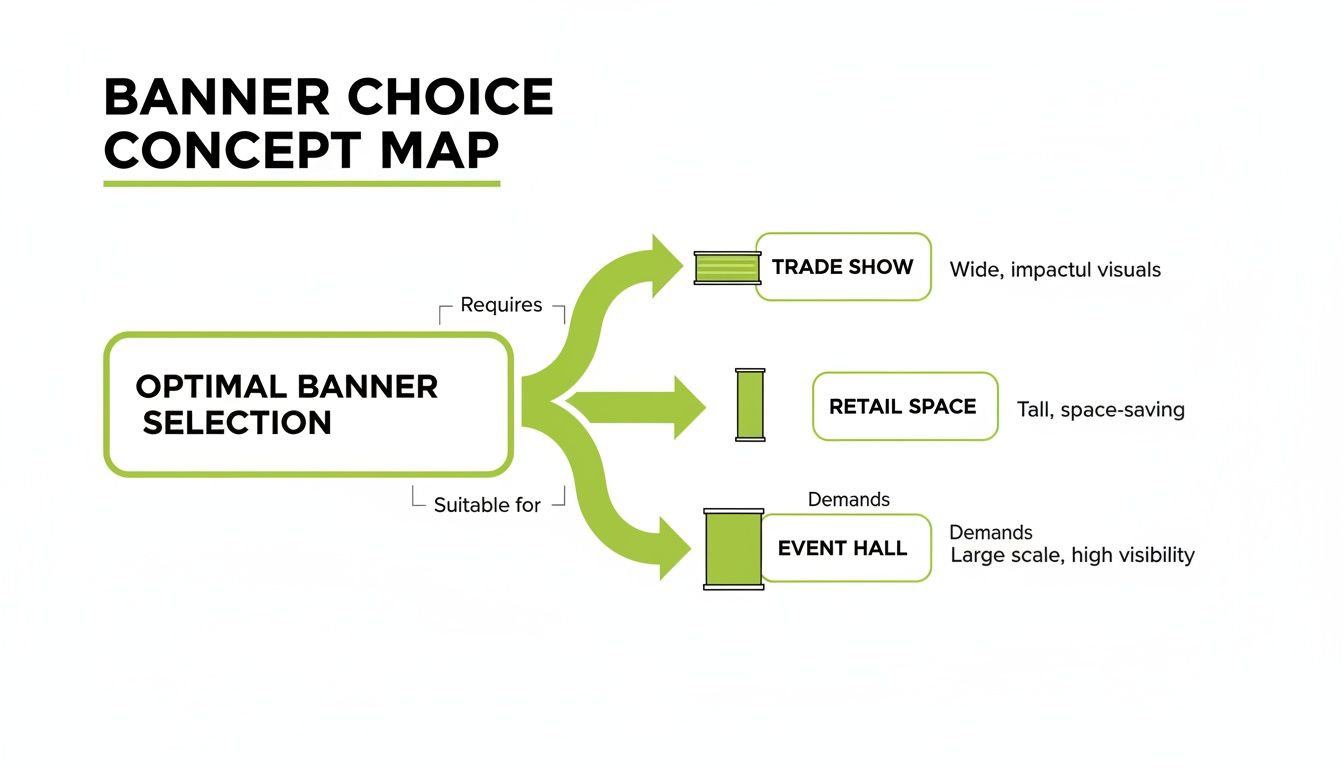
The visual makes it clear that choosing a wider banner for a trade show or an extra-large one for an event hall is a strategic decision to maximise visibility in that specific context.
Visible Area Versus Total Graphic Size
One of the most common pitfalls is forgetting that a portion of your banner graphic will be hidden inside the metal base. This unseen section is essential for the rolling mechanism, but designing without accounting for it can lead to disaster. Your contact details or call to action could be completely lost from sight.
Always check the template provided by your printer. It will clearly mark the visible graphic area. Typically, for a 2000mm tall banner, the bottom 150-200mm of the graphic is hidden. Keep all your vital information well above this lower zone.
Artwork Setup Checklist
Before you send your file to print, run through this final checklist. Think of it as your last line of defence against common, easily avoidable errors.
| Specification | Recommended Setting | Why It Matters |
|---|---|---|
| Colour Mode | CMYK | This is the standard for professional printing, ensuring colour accuracy. |
| Bleed | 3mm on all sides | Guarantees your background extends to the very edge without white borders. |
| Safe Area | 50mm from all edges | Protects your key text and logos from being trimmed or hidden by hardware. |
| Resolution | 150 DPI at full size | Provides a sharp, clear image from a typical viewing distance. |
| File Format | PDF (High Quality Print) | Embeds fonts and images, creating a reliable file that prints as expected. |
| Fonts | Outlined or Embedded | Prevents font substitution issues if the printer doesn't have your specific fonts. |
By following these guidelines, you take control of the printing process. You’re not just submitting a design; you’re providing a precise, technically sound file that will translate your digital vision into a stunning physical banner, ready to make an impact.
Designing Your Banner for Maximum Impact
A great pull-up banner isn't just about printing a graphic in the right size. It’s a strategic tool designed to stop people in their tracks. Think about a busy trade show or exhibition hall you have just a handful of seconds to make an impression before someone walks right past.
This is what we call the '3-second rule'. In the time it takes for a potential customer to stroll by your stand, your banner needs to land its core message, spark their curiosity, and fix your brand in their mind. Every single design choice, from colour palette to font size, has to work hard and deliver.
Structuring Your Message with Visual Hierarchy
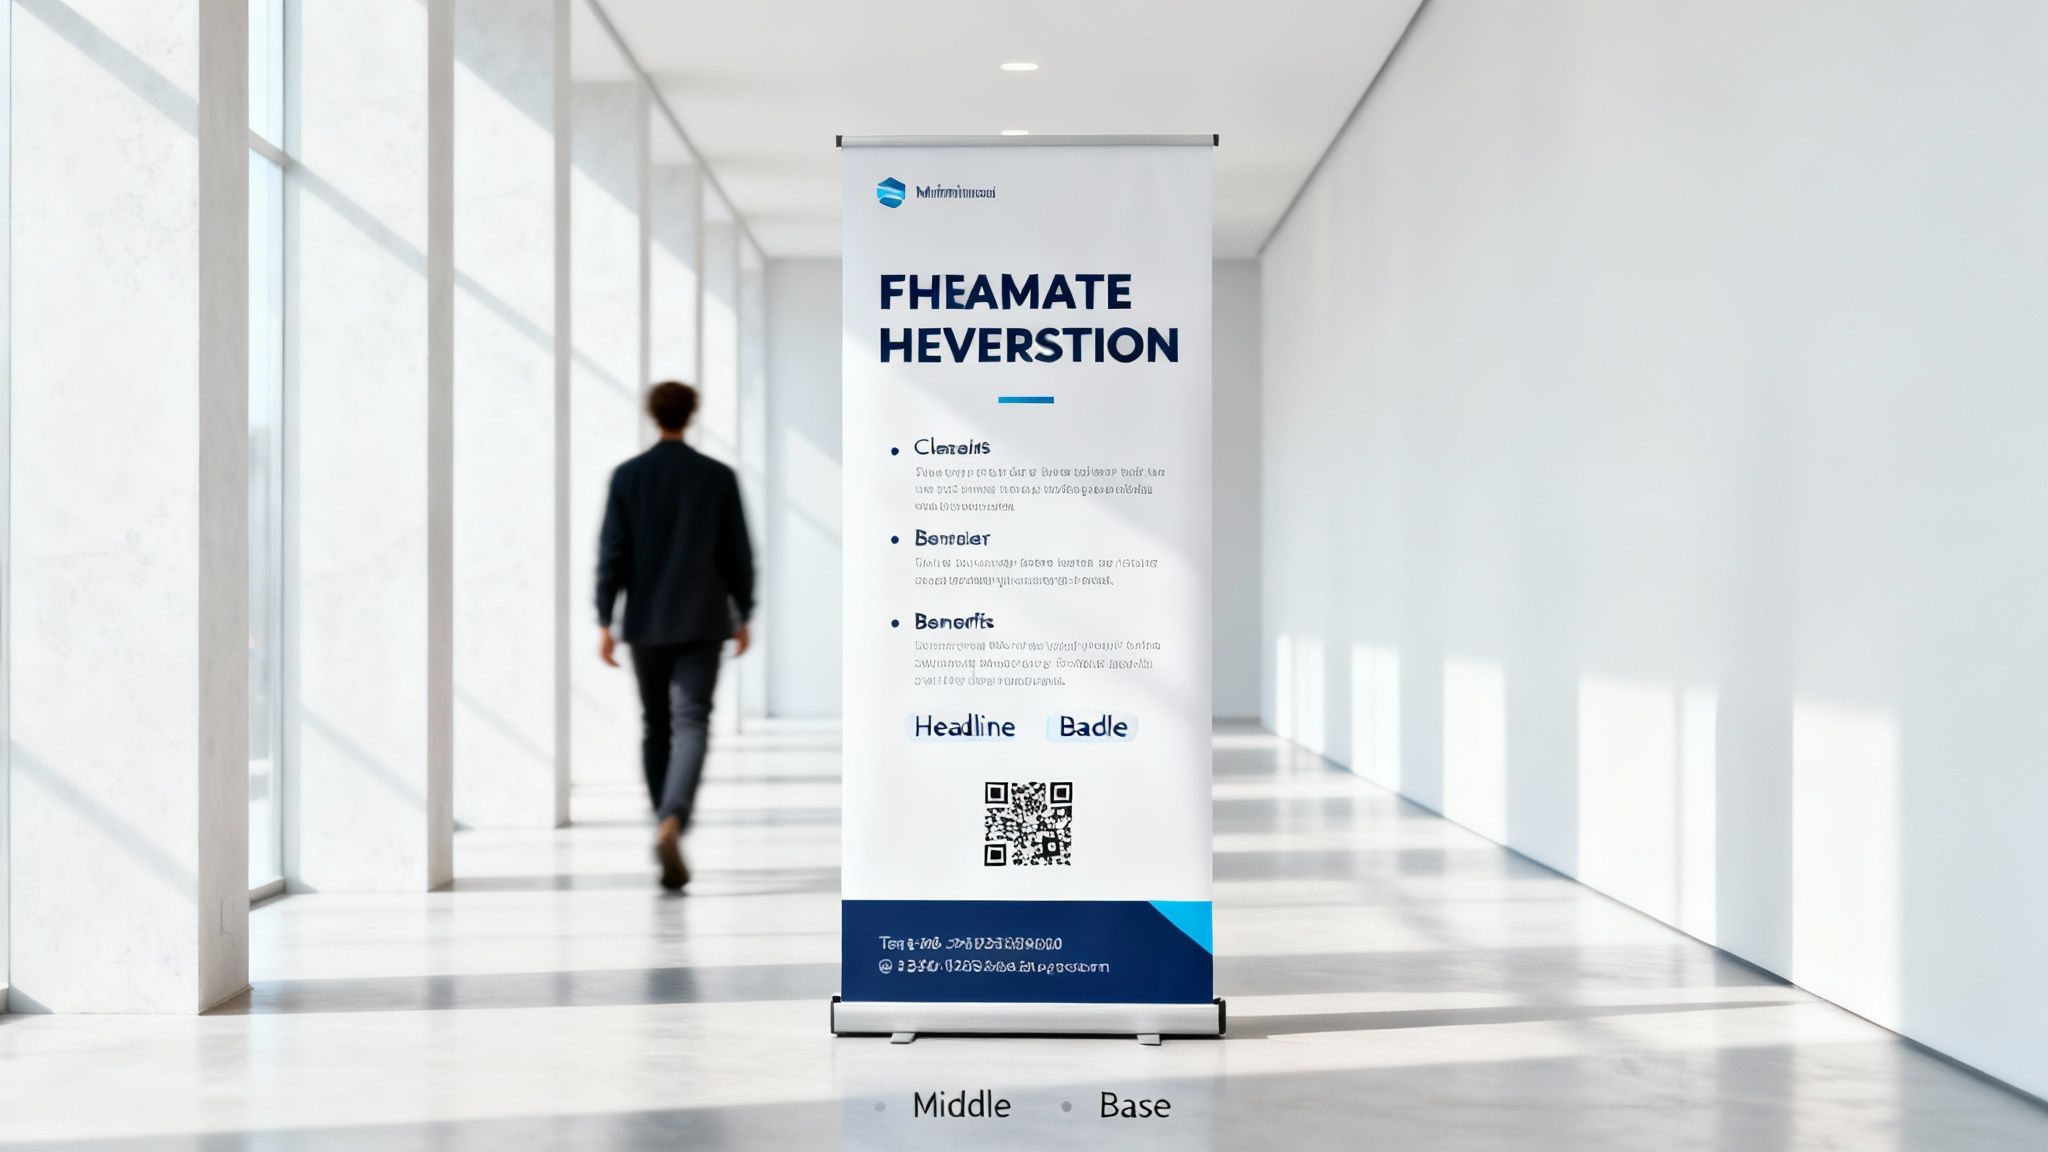
To beat that 3-second clock, your design needs a crystal-clear visual hierarchy. Imagine it’s a pyramid. The most vital information sits at the top, grabbing attention from across the room, while the finer details are placed lower down for people who’ve already been drawn in.
This structure guides the viewer's eye down the banner in a natural, logical flow. It’s the difference between a cluttered, confusing design that gets ignored and a compelling one that pulls people closer.
Here’s how to build your design pyramid:
-
The Peak (Top Third): This is your prime real estate. It’s reserved for your company logo and a punchy, powerful headline. This is what people will see first, so make it bold, clean, and instantly understandable.
-
The Middle (Centre Section): Once your headline has done its job, the middle section provides the hook. Use this space for a single high-quality image, bullet points shouting about key benefits, or a must-have offer. You’re answering their silent question: "What's in it for me?"
-
The Base (Bottom Third): This area is for the final handshake. It’s the perfect spot for your website address, social media handles, or a QR code that takes them somewhere useful. Just remember to keep this info well clear of the very bottom, so it doesn't get swallowed up by the banner stand mechanism.
Choosing Fonts and Colours That Work from a Distance
What looks sharp on your screen can easily turn into a blurry mess from ten feet away. The real secret to a banner that works is all about contrast and scale. Your choice of colours and fonts is absolutely critical for readability.
High-contrast colour combinations are your best friend. Think dark text on a light background (like black on yellow) or light text on a dark background (like white on a deep blue). Steer clear of low-contrast pairings like grey on light blue, which just merge into an unreadable smudge from a distance.
Your headline is your hook, and it has to be seen. As a rule of thumb, your main headline text should be at least 100pt. Aim for around 60-80pt for subheadings, and make sure your body text is no smaller than 24-30pt. This ensures your message is a clear invitation, not just decoration.
Creating Impactful Visuals
The image you choose should be just as hardworking as your text. A single, crisp, high-resolution photo or a clean, bold graphic is always more effective than a busy collage of small images. Your visual should directly support your headline and tell people what you do at a glance.
If you need some inspiration or want to speed up the creative process. These tools are great for quickly experimenting with different layouts and images, helping you land on a final design that looks professional and stands out from the crowd.
By thinking through these design principles, you turn your pull-up banner from a simple piece of print into an active marketing tool. It stops being something that just fills a space and starts working to attract customers, communicate your value, and get people talking.
Exploring Custom and Unique Banner Options
While standard sizes get the job done for most marketing needs, sometimes the best way to get noticed is to break the mould. Stepping away from the familiar can transform your display from just another banner into a memorable brand statement.
Custom and unique banner options are your secret weapon in specific environments where making a bigger, bolder impression is non-negotiable. They're a strategic choice for brands that want to stand out and create a more immersive experience, especially when you have more vertical space to play with or need to capture attention from all directions at once.
Reaching New Heights with Extra-Tall Banners
Ever set up a standard banner in a venue with towering ceilings? In places like university atriums, conference centres, or expansive hotel lobbies, a standard 2000mm banner can sometimes feel a bit lost in the space. This is where extra-tall banners truly shine, drawing the eye upward and making sure your message is seen high above the crowd.
Their extended height gives you a much bigger creative canvas. You can go for larger logos, more impactful imagery, or add extra messaging without the whole design feeling cramped. This vertical advantage is particularly powerful for creating a sense of scale and authority.
For instance, UK universities and public sector bodies often lean towards a slightly taller 800mm x 2300mm pull up banner size. This extra height not only accommodates detailed institutional branding but has been shown to boost visibility by as much as 35% in crowded halls. In fact, data from 2023 showed that 62% of academic event displays used this specific dimension, proving just how effective it is in those environments.
Capturing Attention from Every Angle
What happens when your banner isn’t placed neatly against a wall? In high-traffic walkways, central exhibition spots, or open-plan reception areas, a single-sided banner only does half the job. People are approaching from all directions, and you need a display that works from every single viewpoint.
This is the perfect scenario for double-sided pull-up banners. These clever stands feature two separate graphics that retract into a central base, letting you display a message on both the front and back.
A double-sided banner doubles your opportunity to engage. It ensures your message is never missed, turning a simple display into a 360-degree marketing tool that actively works the room.
This makes them absolutely ideal for:
- Wayfinding: Guiding attendees with arrows and directions on both sides.
- Dual Messaging: Promoting two different offers or products at the same time.
- Maximising Exposure: Catching foot traffic moving in opposite directions down an aisle.
Choosing a unique format isn't just about being different it's about making a smart, strategic decision to match your display to its environment for maximum effect. Whether you need more height or a wider reach, these custom options ensure your brand stands out from the crowd. To learn more about different banner materials and what they're best for, check out our detailed guide to PVC banner printing.
Your Essential Pre-Order Checklist
You’ve picked the perfect pull-up banner size, planned your design, and got your head around the artwork specs. Fantastic. Now it’s time for one last pre-flight check before you send your file to print.
This simple checklist helps you catch those common little mistakes that can cause big headaches later on. Think of it as your final quality control step a few extra minutes here will save you the stress and cost of a last-minute reprint.
Artwork and File Checks
Right, open up your design file one last time. It’s amazing what you’ll spot with fresh eyes.
-
Proofread Everything: Seriously, read every single word out loud. It’s the best way to catch spelling mistakes, grammatical errors, or an incorrect phone number. Get a colleague to check it too if you can.
-
Verify Your Specs: Does your artwork meet all the technical requirements? Have you definitely included a 3mm bleed on all sides? Is all your critical text and your logo safely inside the 50mm safe area? Is the resolution a solid 150 DPI at its full print size?
-
Check the Visible Area: This one’s a classic pitfall. Double-check the template and make sure none of your key info is lurking in the bottom 150-200mm of the graphic. That part gets hidden inside the base mechanism, so anything there will be lost.
-
Export Correctly: When you’re happy, save your final artwork as a high-quality, print-ready PDF. This format is brilliant because it locks in all your fonts and images, ensuring what you see on your screen is exactly what gets printed.
Finalising Your Order Details
With your file prepped and ready to go, the last step is to confirm the physical details of your order.
Before hitting 'confirm', take a moment to double-check the venue rules. A quick call or email to the event organiser can confirm any specific size or height restrictions, preventing any unwelcome surprises on the day.
Finally, think about the hardware itself. Are you ordering a budget stand for a one-off event, or do you need a premium base with a longer warranty for something you’ll use again and again? Choosing the right quality stand makes sure your investment lasts.
Once these final checks are complete, you’re ready to place your order with confidence. For a smooth process from start to finish, you can explore a wide selection of roller banners for every need and upload your print-ready file with ease.
Common Questions About Pull-Up Banner Sizes
Even with all the details sorted, a few last-minute questions always seem to pop up just as you're about to order. Think of this as a final sanity check to clear up any lingering doubts about pull-up banner sizes.
We’ll run through the most common queries we get from customers every day, covering everything from the most popular dimensions to those easy-to-miss hardware details.
What’s the Most Popular Pull-Up Banner Size in the UK?
Hands down, the most popular and widely used pull-up banner size in the UK is 800mm wide by 2000mm high. This is the go-to choice for trade shows, retail spaces, and corporate events for a reason – it strikes the perfect balance between visibility, portability, and value.
Its popularity also means it’s accepted by almost every UK exhibition venue, making it a safe and effective bet for nearly any situation. If you’re ever in doubt, this is the size to go for.
How Much of My Design Gets Hidden in the Base?
This is a critical detail, and one that’s very easy to miss. To make sure the banner retracts smoothly, a small portion of the printed graphic has to stay rolled inside the base mechanism.
As a rule of thumb, the bottom 150mm to 200mm of your total artwork will be hidden once the banner is set up. Always keep your crucial info, like logos and contact details, well above this non-visible area.
Always check the specific template from your printer, as this measurement can vary slightly between different stand models.
What’s the Best File Format for Banner Printing?
For the best possible results, you should always supply your artwork as a high-quality, print-ready PDF. This format is the undisputed industry standard for a few very important reasons:
- It embeds your fonts, which stops any text from changing or looking weird when we open the file.
- It preserves image quality, ensuring your graphics and photos stay sharp and aren't compressed into a blurry mess.
- It locks the layout, meaning your design will look exactly as you intended, with nothing shifting out of place.
While you can use formats like JPEG or TIFF, a well-made PDF is the most reliable and trouble-free way to get a perfect print.
Can I Just Replace the Graphic in My Old Banner Stand?
In many cases, yes, you absolutely can! Whether it’s possible really depends on the quality of your stand. More premium, durable banner stands are built to last, allowing you to simply order a new graphic and have it fitted into your existing hardware. It’s a great way to update your message for a new campaign while being cost-effective and a bit kinder to the planet.
However, many budget or economy stands are designed for single use. Trying to swap the graphic on these can damage the retraction mechanism. It’s always best to check with your print provider to see if your specific model supports a replacement.
Ready to create a banner that truly stands out? The Print Warehouse Ltd offers a huge range of high-quality roller banners in all standard UK sizes. Design and order your perfect pull up banner today!

