
So, you need to print a booklet from a Microsoft Word document? The good news is, you're in the right place. The key is a handy little setting called Book fold, which you can find in the Page Setup options. This one feature does all the heavy lifting, automatically arranging your pages so they print, fold, and bind perfectly.
Your Quick Guide to Printing a Booklet in Word
Putting together a booklet in Word is much simpler than most people think. The software is actually built to handle the most confusing part of the process for you—something the pros call imposition.
Imposition is just a fancy term for arranging your pages correctly so that when they’re printed, folded, and stapled, everything ends up in the right order. Without Word’s Book fold feature, you’d be stuck trying to manually figure out which page needs to go next to which, and trust me, that's a one-way ticket to a headache.
This guide will walk you through the entire process, from that first layout choice all the way to hitting 'print'. We'll cut through the jargon and focus on the settings that matter, helping you avoid common pitfalls like jumbled-up pages or text that disappears into the centre fold.
Core Settings to Get Started
Before we jump into a full step-by-step, let's get familiar with the main controls you'll be working with. Think of these as the foundation of your booklet project.
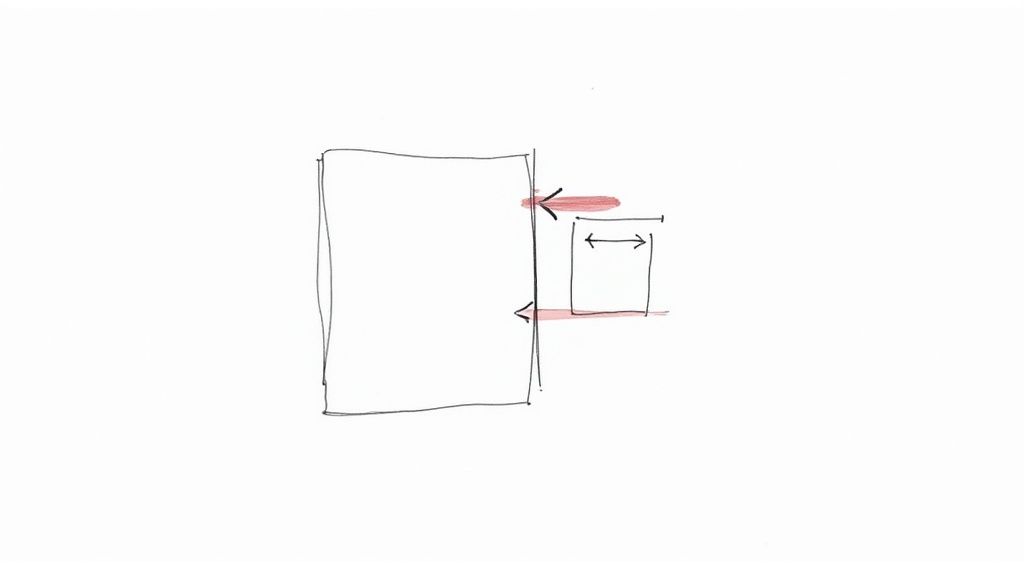
- Book Fold Layout: This is the magic button. Selecting it tells Word you're making a booklet, which immediately reconfigures your document for side-by-side printing. For example, if you want an A5 booklet, it will place two A5-sized pages onto a single A4 sheet.
- Margins and Gutter: You already know what margins are, but the 'Gutter' is a special addition for booklets. It adds a bit of extra space to the inside fold. This is crucial for binding, as it stops your text from getting swallowed up when the pages are stapled or stitched together.
- Paper Size: This one trips a lot of people up. You need to select the size of the paper you're actually printing on, not the final, folded size of your booklet. For a classic A5 booklet, you'll be printing on A4 paper.
To get you started on the right foot, here's a quick reference table for the most important settings in Word's Page Setup dialog box.
Core Settings for Word Booklet Printing
| Setting | What It Does | Practical Recommendation |
|---|---|---|
| Multiple pages | Sets the document layout style. | Select "Book fold". This automatically formats the document for booklet printing. |
| Sheets per booklet | Determines how many pages are grouped together. | Leave this on "All" unless you're creating a very large book with multiple sections (signatures). |
| Gutter | Adds extra space to the inside margin for binding. | Start with 1cm (or 0.4"). You can adjust this later depending on your page count and binding method. |
| Paper Size | Defines the physical paper size for the printer. | Choose the sheet size you'll be printing on (e.g., A4 for an A5 booklet). |
Getting these initial settings right is the key to a professional-looking booklet, whether you're printing it yourself or sending the file to a professional service like ours.
One golden rule of booklet printing: your total page count must be a multiple of four. If your document has 10 pages, Word will automatically add two blank pages at the end to bring the total to 12. It's always best to plan for this from the start to avoid any surprises.
This quick setup ensures you begin with a solid foundation. For more expert tips on getting your files print-ready, feel free to explore our other guides over on https://theprintwarehouse.uk/blog.
Getting Your Document Layout Right for Booklet Printing
The secret to a booklet that looks truly professional isn't something you tweak at the very end; it's all in the setup. Before you even think about hitting 'print', getting your Microsoft Word document configured correctly is the foundation for everything that follows. This means getting familiar with the 'Page Setup' options.
While choosing the 'Book fold' layout is the most important first step, it’s the details that really make or break the final product. Let's start with paper size. A classic example is creating an A5 booklet. You might think you should select A5 as your paper size, but you'll actually choose A4 paper. Word is smart enough to then place two A5 pages side-by-side on each A4 sheet, ready for folding.
Nailing the Margins and the All-Important Gutter
With your page size sorted, it's time to look at the margins. Standard margins might seem fine on a normal document, but they can cause big problems in a booklet. Text can get sucked into the centrefold, making it awkward and difficult to read.
This is exactly why the Gutter setting exists. For booklet design, this is non-negotiable. It adds a little bit of extra space to the inside margin—right where the pages will be bound together. A good starting point for your Gutter is 1cm. This tiny addition is a lifesaver, stopping your words from disappearing into the crease and giving the whole thing a much more polished feel.
You can see exactly where to find these options in the 'Page Setup' window.
Just make sure 'Book fold' is selected under "Multiple pages," and you’ll find the Gutter setting waiting for you right next to the standard margin inputs.
The Unbreakable Rule of Four
Here's a small detail that can derail an entire print job if you forget it: your total page count must be a multiple of four. This isn't just a quirky rule; it's down to the physical reality of how booklets are made. One sheet of paper is folded in half to create four printed pages (a front, a back, and two inside pages).
If your document has, say, 10 pages, Word will automatically add two blank pages at the end to make it up to 12. It’s always better to control this yourself.
Our Pro Tip: Try to plan your content to naturally hit a multiple of four. If you end up with 11 pages, don't panic. Just strategically add a blank page, a dedicated title page, or a final "notes" page to reach 12. This way, you avoid any surprise blank pages at the back of your finished booklet.
If you need some help with structure, exploring different book layout templates can provide a great starting point for a professional look. Mastering these layout basics is crucial, especially for thicker documents where the binding itself becomes more complex. For those larger projects, you might want to look into our professionally finished perfect bound booklets, which offer a sleek, flat spine for a premium, bookshop-quality finish.
Printing Your Booklet at Home Like a Pro
Right, your document is all set up and looking sharp on the screen. Now for the fun part: turning it into a physical booklet. This is where a little know-how can save you a mountain of frustration (and a lot of wasted paper).
When you print a booklet from Word, it does something clever in the background called imposition. This is just the technical term for shuffling your pages into the correct order so that when you print, fold, and staple everything, page 1 is actually followed by page 2, then 3, and so on. Without it, you'd just have a confusing stack of paper.
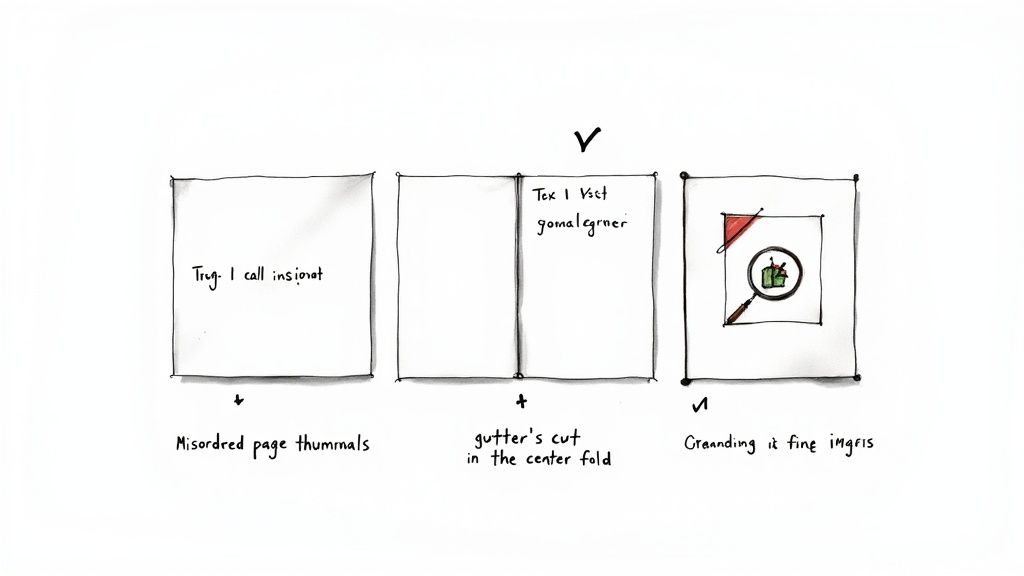
This diagram breaks down the essentials – getting your page size right, choosing the ‘book fold’ layout, and adding a gutter. Nailing these steps before you even think about printing is half the battle.

As you can see, a great print job starts with a well-prepared file. It all comes back to those initial layout and paper settings.
Printing with Automatic Duplex
If you’re lucky enough to have a printer that supports automatic duplex (double-sided) printing, you’re in for a smooth ride. This feature lets the printer handle flipping the pages for you, which makes the whole process refreshingly simple.
In the print dialogue box, you just need to find a couple of key settings:
- Print on Both Sides - Flip pages on short edge: This is the magic button for booklets. It makes sure that when you fold your A4 sheets into an A5 booklet, the back page isn't printed upside down. A common mistake, but an easy one to avoid!
- Printer Properties: You might have to dig into your printer’s specific settings to make sure double-sided printing is definitely switched on.
Once that’s sorted, your printer takes over, managing the imposition and printing on both sides to give you pages that are ready to be folded.
The Art of Manual Duplex Printing
No automatic duplex feature? No problem. You can still print a perfect booklet, it just takes a bit more hands-on effort. This is where you get to feel like a traditional printmaker.
Word has your back with a 'Manually Print on Both Sides' option. When you choose this, Word prints one side of all the sheets first (pages 1, 4, 5, 8, for example). Then, it’ll pop up a message telling you to grab the stack, flip it over, and put it back in the paper tray to print the other side.
Crucial Tip: Before you commit to printing the whole document, do a test run with just four pages. Every printer feeds paper slightly differently, and this quick test will show you exactly how to flip and re-feed the paper for your model. It’s a tiny step that saves a huge headache!
Getting this right matters. Even though the UK printing industry has seen a market decline of 4.1% annually in recent years, efficient, high-quality printing is what keeps great firms going. It shows that a well-made booklet still has massive value. You can dive deeper into these printing industry insights from IBISWorld's comprehensive report.
How to Prepare Your Booklet for a Professional Printer
While printing a booklet at home is fine for a quick draft, nothing quite matches the polished, professional finish from a commercial printer. When your project demands that next level of quality, sending over a standard Word document just won't cut it. To get the best results, you'll need to supply a print-ready PDF file.
This involves a few technical steps that might sound a bit daunting at first. But trust me, they’re essential for making sure what you see on your screen is exactly what you get in your hands. Taking a few moments to prepare your file correctly helps prevent common headaches like fuzzy images, off-kilter colours, or even those dreaded white slivers along the edges after trimming.
Understanding Bleed and Trim Marks
When you send a file to a professional printer, we don't print on individual A5 sheets. Instead, we print on much larger sheets of paper that get cut down to size. This trimming process is incredibly precise, but tiny shifts can still happen. This is where bleed becomes your best friend.
Bleed is simply the practice of extending any background colours, images, or design elements about 3-5mm beyond the final edge of your page. Why bother? If the guillotine is off by even a fraction of a millimetre, this extra coloured area ensures you won’t get an ugly, accidental white line at the edge of your finished booklet. It’s a safety margin that guarantees a full-colour finish right to the very edge.
From our experience in the print room, a file arriving with no bleed is one of the most common reasons a project gets delayed. It’s the single most important step for achieving that seamless, high-end look and avoiding disappointment after the final trim.
Unfortunately, Microsoft Word doesn't have a simple, built-in feature for adding bleed. The best workaround is to set a custom page size that is slightly larger than your final booklet size. For an A5 booklet (148mm x 210mm), you would create a custom page size of 154mm x 216mm. This gives you a 3mm bleed on all four sides.
Exporting a High-Resolution Print-Ready PDF
Once your design is finalised and your bleed is all set up, the final step is to save your file correctly. A professional printer can't work directly with a .docx file; you must export it as a high-resolution PDF. This process locks in your fonts, preserves your image quality, and makes sure your layout looks identical on any computer, including ours.
When saving your file, don't just use the standard "Save As PDF" option. You need to dig into the settings to get a proper print-quality output.
- Head to File > Export > Create PDF/XPS Document.
- Before you hit save, click the Options button.
- Under "PDF options," look for settings compliant with PDF/A or ISO 19005-1. If you happen to see a "Press Quality" or "PDF/X-1a:2001" setting, that’s even better—these are industry standards for printing.
- Make sure the option to "Embed fonts in the file" is ticked. This is absolutely critical to prevent your carefully chosen text from being swapped out with a different font on the printer's system.
By creating a proper PDF, you’re providing a universal file that any print service can use without a hitch. If you're weighing up your options for a larger run, it's also helpful to understand the different digital vs. offset printing methods and what they can offer.
For a hassle-free experience from upload to delivery, The Print Warehouse makes it easy to order high-quality booklets and brochures online, with clear file guidelines to ensure your project is a success every time.
Troubleshooting Common Word Booklet Printing Problems
Even after carefully following every step, you can still hit a few snags when printing a booklet. Pages might come out in a baffling order, your text could get swallowed by the centrefold, or those carefully chosen images might just look… off. Don’t panic—most of these problems are more common than you think and have straightforward fixes.
The most frequent issue we see is pages printing in the wrong sequence. Before you start dragging pages around in Word, take a breath. It’s almost always a settings issue. The culprit is usually Word’s automatic page arrangement (imposition) getting knocked off course because a setting has reverted without you noticing.
Pages Printing Out of Order
When your booklet’s pages are jumbled, it almost always comes down to one of two settings. It’s a quick fix once you know where to look.
- Check the Layout: Pop over to
Layout > Page Setup > Margins. You need to confirm that under 'Multiple pages', the 'Book fold' option is still selected. - Verify Print Settings: In the print dialogue box, make sure 'Print on Both Sides' is selected. This is the crucial bit: for booklets, you must choose 'Flip pages on short edge'. If you select 'long edge', all the back pages will be printed upside down. A classic rookie error!
Text Disappearing into the Fold
Another all-too-common problem is text getting lost in the booklet’s spine, making sentences a real chore to read. This is a classic margin issue, specifically related to the binding area.
The solution is all about giving your content more breathing room. Head back to the 'Page Setup' margins tab and adjust two key values: the 'Gutter' and the 'Inside' margins. The Gutter adds dedicated space purely for the binding. A good starting point is a 1cm Gutter. Increasing the 'Inside' margin also helps by pushing your content further away from the centre.
In today's competitive UK print market, quality is everything. Digital channels, like online video advertising which has proven 73% more effective than traditional print, have really raised the bar. When businesses decide to print a booklet, it has to be flawless to make an impact. For more on these market shifts, you can read the full report on UK print demand patterns from Printed Word.
Finally, if your images look pixelated or blurry, it’s usually because the original file resolution was too low. For crisp, professional printing, your images need to be at least 300 DPI (dots per inch). Unfortunately, this isn’t something you can fix in Word; you’ll have to find a higher-quality version of the image.
If you’ve tried all these fixes and are still pulling your hair out, our expert team is always here to help. You can easily get in touch with The Print Warehouse support team for some friendly, personalised advice.
Stumbled on a Booklet Printing Problem? Let's Get it Sorted
Even with the best guide, a few common questions always seem to pop up when you're trying to print a booklet from a Word document. It happens to everyone. Let's walk through the most frequent head-scratchers we hear about, so you can get your project finished without any more frustration.
This section is all about tackling those lingering uncertainties and giving you clear, straightforward answers.
Why Do I Have Blank Pages at the End of My Booklet?
This is easily the most common issue, and thankfully, it has a simple explanation. Booklets are made from folded sheets of paper, and every single sheet you fold creates four pages in your final product. Because of this, your total page count must be a multiple of four (think 4, 8, 12, 16, and so on).
If your document has, say, 10 pages, Word knows it can't just stop there. It has to round up to the next multiple of four, which is 12. So, it automatically adds two blank pages at the very end to make the printing and assembly physically possible.
Instead of letting Word decide, you can take control. A great trick is to add your own useful content to reach that magic number. You could add:
- A dedicated title page or a clean closing page.
- A "Notes" section for your readers.
- Your contact details or a final call to action.
How Do I Print an A5 Booklet on A4 Paper?
Believe it or not, this is exactly how it's supposed to be done. The whole setup in Word is designed for this very scenario, which is what often catches people out.
You don't actually set your page size to A5 in Word. Instead, you head to the Layout > Page Setup dialogue box and select A4 as your paper size. The key is to then go to 'Multiple pages' and choose the Book fold option. Word takes care of all the complicated maths from there, automatically placing two A5-sized pages onto each side of your A4 sheet, arranged perfectly for printing and folding right down the middle.
Can I Add Page Numbers to My Booklet in Word?
Yes, you absolutely can, and the good news is that it works just like you'd hope. Simply use the standard Insert > Page Number function to add them to your header or footer.
The 'Book fold' feature is smart enough to figure out the correct pagination. It knows the final, folded order of the pages and will place the numbers on the outside corners so they appear in the right sequence once the booklet is put together. You don’t have to waste time manually calculating where each number should go.
One of the biggest reliefs for creators is realising that Word's 'Book fold' setting automatically handles the page imposition. This means page 1 will print on the same sheet as your last page, page 2 with your second-to-last, and so on, guaranteeing everything is in the right order after folding.
By getting your head around these common sticking points, you can sidestep those annoying printing errors and produce a great-looking booklet every single time.
Ready to turn your perfectly prepared file into a stunning, professionally printed booklet? The Print Warehouse Ltd offers fast, high-quality printing with an easy online ordering process. Upload your design and get a quote today!

