
Put simply, print bleed is the small, extra margin around your design that extends past the final trim edge. Think of it as deliberately colouring outside the lines. This ensures your background colours and images go right to the very edge of the paper, giving you a clean, professional finish after trimming.
Decoding Print Bleed and Why It Matters
Ever wondered how professional brochures or business cards get that perfect, seamless colour from edge to edge? The secret isn’t just precise printing; it’s a design fundamental known as bleed. It’s the essential safety net for your artwork.
Picture a giant guillotine slicing through a thick stack of freshly printed flyers. While these machines are incredibly accurate, tiny shifts sometimes less than a millimetre are unavoidable from the top of the stack to the bottom. This tiny mechanical movement is just a normal part of the printing process.
The Problem Bleed Solves
Without a bleed area, any slight misalignment during trimming would leave a frustrating white sliver along one or more edges of your final product. It’s a small detail, but it instantly makes a design look amateurish and unfinished, completely undermining its impact.
By extending your background, images, and other design elements beyond the intended trim line, you create a buffer zone. This extra margin guarantees that even with tiny cutting variations, the final trimmed product will look flawless, with colour running seamlessly from one edge to the other.
Bleed as a Professional Standard
Getting to grips with print bleed is non-negotiable for creating professional-looking brochures, business cards, and other materials that make up effective print marketing campaigns. It’s a small step that makes a huge difference to the final quality.
Here’s why bleed is so important:
- It Eliminates White Edges: Bleed is your insurance against unsightly white gaps appearing after your document is trimmed to size.
- It Accommodates Mechanical Shifts: It cleverly compensates for the minor physical movements of the paper during the high-speed cutting process.
- It Ensures Design Integrity: Ultimately, bleed protects the intended look of your artwork, ensuring a polished and professional appearance.
In short, adding bleed isn't just a technical hoop to jump through; it's a quality control measure that shows real attention to detail. Whether you're designing posters, stationery, or promotional materials like those in our guide on the right dimensions for a flyer, mastering bleed is your first step toward getting perfect print results, every single time.
The Real-World Cost of Ignoring Print Bleed
Imagine spending weeks perfecting a beautiful, full-colour brochure. You approve the final proof, place your order, and eagerly await delivery. But when the boxes arrive, your heart sinks—a jarring, uneven white sliver of paper runs along the edge of nearly every single one.
This is the most common, costly, and entirely avoidable outcome of ignoring bleed. The pristine, professional design you laboured over is instantly cheapened, looking rushed and amateurish. This single oversight can undermine the perceived quality of your entire brand.
At its core, the problem isn’t a mistake by the printer; it’s a matter of physics. Commercial guillotines are incredibly precise, but they slice through massive stacks of paper at once. This process inevitably creates what’s known as trim variance—minuscule shifts and movements of the paper stack during cutting. No machine can guarantee a cut that is 100% perfect on every single sheet in a large run.
Protecting Your Investment and Reputation
Think of bleed as your design’s safety net. By extending your background images and colours 3mm beyond the final trim line, you create a buffer that makes these tiny physical variations irrelevant. When the guillotine falls, it cuts within this extra “bleed” area, ensuring your colour extends seamlessly to the very edge of every finished piece.
Getting this right isn't just a technical chore; it signals professionalism. A perfectly trimmed flyer feels premium and trustworthy, while one with white edges looks like a mistake—and that's not an impression any business wants to make.
Ignoring bleed isn’t just a design error; it's a financial one. The cost of reprinting a flawed batch of marketing materials far outweighs the few moments it takes to set up bleed correctly from the start.
A Longstanding Mark of Quality
The principle of extending artwork for flawless cuts has been a cornerstone of the UK printing industry for decades. As production scaled, this standard became non-negotiable to maintain quality. It’s this commitment to detail that helped UK printed goods achieve a £580m trade surplus by 2020, making the country the sixth-largest print exporter in the world.
Ultimately, understanding and applying bleed is about protecting your investment. It safeguards your design’s integrity, upholds your brand’s reputation, and prevents the unnecessary expense and frustration of a reprint. It's the simple difference between a good design on screen and a great result in your hand.
Navigating the Trim Line, Bleed and Safe Area
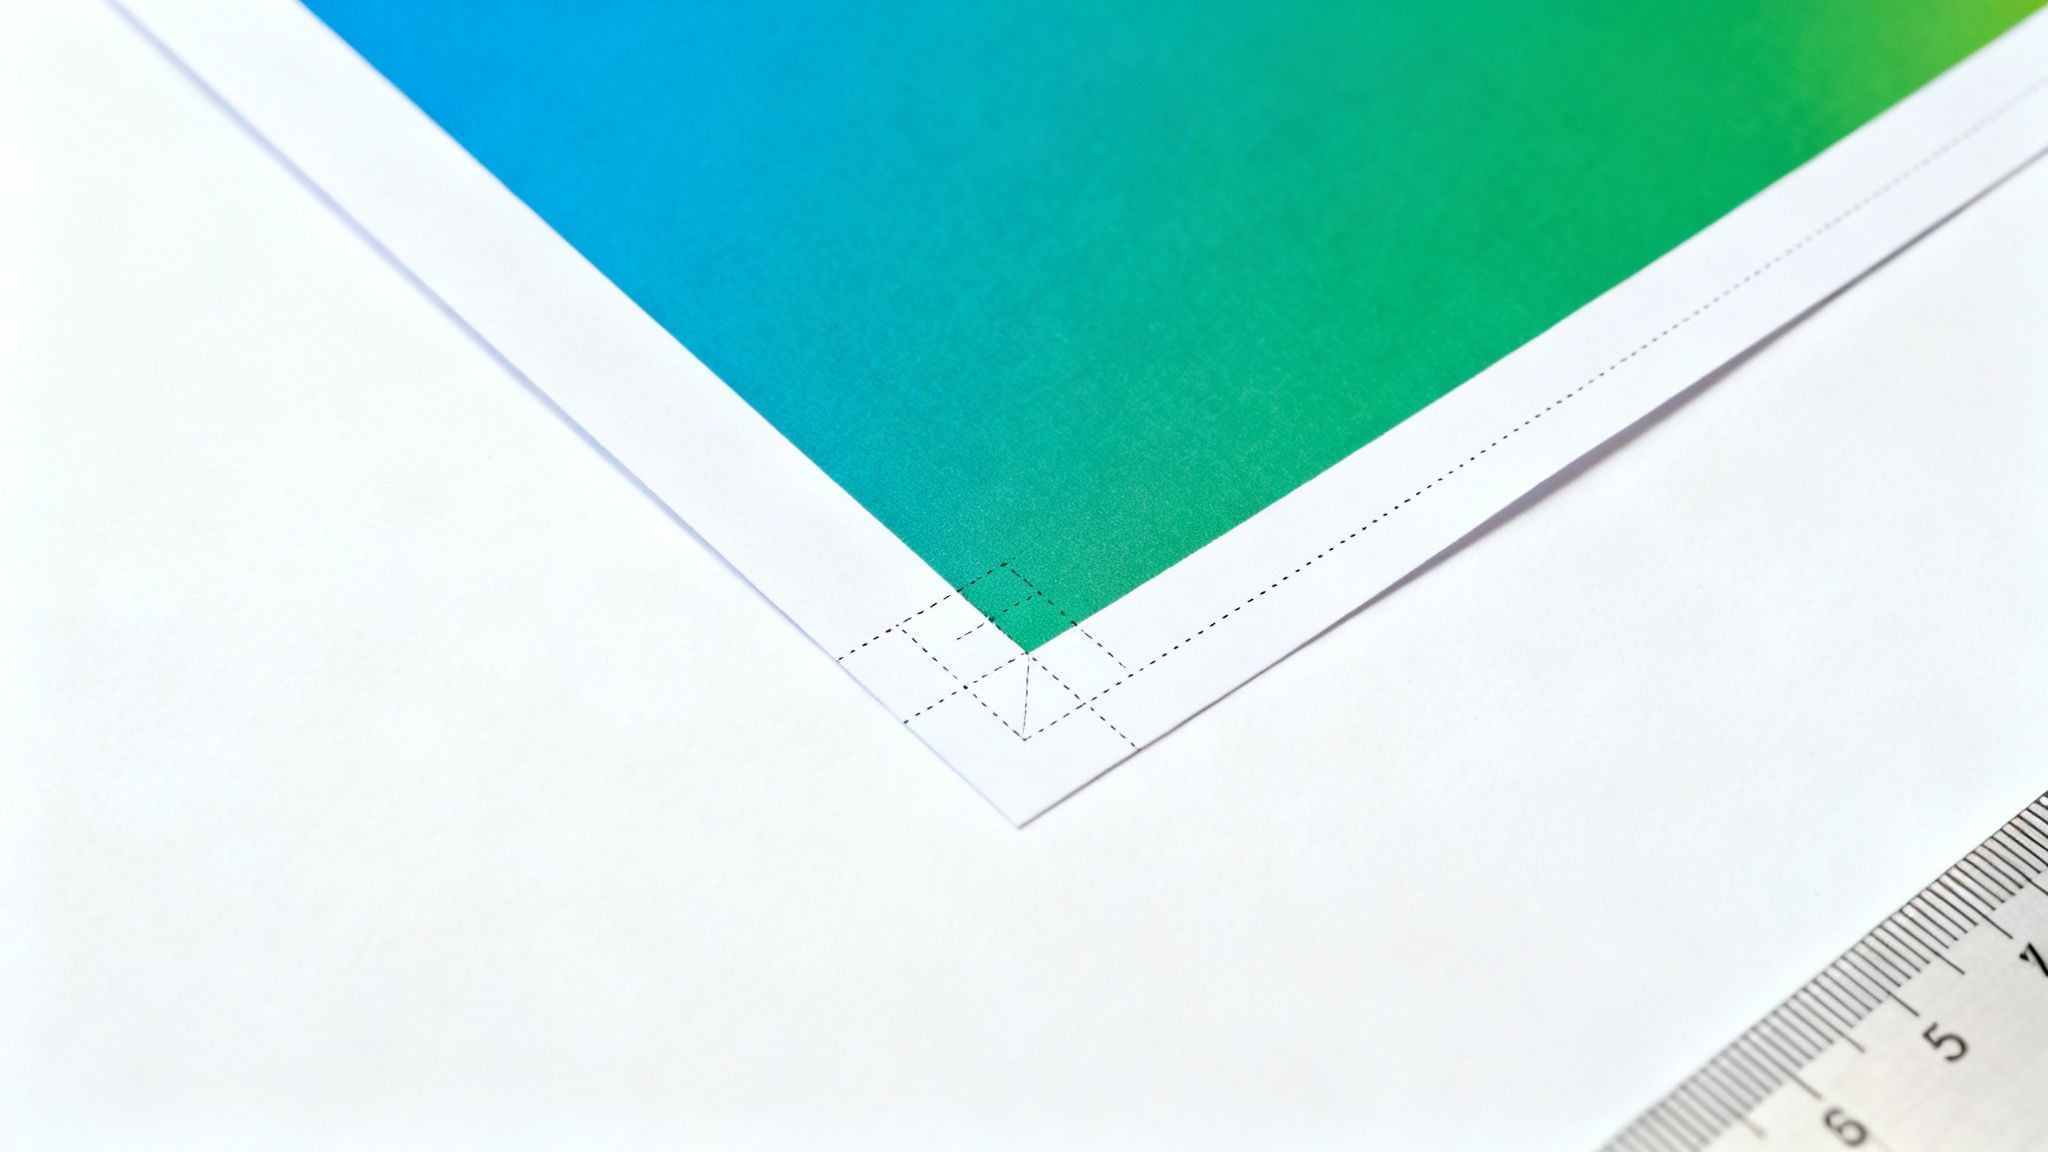
To really get your head around print design, you need to understand three critical zones on your canvas: the safe area, the trim line, and the bleed area. Getting these right is the secret to artwork that prints perfectly, every single time.
Let’s use a simple analogy: think of your design as a framed picture.
The safe area is the main image inside the frame. This is where you must place all your vital content text, logos, and important contact details. Keeping everything tucked inside this zone guarantees it won't be accidentally chopped off during the final trimming stage. It’s your design's protected space.
The Key Boundaries of Your Design
Next up is the trim line, which is like the physical edge of the picture frame itself. This is the exact, final dimension of your printed piece after it has been cut. For an A5 flyer, this line marks the precise 148mm x 210mm boundary.
Finally, the bleed area is the bit of your image that extends underneath the frame, hidden from view. This extra margin, usually 3mm on all sides, is your safety net. It makes sure that if the cutting blade (the trim) shifts ever so slightly, no ugly white slivers of unprinted paper are revealed at the edge. It’s the buffer that guarantees a flawless, professional finish.
Think of it this way: the safe area protects what must be seen, the trim line defines the final product, and the bleed area protects the edges from printing mistakes. Together, they create a foolproof structure for professional print design.
This flowchart shows what happens when a design is missing bleed. It leads directly to a cutting error, resulting in that unwanted white border.
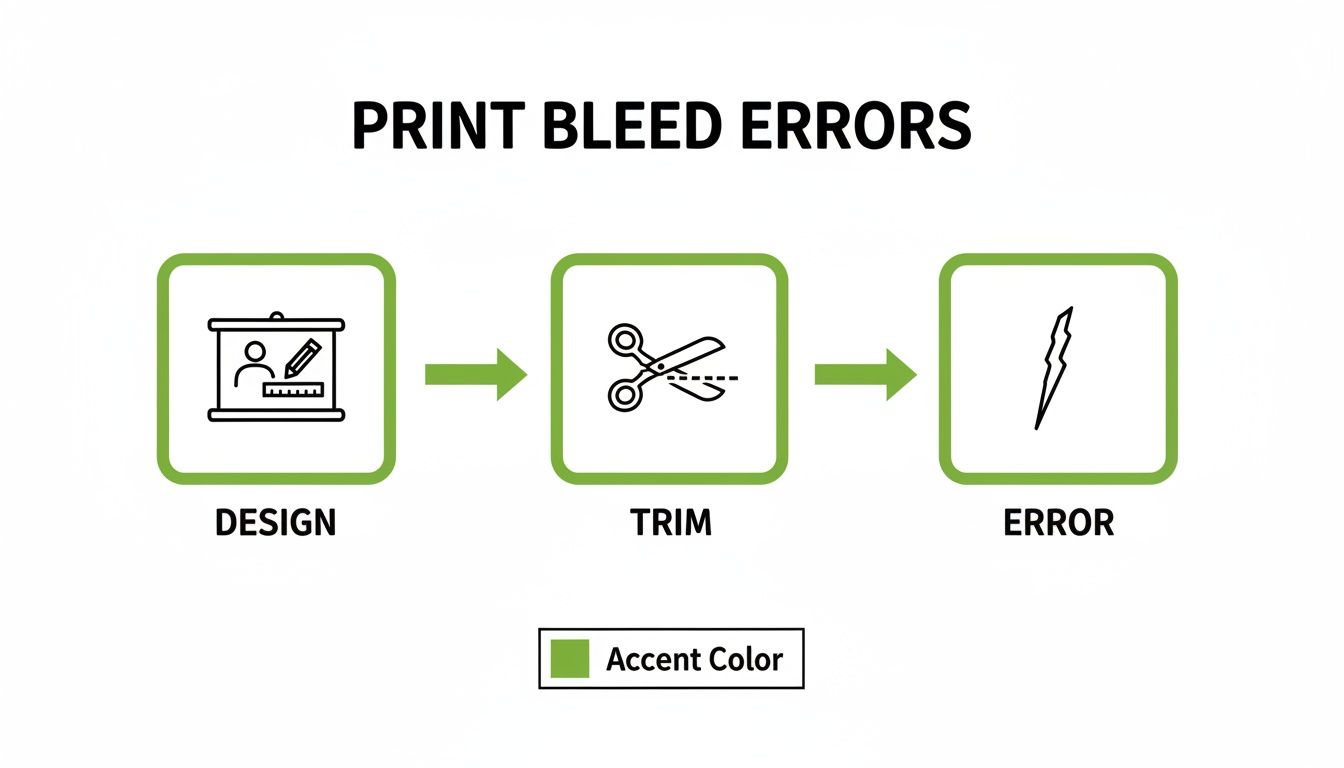
As you can see, the problem only becomes obvious during the trim, but the mistake was made right back at the initial design setup.
By structuring your layouts with these three zones in mind, you can design with confidence. You’ll protect your important elements while getting that polished, professional look on every project, from business cards to compliment slips.
If you're just getting started, using a pre-made guide can be a huge help. Check out a professional comp slip template to see these principles in action. This mental model will soon become second nature, helping you prepare print-ready files correctly from the get-go.
How Much Bleed Do I Actually Need?
So, you've got the 'why' behind bleed sorted. Now for the big question: how much extra space do you actually need to add? The good news is that for most print jobs here in the UK, the answer is refreshingly simple.
The industry standard, and our go-to recommendation at The Print Warehouse, is a 3mm bleed on all sides. This isn't just a number we plucked out of thin air; it’s been a cornerstone of UK printing since the 1970s, designed to work perfectly with the tiny mechanical tolerances of commercial guillotines.
Getting this figure right is crucial for preventing waste, especially on high-speed presses. It’s a standard that helps keep a massive industry which had over 10,000 firms by 2010 running smoothly and consistently.
This 3mm rule is the magic number for the vast majority of products you'll be printing:
- Business Cards: A 3mm bleed is essential for those perfectly crisp, professional edges.
- Flyers and Leaflets: This standard is your best defence against any unwanted white slivers on your promotional materials.
- Brochures and Booklets: Keeps every page looking polished and consistent, from the first to the last.
- Posters: For most standard sizes, 3mm is all you need for that seamless, edge-to-edge finish. You can learn more about poster dimensions in our guide to common print poster sizes.
When You Might Need More Bleed
Of course, one size doesn't always fit all. Some products, because of their sheer size, thickness, or the way they're finished, demand a little extra breathing room to guarantee a perfect result. In these cases, bumping the bleed up to 5mm or even more is the way to go.
The golden rule of print is simple: always check the specific bleed requirements with your printer before you start designing. Their specs are the final word for your exact product.
Why the extra space? Well, larger items like exhibition banners have more potential to shift during trimming just because of their scale. The same goes for thicker products like perfect-bound books or hefty catalogues—the depth of the paper stack can increase the chance of tiny movements during the cutting process.
Recommended Bleed Sizes for Popular Print Products
To make things easier, we've put together a quick-reference guide. This table covers the standard bleed dimensions you'll need for some of the most common print products in the UK.
| Print Product | Standard UK Bleed Size | Key Consideration |
|---|---|---|
| Business Cards, Flyers | 3mm | The gold standard for most everyday print jobs. |
| Brochures, Posters | 3mm | Ensures clean, sharp edges on standard paper stocks. |
| Large Banners, Signage | 5mm or more | The larger surface area requires a bigger safety margin. |
| Perfect-Bound Books | 5mm or more | The thickness of the book block demands extra bleed. |
While this table is a great starting point, remember to treat it as a guide. When in doubt, confirming the specs for your specific project will always save you time and ensure your final print looks exactly as you imagined.
Setting Up Bleed in Illustrator, InDesign, and Canva
Alright, let's move from theory to practice. Getting your bleed set up correctly is the final piece of the puzzle, and thankfully, all the major design tools make it pretty painless. Whether you’re a design pro or just getting started, these steps will have your files ready for a flawless print run.
Applying a simple 3mm margin is a non-negotiable step. For small print businesses in the UK a £13.7 billion industry where 75% of companies have fewer than 10 employees accuracy is everything. Small errors on flyers or brochures can eat into already tight profit margins, which are hovering around 5.5% for 2025.
Adobe Illustrator and InDesign Setup
If you're working with Adobe's professional tools, you're in luck. The process for adding bleed is almost identical in both Illustrator and InDesign, so you can switch between them without missing a beat. You can add it right at the start or to a document you're already working on.
When creating a new document:
- Head to File > New.
- In the New Document window, look for the Bleed settings. You’ll usually find them just below the page size and orientation options.
- Enter 3 mm into the Top, Bottom, Left, and Right fields. Make sure the little "chain" icon is linked—that way, you only have to type it in once and it'll apply to all sides automatically.
That's it. Your artboard will now have a red guide around the edge, showing you exactly where your background elements need to stretch to.
Canva Bleed Settings
Canva has also made it simple to get your files ready for a professional print job, although the setting is a little bit tucked away if you don’t know where to find it.
To get your file set up correctly:
- Click on File in the top-left menu.
- Choose View settings.
- Click Show print bleed.
This will add a dashed line 3mm around the outside of your design. Just remember to pull all your background colours, images, and graphics right out to this new edge. Getting this right is crucial, whether you're designing a business card or a larger A4 size poster.
Remember: The red line in Adobe or the dashed line in Canva isn’t just a guide it’s the target. Your background elements must extend all the way to this outer edge to do their job.
Preparing your file correctly is the single most important thing you can do to get a professional finish. If you're keen to learn more, there are plenty of other Once your bleed is sorted, you're well on your way to creating artwork that looks just as good in your hand as it does on your screen.
Your Final Print-Ready Checklist
Before you hit 'export' and send your design our way, it's worth taking a moment for a final quality check. This simple but essential once-over is the single best thing you can do to catch common mistakes before they become expensive printing problems.
Think of it as your last line of defence. Running through these points gives you the confidence that what you send to us will come back looking exactly as you planned. It’s a quick process that ensures your artwork is genuinely print-ready and avoids any frustrating delays down the line.
Artwork and Layout Checks
First up, let’s double-check the core elements of your design layout. This is where most issues with bleed and safe areas are caught.
-
Extend Backgrounds to Bleed: Have you stretched every single background image, colour block, and graphic element all the way to the outer bleed line? Remember, don't stop at the trim edge.
-
Protect Critical Content: Is every important logo, line of text, and contact detail tucked safely inside the safe area? Nothing vital should be sitting too close to the trim line, where it risks being chopped off.
File and Export Settings
Next, make sure your file settings are configured for a high-quality print run. The right format and resolution are non-negotiable for getting a professional result.
-
Confirm Bleed Amount: Have you set the bleed to the standard 3mm? If you're printing something bigger, like a banner or a thick booklet, just double-check if a 5mm bleed is needed instead.
-
Export as a High-Resolution PDF: Is your final export format a print-ready PDF? This is the industry standard for a good reason – it locks in your fonts, images, and layout details perfectly.
-
Include Crop Marks and Bleed: Finally, did you remember to tick the box in your export settings to include both crop marks and use the document bleed settings? This is what tells our machines exactly where to trim for that perfect, clean finish.
A final check on your artwork is like a pilot's pre-flight inspection. It’s a routine step that guarantees a smooth journey from your design software to the finished printed product, ensuring everything from paper weight to colour is just right.
For more details on how paper choices can affect your final product, see our complete guide on what GSM means for paper. Taking these few extra moments to review your work makes all the difference.
Common Questions About Print Bleed
Even after you’ve got the basics down, a few questions always seem to pop up. Let’s clear up that last bit of confusion so you can send your files to print with complete confidence. Think of this as your go-to list for troubleshooting those final details.
Can My Printer Add Bleed for Me?
Technically, some printers might offer this as a quick fix, but it’s a shortcut you really want to avoid. When a printer adds bleed for you, they have to artificially stretch or mirror the edges of your original design to create that extra margin.
This almost always leads to problems—distorted images, warped text near the edge, or just a generally unprofessional finish. It’s always best practice to provide your artwork with the bleed already set up. That way, you know the final product will look exactly how you designed it, without any nasty surprises.
What Happens If I Forget to Add Bleed?
Forgetting to add bleed is one of the most common reasons for print delays and disappointing results. Without that crucial safety margin, you’re almost guaranteed to see thin, ugly white slivers along one or more edges after the job is trimmed.
Even the tiniest shift in the cutting machine becomes glaringly obvious. It’s an easy mistake to make, but it gives your print an amateurish look that completely undermines the quality of your design and might even force a costly reprint.
Even a design with a white background needs to be set up properly. The file still needs its structural elements like crop marks and page boxes—defined correctly for the press, otherwise you could run into production issues.
Does a Design with a White Background Need Bleed?
This is a great question, and one we hear a lot. If your design has a completely white background with no colours or images touching the edges, you technically don't need to extend any artwork.
However, it’s still best practice to supply a file with the standard 3mm bleed setting. Why? Because it ensures your document is the correct size for the printing press and trimming process. It tells the printer’s software exactly where the final cut should be, guaranteeing a clean and accurate trim every time, even if there's no ink in the bleed area itself.
How Is Bleed Different from a Margin?
It’s easy to mix these two up, but they serve opposite purposes. Think of it this way: a margin (or ‘safe area’) is an internal buffer, while bleed is an external one.
The margin keeps your important content like text and logos safely away from the trim line so it doesn't get chopped off. Bleed, on the other hand, pushes your background colours and images past the trim line to prevent white gaps from appearing.
- Margin: Protects what’s inside the page from being cut off.
- Bleed: Protects the edge of the page from having unsightly white gaps.
At The Print Warehouse Ltd, we make it easy to upload your print-ready files and get flawless results every time. Explore our full range of professional printing services and bring your designs to life.

