
When you’re thinking about pull up banner sizes, it’s easy to get lost in options. But the good news is, most UK businesses find that just three standard widths will cover pretty much every event or promotion you can think of: 800mm, 1000mm, and 1200mm.
These widths are almost always paired with a standard height of 2000mm (that’s 2 metres), giving you a seriously impressive visual without overcomplicating things.
Understanding Standard UK Pull Up Banner Sizes
Unlike some print marketing where the choices feel endless, the world of pull up banners is refreshingly simple. Over the years, the UK market has naturally settled on a handful of go-to dimensions. This is a massive plus, whether you're a small business looking for fresh marketing ideas or a larger organisation planning a nationwide campaign.
This consistency means you can get on with the creative side of things, confident that the final banner will fit perfectly into your event space. The main decision you'll make is about the width, as this determines how much visual real estate you have for your message. The height, on the other hand, rarely changes.
Why the 2-Metre Height Standard Matters
Most pull up banners you see stand tall at 2000mm, or about 6.5 feet. This isn't just a random number; it's the sweet spot for grabbing attention at eye level in busy places. It ensures your banner pops up above the general chaos of an exhibition hall or a crowded high street, making your message visible from across the room.
This standard height also makes the design process a whole lot easier. You don’t have to faff around creating different artwork files for various heights, which is a common headache with other types of print. If you're curious about how dimensions work for other promotional tools, it's worth checking out our comprehensive guide to UK poster sizes.
The Three Dominant Widths Explained
When it comes down to it, the UK pull up banner market really revolves around three main widths. Our own data and industry trends show that 800mm, 1000mm, and 1200mm banners make up over 80% of all commercial orders. It’s a consensus that simplifies choices for everyone.
Think of these three sizes as a clear tiered system for visual impact:
- 800mm: This is the crowd-pleaser. It’s the most popular and portable option, brilliant for tight spots or when you need a supporting banner next to a main display.
- 1000mm: A great middle-ground choice. It gives you a bit more visual punch without taking up a significantly larger footprint.
- 1200mm: The premium option. This width is perfect for creating a strong backdrop or acting as the undeniable focal point of your stand.
Choosing the Right Banner Size for Your Space
Knowing the standard pull-up banner sizes is one thing, but the real magic happens when you match the right dimension to the right environment. Get this right, and your banner goes from a simple display to a powerful marketing tool. Whether you're in a packed exhibition hall or at a local community event, the context is everything.
The goal isn't just to fill a space; it's to align your banner's footprint with your strategic objectives. A wider banner isn't automatically better, and a slim one isn't just for tight budgets. Each size has a specific strength, and knowing how to use it is key to effective business marketing.
Matching Banner Width to Your Audience
One of the easiest ways to decide is to think about who you're trying to reach and the space they'll be in. A wider banner naturally grabs more attention and is perfect for capturing the interest of a crowd from a distance. A narrower option, on the other hand, is built for more personal, close-range engagement.
For example, a new business might place slim banners near the tills in partner shops. Here, space is tight and the message is seen one-on-one. In contrast, a political party like Advance UK might use a row of wide banners to create an unmissable backdrop at a press conference, projecting strength and unity to a large audience and the media.
This simple graphic helps visualise which banner width is the best fit for your intended audience.
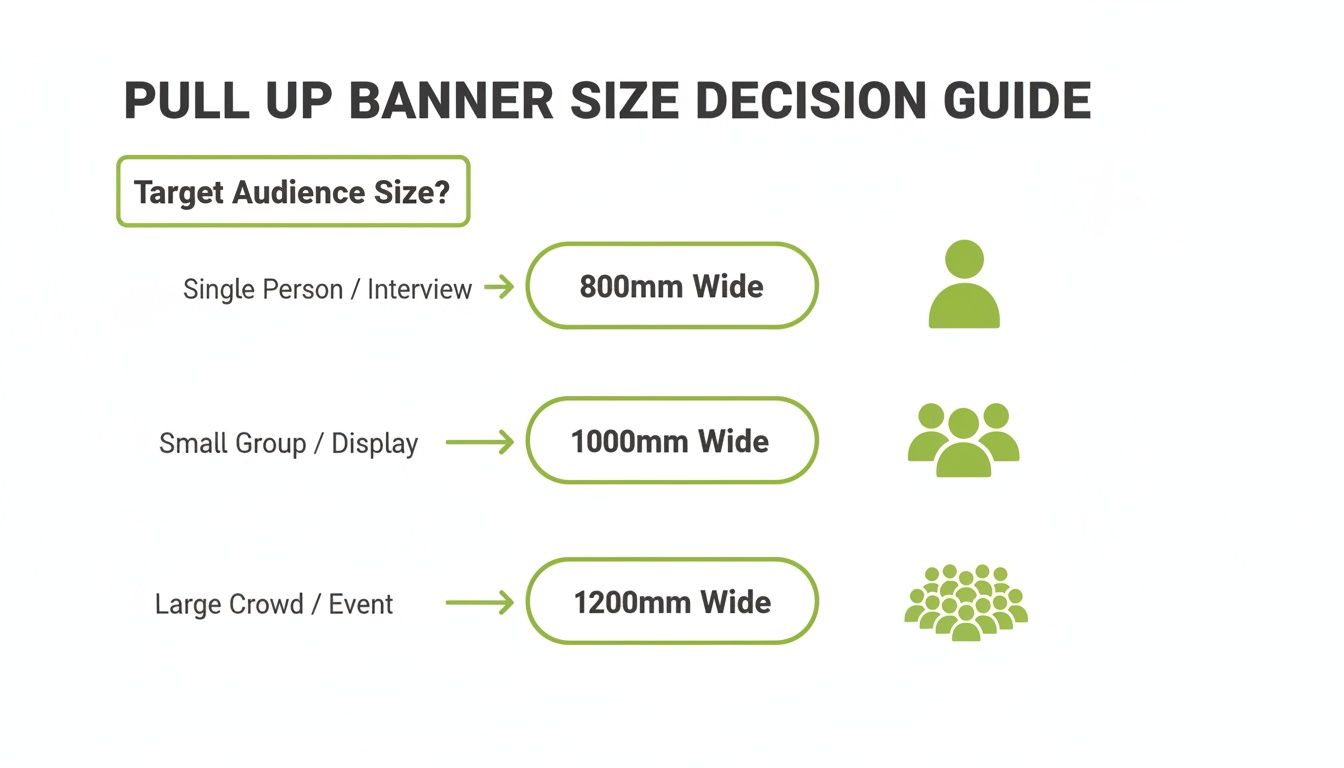
As you can see, the larger the crowd you want to reach, the wider your banner should be to make sure your message lands effectively.
Real-World Scenarios and Recommendations
Let's walk through a few common situations to see how different pull-up banner sizes can be used strategically. Thinking through these examples will help you select from our range of high-quality roller banners with total confidence.
1. The Bustling Trade Show or Exhibition
In a crowded hall, you’re fighting for every single glance. This is where a 1200mm banner truly shines. Its impressive width acts like a mini-mural, creating a powerful backdrop that defines your space and pulls attendees in from across the room. Banners are often the anchor of a great stand, so it pays to explore some creative trade show booth ideas to see how they can fit into a bigger, more compelling display.
2. The In-Store Promotion or Reception Area
In these spots, space is usually at a premium, and people will be passing much closer to your display. The classic 800mm banner is the perfect choice here. It’s slim enough to tuck into a corner or sit next to a product display without getting in the way, delivering a clear, targeted message exactly where you need it most. This is a simple but effective business marketing idea for any retail space.
3. The Community Event or Political Rally
For events like a local fete or a campaign stop, the 1000mm banner strikes a brilliant balance. It has more visual weight than the 800mm model, making it feel substantial and professional, but it’s still a breeze to transport and set up. Political campaigns often use several 1000mm banners together to flank a stage or create a branded perimeter.
Key Takeaway: The best pull-up banner size isn’t the biggest one you can afford; it's the one that best fits the viewing distance, foot traffic, and strategic goals of your specific event or campaign.
Getting Your Artwork Ready for a Flawless Print
A powerful banner design deserves a perfect print finish. But to get that professional result, you need to nail the technical details first. Think of it this way: the design is the creative spark, but the artwork prep is the solid foundation that ensures what you see on your screen is exactly what you get in your hands.
Don't worry, you don't need to be a design guru. We'll walk through the essentials like bleed, resolution, and file types, breaking down the jargon into simple, practical steps.
Bleed and the Safe Area Explained
Two of the most important concepts to get your head around are bleed and the safe area. Getting these right is the difference between a professional-looking banner and one where your logo has been awkwardly chopped off at the edge. It happens more than you'd think!
Imagine you're painting a wall right up to the skirting board. You'd probably let the paint go a tiny bit over the edge onto your masking tape. This is your 'bleed'. It guarantees that when you peel the tape off, you get a sharp, clean line with no pesky white gaps.
Print bleed is the exact same principle. It's a small margin of your background colour or image that extends beyond the final trim line of the banner. This gives our guillotines a little wiggle room, ensuring your background goes right to the very edge. For a more detailed look, check out our guide on how to print with bleeds.
The safe area, on the other hand, is the VIP zone inside the trim lines. Think of it as a safety net for all your crucial information – your logo, your main headline, your contact details. By keeping these key elements comfortably inside this zone, you guarantee they won’t get trimmed off during the finishing process.
Getting Resolution and Colour Spot On
For your banner to look crisp and professional up close, image quality is everything. This is where DPI (Dots Per Inch) comes in. To get those sharp graphics you're after, a key part of the process is understanding 300 DPI resolution for printing. It’s the industry standard for a reason, as it stops images from looking blurry or pixelated, which is especially noticeable on large prints like banners.
Just as important is the colour mode. Your computer screen uses an RGB (Red, Green, Blue) model, which is designed for digital displays that emit light. Printers, however, run on a CMYK (Cyan, Magenta, Yellow, Key/Black) ink-based model.
Pro Tip: Always set up your design file in CMYK mode right from the start. If you design in RGB and convert it at the last minute, you can get some nasty surprises. That vibrant red you chose for your brand might end up looking a bit dull or muddy in print.
Working in CMYK gives you full control over the final colours and avoids any unwelcome shocks when your banner arrives.
Choosing the Best File Format
Finally, sending us your artwork in the right format ensures we can print it exactly as you intended. While we can work with a few different file types, some are definitely better than others for locking in quality.
To make sure everything is ready for the press, we’ve put together a quick checklist of the essential specs. Getting these right from the start will ensure a smooth process and a fantastic final product.
Artwork Specification Checklist
| Specification | Requirement | Why It Matters |
|---|---|---|
| Colour Mode | CMYK | Ensures the colours you see on screen are accurately reproduced in print, avoiding unexpected shifts. |
| Resolution | 300 DPI | Guarantees your images and text are sharp, crisp, and professional, with no pixelation. |
| Bleed | 3mm on all edges | Prevents white edges after trimming, giving your banner a clean, edge-to-edge finish. |
| Safe Area | 5mm from the edge | Protects your important text and logos from being accidentally trimmed off during production. |
| File Format | Print-Ready PDF | This is the industry gold standard. It embeds all fonts and images, ensuring nothing changes or goes missing. |
Following this checklist is the surest way to get a print-ready file to us with confidence. It takes the guesswork out of the process and helps us deliver a banner that looks absolutely stunning.
Exploring Custom and Large Format Banners
While standard pull-up banner sizes get the job done most of the time, some projects demand something a little more special. For those high-stakes events, big product launches, or when you need to create a totally seamless branded backdrop, stepping outside the usual dimensions can make all the difference. This is where custom and large format banners really shine, giving you incredible creative freedom.
Going beyond the typical 800mm to 1200mm widths opens up a whole new world of display possibilities. It lets you create something that fits a specific space perfectly or matches an ambitious campaign goal. Think of it like the difference between buying a suit off the rack and having one tailor-made; the fit, feel, and finish are just on another level.
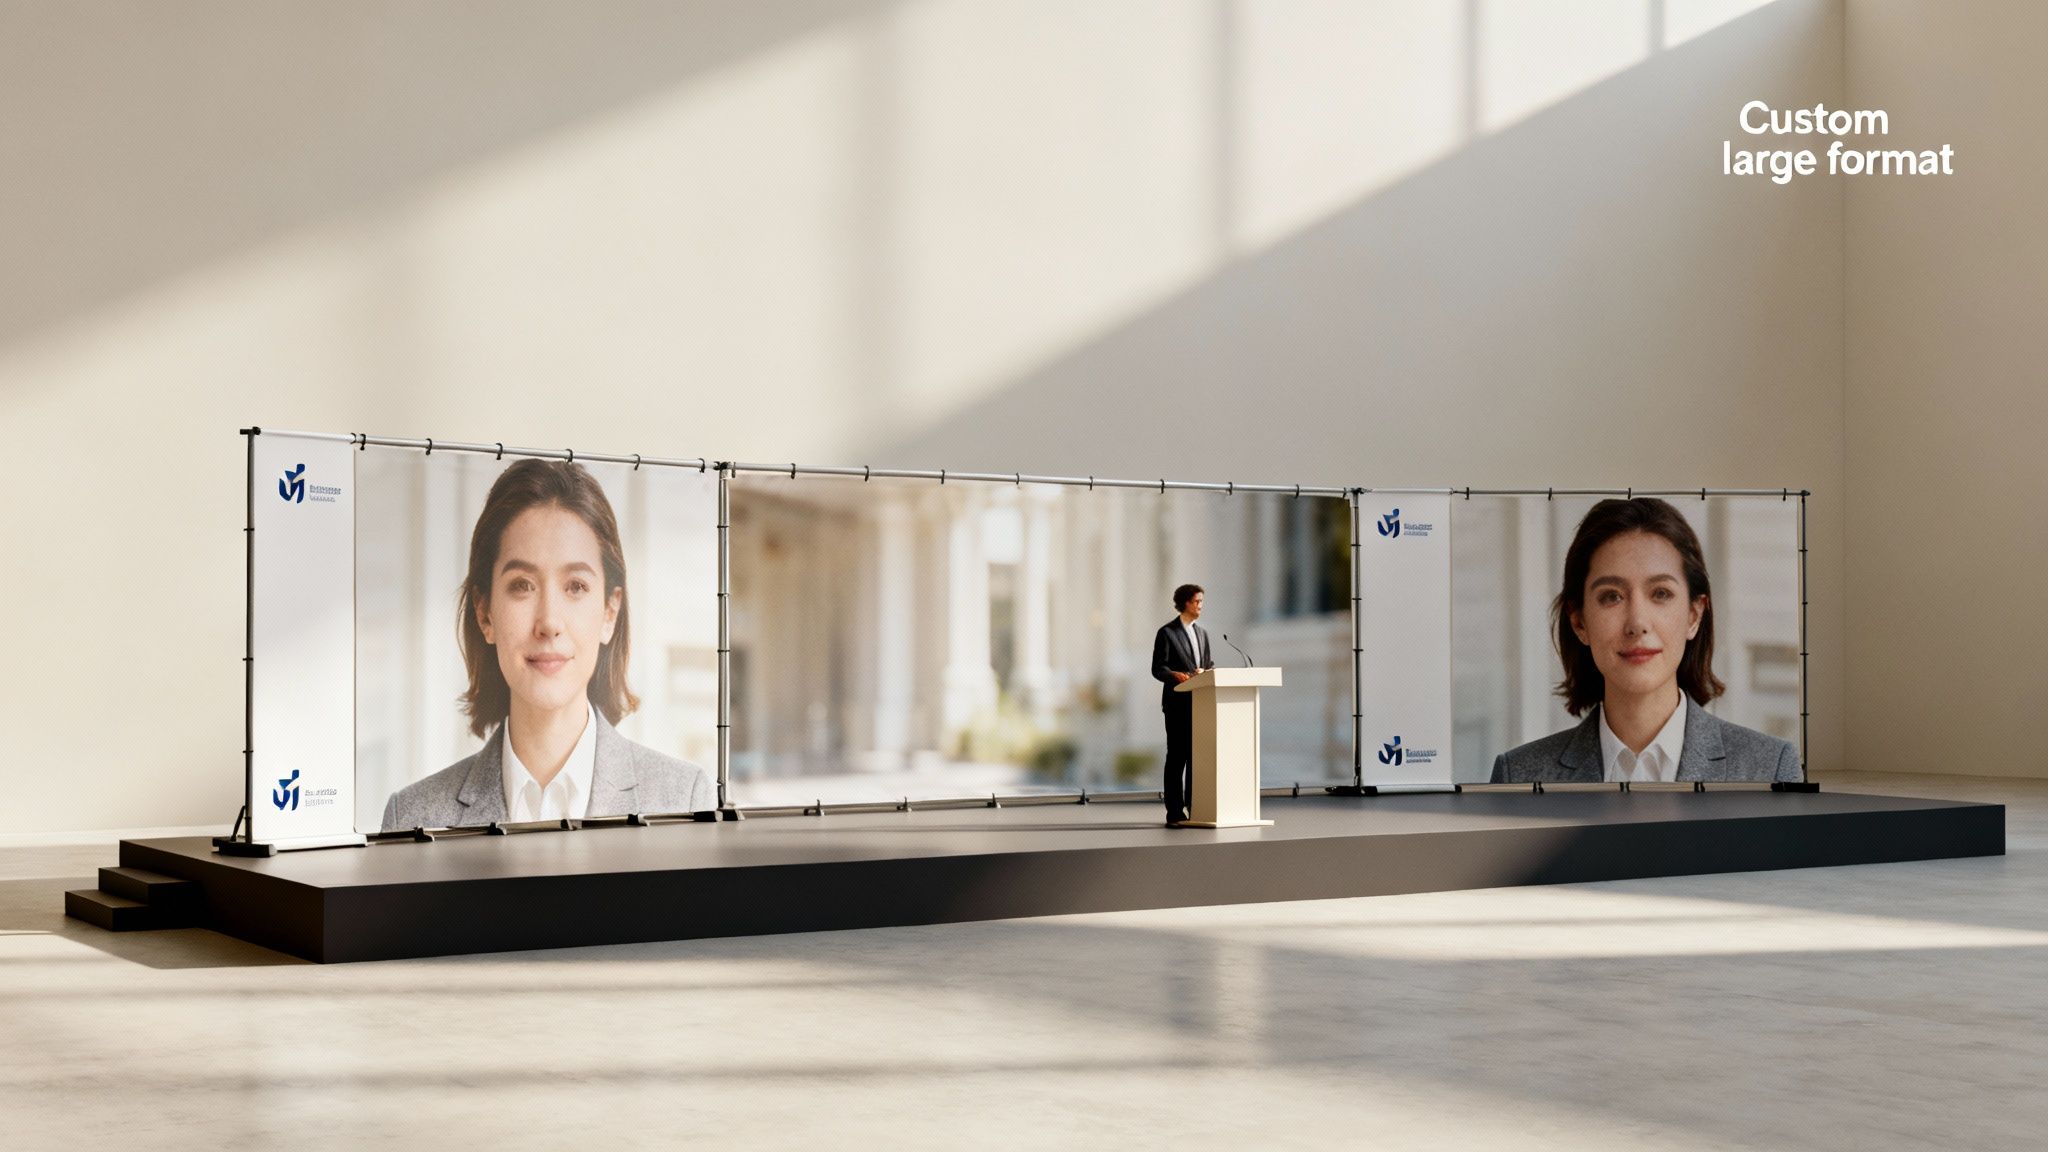
Going Big With Extra-Wide Banners
For press conferences, stage backgrounds, or media walls, extra-wide roller banners are the gold standard. You’ll often see them used by political campaigns or at corporate events to create an unbroken, professional backdrop that looks fantastic on camera. By linking several wide banners together, you can build a massive graphic wall that completely owns the space.
This technique is a popular trick of the trade for large-scale events. It guarantees your branding is front and centre, creating an immersive feel for guests and a polished look for any photos or videos. These bigger banners work just like the standard ones but deliver a much bigger visual punch.
The real magic of large format banners is their ability to create a seamless, professional background. This is vital for any event with photography or video, as it cuts out distracting backgrounds and keeps all eyes on your brand or message.
Miniature Banners for Maximum Impact
Flipping things around, you've also got mini desktop banners. These tiny pull-ups are perfect for point-of-sale promotions, reception desks, or even as part of a table setting at a corporate dinner. They pack all the professionalism of their larger siblings into a compact, eye-catching format.
These mini banners are brilliant for:
- Highlighting special offers: A small banner right by the till can instantly draw attention to a new deal or product.
- Providing key information: Pop one on a reception desk with Wi-Fi details, a welcome message, or a QR code for guests.
- Reinforcing branding: They're a subtle but effective way to add a touch of branding to any tabletop or counter.
So, whether you need a massive backdrop or a tiny tabletop display, custom pull-up banner sizes give you the flexibility to bring your vision to life. And while pull-ups are fantastic for indoor use, if you're planning an outdoor event or need different material options, you might want to explore the world of PVC banner printing to find the perfect solution, whatever the weather.
Balancing Banner Materials with Your Budget
Choosing the right pull up banner size is a huge part of the puzzle, but what it’s made of both the printed graphic and the stand holding it up—is just as important. Get this bit right, and you’ll have a marketing tool that not only looks fantastic but also gives you real value for money.
The final price tag isn't just about the dimensions. It's a mix of the banner size, the graphic material, and the quality of the hardware. Sometimes, spending just a little bit more can transform a one-off display into a reliable marketing asset you can use again and again.
What Are Your Banners Actually Made Of?
The most common material you'll find for pull up banners is a stay-flat vinyl or flexible plastic sheet. It's the industry workhorse for a reason: it's durable, cost-effective, and gives a crisp, professional look for most indoor events. If you need a reliable banner for regular use, this is almost always the right call. We dive deeper into the properties of these materials in our guide to flexible plastic sheets.
If you want to step things up a notch, look for light-blocking materials. These are a bit thicker and have a grey backing that stops bright light from shining through and washing out your design. This is a brilliant choice for well-lit exhibition halls or if your banner will be sitting in front of a window, making sure your message stays bold and easy to read.
It's the same story with the stand mechanism. A standard, lightweight aluminium cassette is fine for occasional use and is super easy to carry. But if you're constantly on the road, travelling from event to event, investing in a sturdier system with a weighted base and better components is a smart move. It'll handle the wear and tear of being put up and taken down all the time.
Key Insight: Don’t just think about the initial cost; think about how long you need the banner to last. A premium stand might cost more today, but it could save you from having to buy a replacement banner down the line.
How Size and Quality Affect Your Budget
While premium materials do add to the cost, you might be surprised at how little the price changes when you go up a size. Often, getting a much bigger, more noticeable banner is more affordable than you'd think.
Let's look at some typical UK prices. A standard 850mm banner might cost around £165. The wider 1000mm version only bumps up to about £173, and the even larger 1200mm model comes in at roughly £184. As you can see, you can increase the banner's width by over 40% for as little as an 11-12% increase in cost.
This makes upgrading to a larger size one of the most efficient ways to spend your marketing budget. You get a much bigger canvas to work with for a relatively small extra investment.
Your Pull-Up Banner Questions Answered
When you're investing in something as visible as a pull-up banner, it’s natural to have a few questions. To help you order with confidence, we’ve put together answers to the most common queries we get from customers, covering everything from lifespan to design blunders.
How Long Will My Pull-Up Banner Last?
This really comes down to two things: the quality of the stand and how you treat it. Our standard banners are printed on a tough, scratch-resistant material that’s specifically designed for the rigours of repeated indoor use, whether that's at a business expo or a community event.
With a bit of care—like guiding the graphic back into its base instead of letting it snap shut and always using the carry case—you can expect your banner to look sharp for years. If you’re planning a heavy-use tour or a long-term campaign, we’d point you towards our premium stands. They have more robust mechanisms built for maximum longevity.
Can I Reuse My Banner Stand with a New Graphic?
A great question, and the answer depends on the stand you choose. Most of our budget-friendly cassettes are designed to house a single graphic for life. Once assembled, they’re sealed, making them a fantastic, low-cost option for one-off events or specific campaigns.
However, many of our premium roller banner systems are built precisely for this purpose. They make it easy to swap out graphics, which is a seriously cost-effective strategy if you run seasonal promotions or need to update your messaging regularly. If you think you'll need to change your display, just ask our team, and we’ll show you which systems give you the best long-term value.
Expert Tip: Thinking about reusability from the start is a smart move. Investing in a stand that lets you switch graphics can slash your long-term marketing costs, especially if you attend the same annual events or run evolving campaigns.
What Are the Most Common Design Mistakes to Avoid?
We see a few common slip-ups that can unfortunately undermine a brilliant banner. Here are the top three things to watch out for:
- Placing text too low: Remember that the bottom few inches of your graphic will always be hidden inside the cassette. Keep your logo, contact details, and any crucial information in the upper two-thirds of the banner to make sure it gets seen.
- Using low-resolution images: A pixelated logo or a blurry photo is a real let-down and can make your whole display look unprofessional. Always, always use high-resolution images we recommend at least 150 DPI at the final print size to get that crisp, clean finish your brand deserves.
- Creating a cluttered design: A pull-up banner needs to make an impact from a distance. A bold headline, one strong image, and just a few bullet points will always work better than a wall of text. Keep it simple and scannable.
How Should I Care For and Store My Pull-Up Banner?
Looking after your banner is easy, but it makes a huge difference. When you're packing it away, always guide the graphic slowly and gently back into the base. Letting it fly back on its own can damage the print and the internal roller.
Before you zip it up, a quick wipe with a soft, dry cloth will get rid of any dust. And most importantly, always use the padded carry case we provide. It’s your banner’s best defence against scuffs, knocks, and moisture during transit. Storing it upright in a cool, dry place is the final step to keeping it in perfect condition for your next event.
Ready to create a professional display that gets you noticed? At The Print Warehouse Ltd, we offer a wide range of pull-up banner sizes and materials to suit any budget or event. Explore our options and start designing today at https://theprintwarehouse.uk.

