
Ever wondered how brands create those uniquely shaped business cards, stickers, and product tags that just grab your attention? The secret is a process called die cutting.
Think of it like a high-precision, industrial-strength cookie cutter, but for paper and card. It uses a custom-made metal shape or ‘die’ to cleanly cut through material, allowing for virtually any shape you can imagine. This is the technique that transforms a standard sheet of paper into something truly special.
How Die Cutting Shapes Your Brand Identity
Let’s be honest, a world where every printed item was a plain rectangle would be pretty dull. Die cutting is what breaks that mould, giving you a powerful way to inject personality and creativity directly into your physical marketing materials.
It’s the magic behind a coffee shop’s loyalty card shaped like a coffee bean, or a real estate agent’s flyer cut into the outline of a house. This process elevates a simple piece of print into a memorable brand experience. By moving beyond squares and rectangles, your business can create items that aren’t just seen, but are felt, touched, and remembered.
The Power of a Unique Shape
In a crowded market, standing out is everything. A custom die-cut shape is a brilliant way to differentiate your brand, achieving several key marketing goals at once:
- It’s Memorable: Our brains are wired to notice things that are different. A uniquely shaped item is far more likely to stick in someone's mind than a standard one.
- It Feels Premium: Customisation signals quality and care. A bespoke die-cut business card or product tag immediately feels more valuable to a potential customer.
- It Strengthens Your Brand: Consistently using a unique shape perhaps one that echoes your logo helps cement your brand identity in the minds of your audience.
Let's quickly sum up the core ideas.
Die Cutting at a Glance
| Aspect | Brief Explanation |
|---|---|
| What Is It? | A finishing process that uses a custom metal 'die' to cut specific shapes into paper, card, or other materials. |
| Main Purpose | To create non-rectangular shapes for print materials like stickers, business cards, flyers, and packaging. |
| Key Benefits | Boosts brand memorability, enhances perceived value, and creates a unique, tactile experience for the customer. |
Ultimately, die cutting adds a tangible, physical dimension to your design.
By shaping the material itself, die cutting invites interaction. It encourages people to pick up, touch, and engage with your brand in a way that digital media simply can't match.
For example, a simple sticker becomes far more effective when it’s not just a circle, but is precisely cut around the contours of your logo. If you're exploring options, understanding the different types of cuts is key; you can dive deeper into choosing the right sticker or label in our comprehensive guide. At its heart, die cutting offers a brilliant opportunity to make a lasting physical impression.
How Custom Shapes Are Brought to Life
Ever wondered how a design on your screen becomes a perfectly shaped sticker or tag in your hand? It’s a fascinating process that blends smart engineering with a bit of old-school craftsmanship. The secret ingredient is something called a ‘die’ – a custom-made tool that acts as the blueprint for your cut.
Think of it like an incredibly precise, industrial-strength cookie cutter. This die is forged from sharp steel, shaped to the exact outline of your design, whether it’s a quirky logo, a unique product tag, or an elegantly shaped invitation. Once it’s ready, the die is mounted onto a powerful press. The machine then applies a huge amount of pressure, pushing the die clean through your chosen material – paper, card, vinyl, you name it. The result is a perfect cut, every single time, ensuring every piece in a run of thousands looks identical.
This infographic shows you the simple three-step journey from a standard sheet to a one-of-a-kind shape.
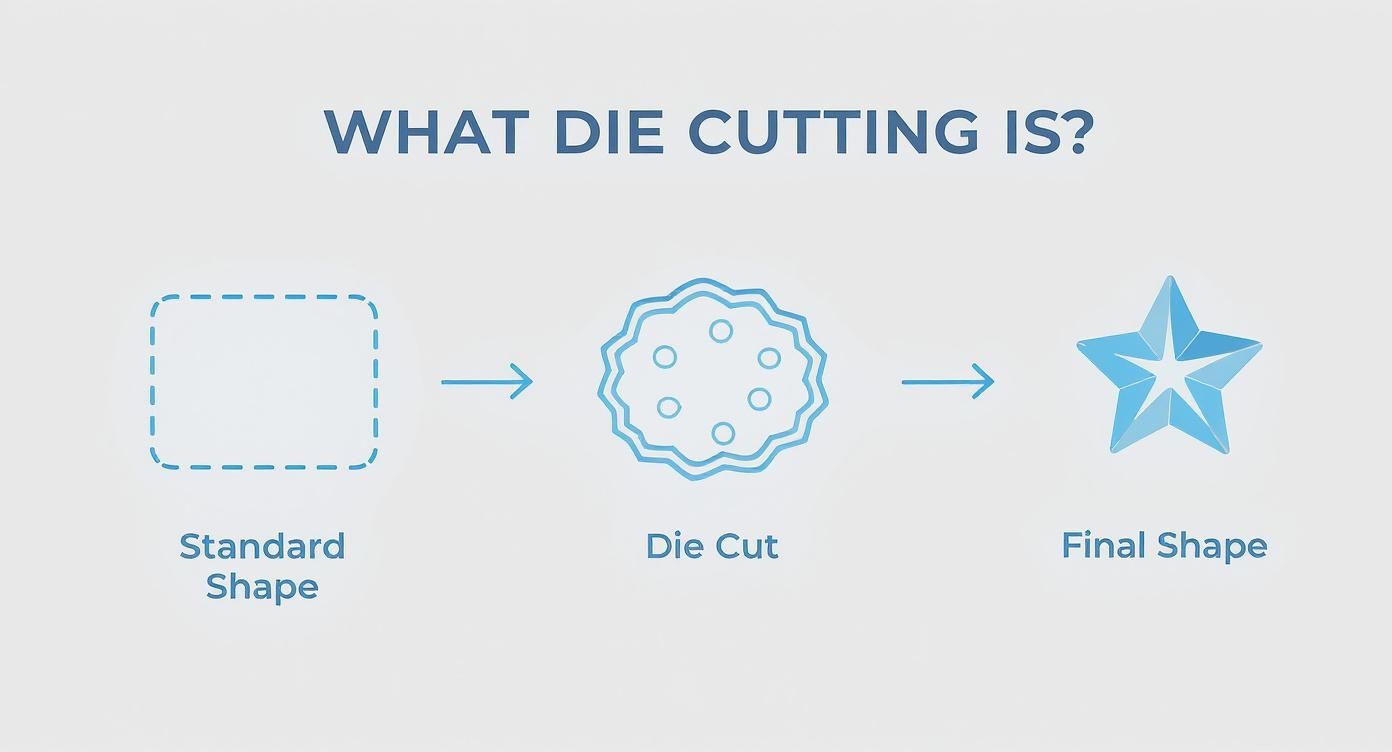
As you can see, the die is what makes it all possible, turning a plain sheet of material into something truly special with incredible speed and precision.
Choosing the Right Cutting Machinery
In the world of die cutting, there are two main types of machines, each with its own strengths. The choice really boils down to the size of the job and how quickly it needs to be done.
-
Flatbed Die Cutters: These work a bit like a traditional printing press. The material is laid flat, and the die presses down from above to make the cut. This method is exceptionally accurate, making it perfect for smaller to medium-sized orders, thicker materials, and designs with lots of intricate detail.
-
Rotary Die Cutters: When you need to produce a massive volume of items, rotary cutters are the answer. Here, the die is a cylinder, and the material is fed through it at high speed, creating continuous cuts. It’s unbelievably fast and efficient, which is why it’s ideal for jobs like producing thousands of custom stickers and labels for UK businesses.
The demand for unique, eye-catching print is always growing, and die cutting plays a massive role in the UK’s manufacturing and print sectors. The value of the flat die cutting machine market alone was in the tens of millions of pounds in the early 2020s, which shows just how vital this technology is for businesses wanting to stand out.
Ultimately, the process is a perfect blend of technology and artistry. The machine provides the power and consistency, while the custom-made die ensures your creative vision is realised with absolute accuracy.
So, whether we’re using a flatbed for a boutique packaging run or a rotary cutter for a huge promotional campaign, the principle is the same. It’s all about a precision-made die and a powerful machine working in tandem to bring your custom shapes to life.
Choosing the Right Die Cutting Technique
Picking the right cut is all about matching the technique to your end goal. Think of it like a chef choosing a specific knife for a certain task – the function of your print project will point you towards the best die cutting method. Getting this right from the start ensures your final product not only looks fantastic but works exactly as you intended.
Not all cuts are created equal. Some are designed to stamp out individual items, while others are there to add practical features like an easy-to-tear edge or a perfect fold. A little know-how here saves a lot of headaches later and guarantees your marketing materials make the right impression.
To help you decide, let's look at the most common techniques you'll come across and where they really shine.
Comparing Die Cut Techniques for Your Project
This table breaks down the most common die cutting techniques, their best use cases, and what makes them unique.
| Cut Type | Best For | Key Feature |
|---|---|---|
| Through Cut | Uniquely shaped flyers, business cards, swing tags, invitations. | Slices completely through the material to create a standalone, custom-shaped item. |
| Kiss Cut | Sticker sheets, easy-peel labels, promotional decal packs. | Cuts only the top layer, leaving the backing sheet intact for easy peeling. |
| Perforation | Vouchers, raffle tickets, reply cards, tear-off slips. | Creates a dotted line of small cuts for a clean, easy-to-tear section. |
| Creasing/Scoring | Greetings cards, presentation folders, product packaging, folded leaflets. | Creates a crisp fold line without cutting, ensuring a professional, crack-free fold. |
Each method serves a distinct purpose, transforming a simple sheet of paper or card into something much more interactive and professional.
Through Cut: The Classic Shape Maker
This is what most people picture when they hear “die cutting.” A through cut does exactly what it says on the tin: it slices completely through the material and its backing, creating a custom-shaped, individual item.
Imagine a business card shaped like your company’s logo, or a flyer that breaks free from the usual rectangle. The die cuts cleanly through the card stock, leaving you with a standalone piece that perfectly matches your design’s outline. It's the go-to for creating items that need to make an immediate, individual impression, like unique swing tags, invitations, or even some eye-catching rounded corners flyers that offer a subtle but effective customisation.
Kiss Cut: The Sticker Sheet Secret
The kiss cut is a much more delicate technique with a clever trick up its sleeve. Instead of punching all the way through, the die blade just "kisses" the surface, slicing only the top vinyl or paper layer while leaving the backing sheet completely intact.
This is the magic behind every sticker sheet you’ve ever used. It allows you to have multiple, intricately shaped stickers on a single sheet, making them incredibly easy for people to peel off. Think of promotional sticker sheets for an event or branded labels for your product packaging. The kiss cut is all about convenience and great presentation.
The key difference is depth. A through cut creates a separate object, while a kiss cut creates an easy-peel sticker that lives on a larger backing sheet.
Perforation and Creasing: Cuts That Add Function
Beyond just shaping an object, die cutting can add essential, practical features to your print. The two most common functional cuts are perforations and creasing.
-
Perforation: This involves creating a line of tiny cuts that form a tear-off line. It’s perfect for vouchers, raffle tickets, or reply cards where you want a section to be easily removed without ripping the main piece.
-
Creasing (or Scoring): Here, a blunt die is used to impress a crisp, clean fold line into the card stock instead of cutting it. This is absolutely essential for creating professional-looking greetings cards, presentation folders, and custom boxes. It ensures they fold perfectly every time, without any ugly cracking.
Choosing the right technique is the final step in turning a great design into a brilliant physical product. Whether you need a bold through cut, a practical kiss cut, or a functional perforation, understanding these options gives you the power to create print materials that truly perform.
Materials and Creative Ideas for Die Cut Projects
Once you get your head around the techniques, the really fun part begins: bringing your ideas to life. The true magic of die cutting happens when you pair the perfect shape with the right material. It’s a process far more versatile than most people think, capable of handling a whole range of materials well beyond standard paper.
The material you choose really sets the tone for your entire project. A thick, textured card stock can give off a vibe of luxury and tradition, while a sleek, durable vinyl might be the perfect fit for modern, long-lasting labels. Each option offers a different feel, durability, and visual punch.
Common Materials for Die Cutting
While paper and card are the usual suspects, the possibilities are genuinely exciting. Here are just a few of the materials we can precision-cut to create some truly stunning marketing tools:
-
Paper and Card Stock: From lightweight 150gsm paper for delicate inserts to a hefty 400gsm card for premium business cards and folders, the range is huge. Different finishes like gloss, silk, or uncoated matte will also completely change the final look.
-
Vinyl: A brilliant choice for stickers and decals thanks to its durability and weather resistance. It’s perfect for everything from product labels to window graphics that need to last.
-
Corrugated Cardboard: Absolutely essential for creating custom-shaped boxes and inserts. This is how you turn standard packaging into a memorable unboxing experience.
-
Specialty Papers: This is where things get interesting. Think textured papers, metallic foils, and even lightweight plastics. These materials can add a unique tactile or visual element that makes your item impossible to ignore.
Just look at the UK's die cut lids market – it has seen massive growth, with a market value soaring into the hundreds of millions of pounds. This is largely driven by demand for aesthetic and functional food packaging, proving just how big an industry die cutting on various materials has become. You can dig deeper into these market trends and the growth of die cut packaging.
The material you choose isn’t just a carrier for your design—it’s an integral part of the message. The texture, weight, and finish all contribute to how your brand is perceived by the customer.
Inspiring Ideas for Your Next Project
So, how can you use die cutting to make your brand unforgettable? Let’s move past the theory and look at some practical, high-impact ideas that UK businesses are using right now.
-
Uniquely Shaped Retail Tags: Instead of a boring rectangle, imagine a clothing tag shaped like a leaf for an organic cotton brand, or a hexagonal tag for a modern tech accessory. It’s a small detail that says a lot.
-
Custom Presentation Folders: A folder with a die-cut window revealing your logo or a curved pocket inside communicates attention to detail before your client has even opened it.
-
Creative Business Cards: Make an instant impression with a business card shaped like your best-selling product, a key, or your company mascot. It’s a conversation starter.
-
Engaging Event Invitations: Create a bit of intrigue with invitations that have die-cut shapes or patterns, giving guests a tantalising hint of the event’s theme.
These creative touches transform everyday print items into powerful branding tools. By exploring different shapes and materials, you can create a truly distinctive feel for your marketing, especially when it comes to designing bespoke product packaging that truly wows your customers.
Preparing Your Artwork for a Perfect Cut
A brilliant die-cut product starts long before it hits the press. It all begins with your design file. Getting your artwork set up properly is the single most important thing you can do to make sure the final result is crisp, accurate, and exactly what you had in mind. It's the best way to avoid common and costly reprints.
The secret is to give the cutting machine crystal-clear instructions. You do this by creating a special path in your design file called a dieline or cut line.
What Is a Dieline?
Think of the dieline as a map for the blade. It's a precise vector line, usually drawn in a program like Adobe Illustrator, that tells the die-cutting machine the exact path to follow. This line won’t be printed on your final product; it’s purely a guide for the machinery.
To set up your dieline correctly, it must be:
- A Vector Path: Dielines can't be pixel-based images (like a JPEG or PNG). They have to be created with vector points and lines to get that razor-sharp precision.
- A Closed Shape: The path needs to start and end at the same point, forming a complete, unbroken outline for the cut.
- Clearly Defined: We typically ask for the dieline to be set as a specific spot colour (often a bright magenta) and set to 'overprint'. This makes it visible to our production team but ensures it doesn't interfere with your actual artwork.
Nailing this step is absolutely crucial for a clean, professional finish.
A well-prepared dieline is the blueprint for a perfect cut. It eliminates guesswork, reduces the risk of errors, and ensures your unique shape is produced with complete accuracy from the first piece to the last.
Essential File Prep Tips
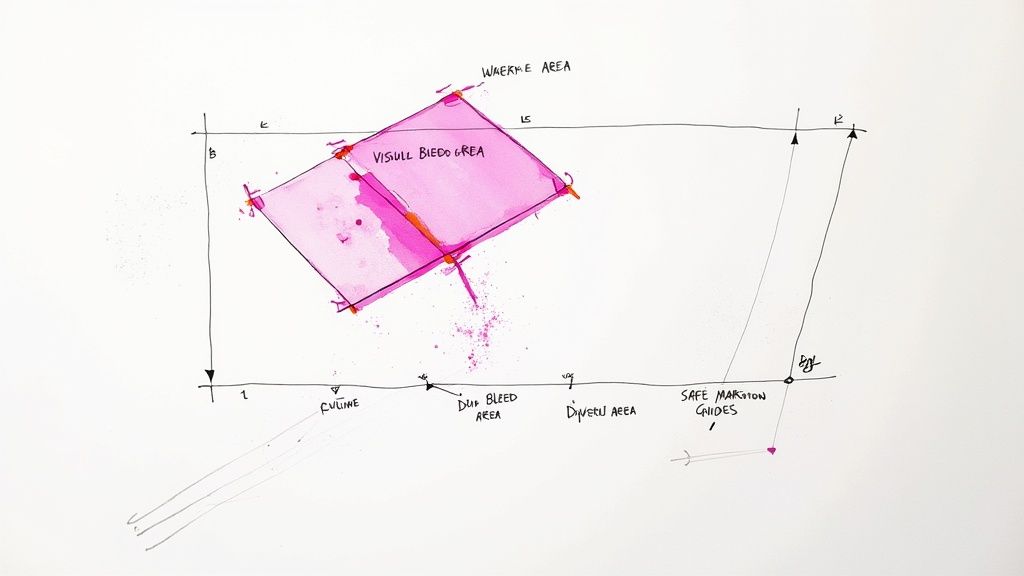
Beyond the dieline itself, two other elements are vital for getting flawless results: the bleed and the safe margin. If you ignore these, you risk getting disappointing white slivers along the edges or, even worse, having your text chopped off.
-
Add a Bleed Area: Always extend your background colour or images about 3mm beyond the dieline on all sides. This is your bleed. Paper can shift ever so slightly during the cutting process, and this extra bit of artwork ensures your design goes right to the very edge, with no unprinted gaps.
-
Respect the Safe Margin: Just as important is keeping all your key text, logos, and critical design elements at least 3-5mm inside the dieline. This 'safe zone' acts as a buffer, preventing anything important from being accidentally trimmed away.
By setting up your dieline, bleed, and safe margin correctly, you make the whole production process smoother and guarantee your finished items look polished and expertly made.
How Die Cutting Affects Your Project Budget
When you’re planning a print project, keeping an eye on the budget is always a top priority. The cost of die cutting isn't just a simple line item; it’s influenced by a few key things, like how complex your design is, the material you’ve chosen, and most importantly, how many you’re ordering.
With traditional die cutting, the main upfront cost is the creation of a custom metal die. Think of it as a bespoke cookie cutter made just for your design. This means there's a one-off setup fee to get it made. While that adds to the initial bill, it quickly becomes cost-effective on larger print runs, as the price per piece drops dramatically the more you print.
Balancing Cost with Modern Methods
But what if you don’t need thousands of items? For smaller batches, one-off prototypes, or jobs with lots of different designs, there’s a much more flexible and wallet-friendly alternative: digital die cutting.
This newer method uses a computer-guided blade to cut the shape straight from your digital file, meaning there’s no need for a physical die at all. That means no setup fees, making it the perfect choice for short runs where a custom die would be overkill. It's no surprise that more and more businesses are turning to this technology.
The UK’s digital die cutting market is booming, with a market size already in the tens of millions of pounds. It’s set to grow at an annual rate of 8.3% in the coming years, which just goes to show how vital it’s becoming for businesses that need flexible, on-demand printing. You can learn more about the growth of the UK's die cutting market here.
Making the Smartest Investment
So, which is the right choice for you? It really boils down to what your project needs.
- Large, repeatable orders: A traditional die is a smart long-term investment. The upfront cost pays for itself over time.
- Small runs or prototypes: Digital die cutting gets you those custom shapes without the big commitment, keeping your costs down.
Knowing the difference helps you make a savvy decision that lines up your creative vision with your budget. You get a standout final product without compromising on value.
Got a Few Questions About Die Cutting?
You’re not alone. When you’re getting an order ready, a few practical questions always come up. Getting your head around the details helps you choose with confidence and makes sure the final print job is exactly what you had in mind. Let's clear up a few of the most common ones.
First off, lots of people ask about the difference between a die cut and a kiss cut, especially for stickers. It’s a simple distinction, but a crucial one for how your final product looks and works.
Die Cut vs Kiss Cut Stickers
The big difference is all about how deep the blade goes.
-
A die cut (sometimes called a through cut) slices right through both the sticker vinyl and the paper backing. This gives you a totally custom-shaped, individual sticker that stands on its own.
-
A kiss cut, on the other hand, just slices through the top vinyl layer, leaving the backing paper completely intact. This is perfect if you want a sheet of multiple stickers that are easy to peel off.
Think of it this way: a die cut is a standalone item, while a kiss cut presents stickers on a bigger sheet.
How Complex Can My Shape Be?
While die cutting is incredibly accurate, it does have its limits. Really intricate designs with super sharp, narrow angles or tiny cut-outs can be a bit tricky for the blade. This can sometimes lead to tearing or a finish that isn’t quite perfect.
To get a clean, professional cut every time, it’s best to avoid overly complex shapes. Try to keep corners slightly rounded where you can, and make sure every part of your design is substantial enough to be cut cleanly. If your design is very detailed, it's always a good idea to have a quick chat with us first.
Do I Have to Pay for a New Die Every Time?
Good question! It all depends on your order and the cutting method we use. For traditional die cutting, we create a custom metal die, which has a one-time setup cost. If you reorder the exact same shape and size, we can simply reuse that die, and you will not have to pay the setup fee again.
For digital die cutting, no physical die is ever made. This means there are no die setup fees at all, making it the perfect choice for smaller runs or one-off jobs.
Ready to bring your unique shapes to life? From custom stickers to perfectly creased packaging, The Print Warehouse Ltd has the technology and expertise to deliver outstanding results. Explore our full range of printing services and see how custom shapes can elevate your brand. Visit us at https://theprintwarehouse.uk today.

