
When you're sending out invitations, postcards, or marketing mailers, getting the envelope size right is the first step to making a great impression. The standard size of an A6 envelope is 114 x 162 mm, which is designed to perfectly hold a piece of A6 paper (105 x 148 mm).
But here’s a little insider tip: while everyone calls it an 'A6 envelope', its official name in the print world, according to ISO standards, is actually a C6 envelope. It's a small detail, but knowing the lingo helps!
Your Guide to A6 Envelope Dimensions
When you need to send something A6-sized, understanding the exact envelope dimensions isn't just about looks. It's about making sure your mail travels smoothly through the postal system and that your designs are prepared correctly. Getting this right from the start saves you time, money, and the headache of costly reprints.
So, what is an A6 envelope really? Think of a standard A4 sheet of paper. Fold it in half, and you get A5. Fold that in half again, and you get A6. The A6 envelope or more accurately, the C6 is designed to comfortably house that A6 sheet. This clever and intuitive system is all part of the ISO 216 international paper standard, a framework that ensures paper and envelopes across the globe work together seamlessly.
A6 Envelope Dimensions at a Glance
Precision is everything in printing, so here are the exact measurements you’ll need. Whether you're setting up a file in a design program or measuring a card by hand, these numbers are your guide.
| Unit | Width | Height |
|---|---|---|
| Millimetres | 114 mm | 162 mm |
| Inches | 4.49 in | 6.38 in |
These dimensions have made the A6 format incredibly popular here in the UK for both personal and business mail. It’s the size of a classic postcard, a party invitation, or a small notebook. Since the UK adopted the ISO 216 standard back in the 1970s, it's become a go-to choice. In fact, over 60% of greeting cards sold in the UK are A6. It’s a reliable and efficient format that just works.
The C6 envelope is the unsung hero of stationery. It's the perfect fit for an A6 card, giving it just enough breathing room to slip in easily without rattling around or getting damaged in transit.
This common size is a staple for a reason. Its versatility and compatibility make it an essential for anyone sending greeting cards, marketing mailers, or personal notes. If you're getting a project ready, you can browse a wide selection of high-quality envelopes designed to meet these exact specifications.
Why an A6 Card Needs a C6 Envelope
It’s a question we get all the time, and it makes perfect sense. If you have an A6 card, surely you need an A6 envelope? Not quite. In the world of print and stationery, an A6 card actually fits perfectly inside a C6 envelope.
Think of it like buying a picture frame. You wouldn't buy a 6x4 inch frame for a 6x4 inch photo because the picture simply wouldn't go in. Instead, you buy a frame made for a 6x4 photo, which is always slightly bigger to hold it properly. Envelopes work on exactly the same principle.
Thankfully, international sizing standards were created to take all the guesswork out of it.
The A, B and C Series Sizing System
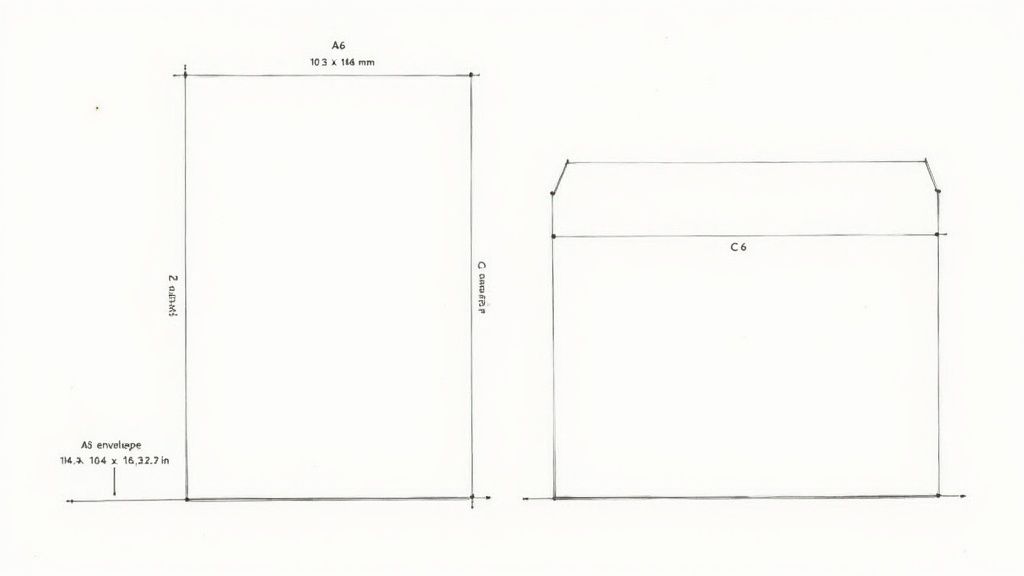
The 'C' series of envelope sizes was specifically designed to be the perfect home for the corresponding 'A' series of paper sizes. A C6 envelope measures 114 x 162 mm, making it just the right amount larger than an A6 card, which is 105 x 148 mm.
This tiny bit of extra space ensures your card slides in comfortably without getting bent or scuffed. This system, part of the ISO 269 standard, is beautifully logical. An A4 sheet folded in half becomes A5, which fits a C5 envelope. An A5 sheet folded in half becomes A6, which fits… you guessed it, a C6 envelope.
So, when you see a product listed as an "A6 envelope," it's almost always industry shorthand for a C6 envelope—the one made for A6 inserts.
The golden rule of envelopes is this: The envelope is always slightly larger than the item it’s designed to hold. An A6 card needs the breathing room that a C6 envelope provides.
More Than Just a Perfect Fit
This clever sizing system doesn’t just work for flat A6 cards. The C6 envelope is a real workhorse, brilliantly versatile for all sorts of mailings.
- Folded A5 Sheets: An A5 sheet of paper (148 x 210 mm) folded neatly in half becomes A6, slotting perfectly inside a C6. This is ideal for everything from personal letters to marketing flyers or event programmes.
- A6 Postcards: Standard A6 postcards fit with ease, giving them that extra layer of protection to keep them pristine in the post.
- 6x4" Photo Prints: The classic 6x4 inch photo print (roughly 102 x 152 mm) also fits comfortably, making C6 envelopes a fantastic choice for sending prints to family or clients.
This flexibility makes the C6 envelope an absolute staple for businesses and individuals alike. Whether you're sending out custom greeting cards for a promotion or personal thank-you notes, getting the sizing right ensures your mail looks professional and arrives in perfect condition, every single time.
Preparing Your A6 Artwork for Professional Printing
Getting a digital design onto a physical piece of paper is where the magic happens, but it does require a bit of technical prep. To make sure your A6 inserts look as crisp and professional in your hand as they do on screen, you’ll need to set up your artwork in a way that works with the printing and cutting process.
Think of it like framing a picture. You wouldn't cut the photo to the exact size of the frame’s opening; you need a little extra around the edges for the mount to grip onto. In printing, we call these extra margins the bleed, trim, and safe area. Getting them right is the secret to a flawless finish.
Understanding Bleed and Safe Areas
Imagine a massive stack of your freshly printed A6 cards under a guillotine. Even the most precise machinery can have tiny, millimetre-sized shifts during the cutting process. If your design stops exactly at the edge of the card, any slight movement could leave a frustrating sliver of white paper along one side.
This is where bleed comes in.
Bleed is just a bit of extra background colour or image that extends past the final trim line. For professional printing in the UK, we always ask for a 3mm bleed on all sides of an A6 insert (which is 105 x 148 mm). That means the artwork file you send us should actually be a little bigger, at 111 x 154 mm.
On the flip side, you have the safe area. This is the inner zone of your design, usually 5mm inside the trim line, where all your important stuff like text, logos, or contact details needs to live. Keeping everything critical inside this margin guarantees it won't get accidentally chopped off during trimming.
It's a simple idea: the bleed pushes your background out, while the safe area pulls your important content in. Together, they create a buffer that protects your design from the physical realities of printing, ensuring a perfect result every time.
This diagram shows how a standard A6 card fits perfectly inside a slightly larger C6 envelope, which is its ideal partner.
It’s a great visual reminder that your envelope always needs to be a little roomier than what you're putting inside it.
Your Pre-Print Checklist
Before you hit ‘send’ on your files, a quick run-through of this checklist can save you from common hiccups that cause delays or extra costs.
- Set Resolution to 300 DPI: DPI stands for Dots Per Inch, and it’s all about print clarity. For sharp, professional-looking results, your artwork must be set to 300 DPI. Anything less can look blurry or pixelated.
- Use CMYK Colour Mode: Your screen displays colour using RGB (Red, Green, Blue) light, but printers use CMYK (Cyan, Magenta, Yellow, Black) ink. Designing in CMYK from the start ensures the colours you see on screen are the colours you get on paper.
- Export as a Print-Ready PDF: This is the gold standard for printers. When you export, make sure you include the bleed and crop marks in the final file—this tells our machines exactly where to trim.
Getting these technical details right is crucial for any project, from wedding invitations to business flyers. Our professional stationery printing services are here to bring your perfectly prepared designs to life.
Right, you’ve got your perfectly designed A6 mailers printed and ready to go. The last piece of the puzzle? Getting them sent out without breaking the bank.
Here in the UK, how much you pay for postage isn’t just about distance. It all comes down to the size and weight of your item, a system managed by Royal Mail. Getting your head around this is the key to keeping your mailing campaign on budget.
The good news is that a standard A6 mailer, popped inside a C6 envelope, is designed to be super cost-effective. It fits comfortably into Royal Mail’s cheapest postage tier: the ‘Letter’ format. This is a huge win for anyone sending out marketing materials, invitations, or thank you cards, as it keeps your costs right down.
But—and this is a big but—a couple of simple mistakes can easily bump your mailer into the pricier ‘Large Letter’ category. The two culprits? Thickness and weight.
Letter vs. Large Letter: The Key Differences
To avoid any nasty surprises at the Post Office counter, you need to know the rules. A single millimetre or a few extra grams can make a massive difference to your final bill, especially if you’re sending a big batch.
Here’s a quick look at the maximum limits for Royal Mail’s main postal formats to help you stay on the right side of the line.
Royal Mail UK Postal Size Guide
This table breaks down the maximum dimensions, thickness, and weight for Royal Mail's Letter and Large Letter formats. As you'll see, a C6 envelope fits the dimensions for a 'Letter' easily, but the thickness and weight are where you need to be careful.
| Format | Max Dimensions (L x W) | Max Thickness | Max Weight |
|---|---|---|---|
| Letter | 240mm x 165mm | 5mm | 100g |
| Large Letter | 353mm x 250mm | 25mm | 750g |
A C6 envelope measures 162mm x 114mm, so it's well within the length and width for a standard Letter. The real challenge is keeping the entire package under that crucial 5mm thickness and 100g weight limit.
Honestly, misjudging these two factors is one of the most common pitfalls we see, often leading to unexpected surcharges or, even worse, returned mail.
The 5mm thickness rule is the number one reason an A6 mailer gets upgraded to a Large Letter. A slightly bulky insert, a small promotional gift, or even a fancy wax seal can easily tip it over the edge.
To keep your campaign on budget, always try to choose lighter paper stocks for your inserts and envelopes. Before you seal everything up, do a quick check with a ruler to make sure it’s not too chunky.
For more practical print and design tips, feel free to browse the other articles on our blog.
Choosing the Right Envelope Material and Style
While getting the size right is a crucial first step, the material of your A6 envelope is what your recipient actually touches. It’s their first physical interaction with your brand. The right paper stock and finish can elevate a simple mailer into a memorable experience, shaping perceptions before the envelope is even opened.
It’s amazing how much the choice of paper can say about your brand. High-quality, tactile paper stocks like kraft or textured paper can actually boost open rates by up to 30% compared to a standard white envelope. The paper's weight, measured in grams per square metre (gsm), also sends a message. While 80-100 gsm is the norm for everyday business use, premium invitations often use 120 gsm or more for a much more substantial, quality feel.
Common Paper Stocks and Finishes
You’ve got so many options beyond plain white paper. Each type offers a completely unique look and feel, helping you match the envelope perfectly to its purpose. Getting this right is just as important as selecting the right paper surface for fine writing when it comes to the insert inside.
Here are a few popular choices:
- Uncoated Paper: This is your versatile, cost-effective workhorse. It has a natural, matte surface that’s perfect for everyday business letters and prints colours with a softer, more subtle finish.
- Recycled Paper: A fantastic choice for eco-conscious brands. Recycled stocks often have a slightly rustic texture and immediately communicate a commitment to sustainability without sacrificing quality.
- Textured or Laid Paper: For high-end invitations or luxury marketing, a textured finish adds a touch of class you can feel. These papers feel important and make an instant impression.
- Kraft Paper: With its rustic, brown look, kraft paper is ideal for artisanal brands, country-style wedding themes, or any message aiming for an organic, down-to-earth vibe.
Functional Features to Consider
Beyond the paper itself, a few practical features can make life much easier for both you and your recipient. The sealing method, for instance, is a small detail that makes a big difference. Traditional gummed envelopes need moisture to seal, whereas self-seal (or peel-and-seal) options offer a quicker, cleaner closure a lifesaver for larger mailouts.
Think about the journey your mailer takes. For a high-volume direct mail campaign, a self-seal envelope saves precious time. But for a handful of wedding invitations, the classic feel of a gummed envelope might feel more special and appropriate.
Another key feature to think about is the window. Windowed envelopes are a brilliant time-saver for business mailings like invoices or statements. They cleverly display the recipient's address from the letter inside, which means no more printing and sticking separate address labels.
And if you’re looking to create a complete branded package, you might want to explore bespoke packaging and box solutions that can complement your mailers perfectly.
A Practical Checklist for Your Next A6 Project
You've got the theory down, so let's put it all into practice. This final checklist is your simple, step-by-step guide to take your project from a bright idea to a professional mailshot, making sure everything runs smoothly from start to finish.
Think of it as your pre-flight check before you launch. Running through these points will help you sidestep common mistakes, save a bit of money, and create a mailer that looks fantastic. It doesn't matter if you're sending a handful of party invites or a major marketing campaign—these fundamentals always apply.
Your Step-by-Step Guide
Before you hit 'send' on that design or place your print order, just take a moment to run through these key points. They pull everything we've covered together into one simple workflow.
-
Confirm Your Sizes: This is step one for a reason—it’s the most important. You need a C6 envelope (114 x 162 mm) to perfectly fit your A6 insert (105 x 148 mm). Double-check that both your design files and your envelope order match up. Getting this right from the start is half the battle.
-
Get Your Artwork Print-Ready: Now, let's set up your design file properly for a professional printer. This means adding a 3mm bleed on every side of your artwork, making your total file size 111 x 154 mm. Just as crucial, keep all your important text and logos at least 5mm away from the final trim edge to create a safe area.
-
Check Your Postage: Before you send out hundreds of items, pop a finished, sealed sample on the scales and measure it. Make sure it stays under the Royal Mail ‘Letter’ limits of 100g in weight and 5mm in thickness. A quick check with a kitchen scale and a ruler can save you from a nasty surprise with postage costs.
By getting these three things right—sizing, artwork, and postage—you’re in complete control of your project. This isn't about guesswork; it's about following a reliable process that gives you the confidence to move forward, knowing you've covered all the bases for a flawless result.
Ready to bring your perfectly planned project to life? The Print Warehouse Ltd offers fast, high-quality printing for all your A6 mailer needs, with a wide range of finishes and dependable UK delivery. Start your order today at https://theprintwarehouse.uk.

