
If you’ve ever picked up a paperback novel, you already know what perfect binding looks like. It’s that clean, professional finish with a flat, squared-off spine that looks just right on a bookshelf. This popular and affordable method is the go-to choice for creating high-quality catalogues, magazines, and self-published books.
What Exactly Is Perfect Binding?
So, how do printers transform a simple stack of loose pages into a sleek, bookstore-quality book? The magic is in the perfect binding process, a clever technique that delivers a high-end feel without the expense of a hardcover. It’s much more straightforward than you might think.
The method really took off in the UK during the 19th century, right alongside the industrial revolution's printing boom. It was so effective and affordable that by the early 20th century, perfect binding was used for an estimated 70-80% of all paperback novels published in the United Kingdom.
The Mechanics of Perfect Binding
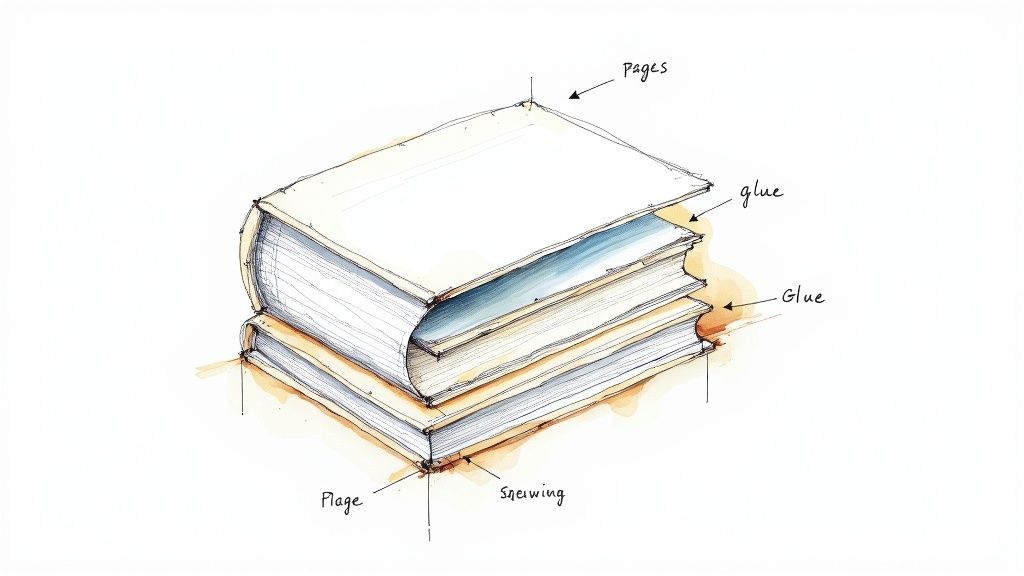
Let’s break down how it works. First, all the interior pages are gathered together into a neat block, like a deck of cards. The edge that will become the spine is then roughened up – a process called ‘milling’ – which creates more surface area for the adhesive to grab onto.
Next, a strong but flexible hot-melt glue is applied right along that milled edge. Before the glue sets, a wraparound cover is pressed firmly onto the spine, fusing everything together into a single, solid unit. To finish it all off, the book is trimmed on the other three sides to give it those perfectly crisp, clean edges.
Core Benefits and Common Uses
Perfect binding isn't just popular for its looks; it offers some serious practical advantages for businesses, designers, and authors alike. These key benefits make it a brilliantly versatile choice for all sorts of projects.
- A Professional Look: The square spine gives books a polished, retail-ready appearance that sits neatly on any shelf.
- Printable Spine: Unlike other methods like saddle-stitching, you get a spine you can print on. This is crucial for adding a title or author name, making your book visible in a stack.
- Cost-Effective for Bigger Jobs: While there are initial setup costs, the price per book drops significantly on larger orders, making it a very economical choice for bigger print runs.
- Durable and Flexible: Today's adhesives create a powerful bond that holds up to regular use, letting you open the book wide without cracking the spine.
The real value of perfect binding is its ability to deliver a premium, bookstore-quality product at an accessible price point. It opens the door to professional publishing for everyone from small businesses to independent creators.
You’ll see perfect bound books everywhere, from corporate reports and product catalogues to literary journals and event programmes. A great example is a softcover children's emotions book, where a durable and professional finish is essential for both parents and little readers.
Choosing The Right Binding Method For Your Project
Picking the right binding isn't just a final flourish; it’s a critical decision that affects how your project looks, lasts, and fits your budget. While perfect binding is a fantastic all-rounder, knowing the alternatives is key to making a smart choice that truly suits what you’re creating. After all, not all binding is made equal.

Let’s dive into the main contenders and see how they stack up. We'll explore the differences between standard perfect binding, its tougher cousin PUR binding, and the simple, effective saddle-stitch. Each one has its own personality and purpose.
Perfect Binding vs PUR Binding: A Battle of Adhesives
At a glance, a standard perfect bound book and a PUR-bound book look identical. They both have that crisp, professional, squared-off spine. The real difference is hidden inside, right in the glue holding it all together. This single component completely changes the book's strength and lifespan.
Standard perfect binding uses Ethylene Vinyl Acetate (EVA), a hot-melt adhesive that’s reliable and gets the job done for most projects. It’s fast, affordable, and has become the industry go-to for paperbacks, catalogues, and magazines.
But when you need something that can really take a beating or survive extreme temperatures, PUR binding is the champion. PUR stands for Polyurethane Reactive, a seriously advanced adhesive that forms an incredibly strong yet flexible bond. It works by chemically reacting with moisture from the paper and the air, creating a bond that’s far tougher than EVA’s.
The difference in durability is no small thing. Studies have shown that PUR binding is approximately 40-60% stronger in page pull tests than standard perfect binding with EVA glue.
That means pages are much less likely to ever fall out, even with constant use. PUR is the perfect choice for:
- High-Use Manuals: Think of training guides or workshop handbooks that are opened, closed, and flattened out day after day.
- Premium Catalogues: Especially those printed on heavy, glossy, or coated papers, which can be tricky for EVA glue to properly grip.
- Long-Lasting Books: For publications designed to have a long shelf life, like yearbooks, coffee table books, or high-end corporate reports.
When you’re weighing up these kinds of production choices, a good guide on how to self-publish a book can be a goldmine of information, helping you see the bigger picture.
Perfect Binding vs Saddle Stitching
Another popular alternative is saddle stitching. Instead of a glued spine, this method involves folding large printed sheets in half, nesting them together, and stapling them right through the centre fold with wire staples. If you’ve ever held a typical newsletter, event programme, or comic book, you’ve seen saddle stitching in action.
Its biggest advantage is its simplicity and low cost, especially for publications with a smaller page count. It also allows the booklet to lie completely flat when opened, which is a huge plus for certain layouts and designs.
The trade-off, however, is its limitations. Saddle stitching is really only suitable for thinner documents usually up to 64 pages or so, depending on the paper thickness. Any more than that and the booklet starts to get too bulky and won’t close properly, a problem known in the print world as 'creep'. Plus, it doesn’t have a printable spine, which is a major drawback if you want your publication to be visible on a shelf.
So, how do you decide between them?
- Choose Saddle Stitching for: Thin booklets, brochures, event programmes, newsletters, and zines under 64 pages where laying flat is essential. You can take a closer look at our saddle-stitched booklets here.
- Choose Perfect Binding for: Thicker documents (usually 40+ pages), novels, corporate reports, lookbooks, and any project needing that professional, bookstore-quality finish with a printable spine.
Binding Method Comparison
To make things even clearer, here’s a quick side-by-side look at the main features of each binding method.
| Feature | Perfect Binding (EVA) | PUR Binding | Saddle Stitching |
|---|---|---|---|
| Best For | Paperbacks, magazines, catalogues | High-end books, manuals, coated paper | Brochures, newsletters, thin booklets |
| Page Count | 40 - 700 pages | 40 - 700 pages | 8 - 64 pages |
| Durability | Good | Exceptional | Moderate |
| Spine | Flat, printable spine | Flat, printable spine | No printable spine |
| Cost | Cost-effective | Premium | Very low cost |
| Lays Flat? | No | Partially (more flexible) | Yes |
Ultimately, choosing the right binding comes down to balancing your project’s page count, how it will be used, how long you want it to last, and your budget. By understanding these key differences, you can ensure your final product is not only beautiful but perfectly suited to its purpose.
Where Perfect Bound Books Make an Impact
Knowing the nuts and bolts of perfect binding is one thing, but seeing it out in the wild is where its real value clicks into place. This isn't just a technical process; it’s a tool that helps authors, brands, and organisations bring their vision to life with a seriously professional finish. Let's walk through a few real-world scenarios where perfect bound books really hit their stride.
Imagine a growing fashion brand, ready to launch its first seasonal lookbook. They need more than a simple flyer. What they're after is a premium piece of marketing that speaks to the quality of their clothing. By choosing perfect binding, they can create a stunning catalogue with that sleek, printable spine displaying their brand name.
The result is a substantial, high-quality booklet that feels more like a magazine than a throwaway ad. It’s the kind of thing customers are happy to leave on their coffee table, extending the life of the marketing and cementing the brand's sophisticated image.
The First-Time Author’s Debut
Now, picture a first-time author who has poured years into writing their debut novel. After all that hard work, the last thing they want is a finished product that looks amateur. They need a book that can sit proudly on a bookstore shelf right next to titles from the big publishing houses.
Perfect binding is the answer. It delivers that classic paperback look with a clean, squared-off spine—perfect for the title, author's name, and publisher's logo. That professional finish is crucial for credibility and shelf appeal, helping the author’s work get the attention it deserves from readers and retailers. In fact, perfect bound books are a dominant force in the UK, representing approximately 60-70% of all mass-market fiction paperbacks. Retailers often prefer them because their professional look, especially with a matt laminated cover, maximises their appeal on crowded shelves. Find out more about UK book market preferences from industry experts.
For an independent creator, the choice of binding is about more than just holding pages together. It's about legitimacy. A perfect bound book signals professionalism and tells the world this story is worth reading.
Corporate Reports and Annual Reviews
Finally, think about a large corporation preparing its annual report for shareholders. This document has to scream authority, success, and a meticulous eye for detail. A flimsy, stapled booklet just isn't going to cut it.
Perfect binding provides the necessary gravitas. It easily handles the high page counts typical of comprehensive reports while looking polished and organised. The flat spine allows for clear labelling by year, making it easy to archive and pull off the shelf later.
This method also turns out to be incredibly cost-effective for the large print runs these reports require. It strikes the perfect balance between presenting a high-end image and keeping a close eye on the budget. The versatility of perfect binding makes it a fantastic choice for a huge range of professionally printed materials, from corporate reports to marketing booklets and brochures.
In each of these examples, the binding choice directly shapes how the final product is perceived. Perfect bound books provide a tangible sense of quality that elevates the content inside, making them a powerful tool for leaving a lasting impression.
Mastering The Technical Specifications For Print
Getting the technical details right is the difference between a professional print job and a costly, frustrating mistake. This guide will walk you through the essential specs for your perfect bound books, from choosing the right paper to calculating that all-important spine width.
Nailing these elements isn't just for printers; it’s how you guarantee your project looks and feels exactly as you imagined.
First up, let's talk page count. Perfect binding has a sweet spot, and it’s generally between 40 and 400 pages. This range is substantial enough to need a proper spine but not so thick that it puts too much stress on the glue.
If your document has fewer than 40 pages, the spine simply won't be thick enough for the adhesive to form a strong, lasting bond. For projects with very low page counts, something like our wiro-bound booklets is a much better fit.
On the other hand, for massive books over 400 pages, the sheer weight of the paper block can strain standard adhesives. It’s always worth asking your printer about super-strong PUR binding for those chunkier projects.
Understanding Paper Weight and Thickness
The paper you choose has a huge impact on the final feel of your book. We measure paper weight in GSM (Grams per Square Metre) – the higher the GSM, the thicker, heavier, and more premium the paper feels. A higher GSM also means less 'show-through', where you can see the print from the other side of the page.
For the inner pages, a weight of 130gsm to 170gsm is a fantastic all-rounder. It’s thick enough to feel high-quality while still being flexible. You could go for a lighter 100gsm for text-heavy novels, or a heavier 200gsm for high-end art books where image quality is everything.
The cover, of course, needs to be much tougher. A reliable industry standard is 300gsm card stock. This gives it the rigidity needed to protect the pages inside and creates that solid, professional feel you want in a book.
Choosing the right paper can feel tricky, so we've put together a quick guide to help you decide.
Recommended Paper Weights for Perfect Binding
| Paper Type | Recommended GSM Range | Best For |
|---|---|---|
| Inner Pages | 130gsm - 170gsm | The go-to range for reports, catalogues, and magazines. Great quality feel. |
| 100gsm - 120gsm | Ideal for text-heavy novels or manuals where budget is a key factor. | |
| 170gsm - 200gsm | Perfect for premium art books or photo-heavy projects requiring less show-through. | |
| Cover | 300gsm | The standard choice for a sturdy, professional cover that protects the book. |
This table should give you a solid starting point, but always feel free to ask for a sample if you're unsure!
Calculating Your Spine Width Correctly
Of all the technical details, this is the one that trips people up the most. Getting the spine width wrong is a classic (and completely avoidable) mistake. If it’s too narrow, your cover will be strained and won't close properly. Too wide, and it’ll look loose and unprofessional.
Getting it spot on is non-negotiable.
The spine width isn't a guess; it's a precise calculation based on two things:
- The number of pages in your book.
- The thickness (GSM) of the paper you’ve chosen for the inner pages.
Crucial Tip: Never, ever guess your spine width. Always ask your printer for the exact calculation before you start designing your cover. They have a precise formula based on the specific paper stocks they use.
Think about it: a 100-page book using 130gsm paper will have a much thinner spine than a 100-page book on 170gsm paper. A tiny change in paper choice can completely throw off your cover artwork dimensions.
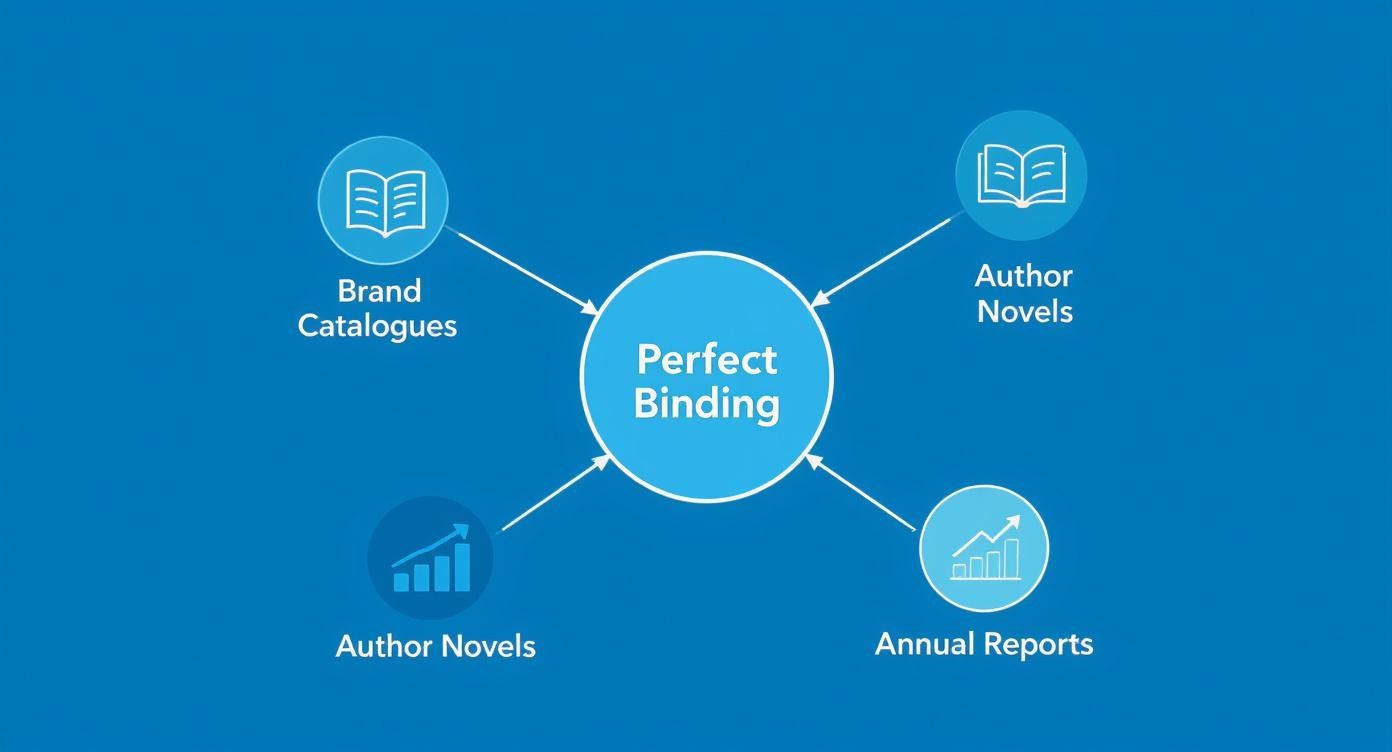
As you can see, perfect binding is trusted for high-stakes projects like brand catalogues, novels, and annual reports—all of which demand a flawless finish that starts with getting the technical details right.
Choosing Your Cover Finishes
The final touch for your perfect bound book is the cover finish. This isn’t just about looks; a good finish adds a vital layer of protection against scuffs, fingerprints, and general wear and tear. The two most popular choices are matt and gloss lamination.
-
Matt Lamination: This gives the cover a smooth, sophisticated, and non-reflective finish. It has a modern, elegant feel that softens colours slightly and completely kills any glare. It’s a fantastic choice for corporate reports, literary journals, and high-end lookbooks.
-
Gloss Lamination: For a vibrant, high-impact look, gloss is the way to go. It creates a shiny, reflective surface that makes colours pop and images look incredibly sharp and rich. This finish is perfect for photo books, colourful catalogues, and any design that needs to jump off the shelf.
How to Prepare Print-Ready Artwork Files
Creating flawless artwork for a perfect bound book is all about thinking like a printer. A little bit of prep work now saves a whole lot of hassle later, ensuring the design on your screen translates perfectly to the printed page. Getting these foundations right from the start will save you time, money, and the headache of any nasty surprises.
Let's walk through the essential checks and setup tips for getting your files print-ready. We'll cover everything from bleed and margins to designing your cover as one single, seamless piece.
Add Bleed for a Professional Edge
Ever seen a brochure with a tiny, annoying white sliver of paper showing at the edge? That’s what happens when artwork is missing its bleed. Bleed is simply the practice of extending your background colours, images, or graphics 3mm beyond the final trim line of your page.
Think of it like fitting a new carpet. You wouldn't cut the carpet to the exact dimensions of the room; you'd leave a little extra around the edges to trim down for a perfect, wall-to-wall fit.
This extra 3mm area gets trimmed off after printing, but it acts as a crucial safety net. It guarantees that even the slightest shift during the cutting process won't leave an unprofessional-looking white border. It’s a non-negotiable step for any design that touches the edge of the page.
Set Your Margins and Gutter
While bleed pushes your design outwards, margins create a safe zone inwards. Think of the safe margin as an invisible frame inside the trim line where all your important text and logos need to live. We recommend keeping everything crucial at least 5mm away from the edge to stop it from getting accidentally chopped off.
For perfect bound books, you also have to account for the gutter the inner margin where the pages disappear into the spine. Because the pages are glued in, they don't lie completely flat like they would in a spiral-bound notebook.
To stop your text from getting swallowed by the crease, you need a much bigger inner margin, or gutter. A safe gutter of at least 10-15mm is what we'd recommend. This ensures everything is easy to read without your audience having to crack the spine.
This is especially critical for any text or images that run across a two-page spread. Without a proper gutter, you risk words and pictures being distorted or lost completely in the binding.
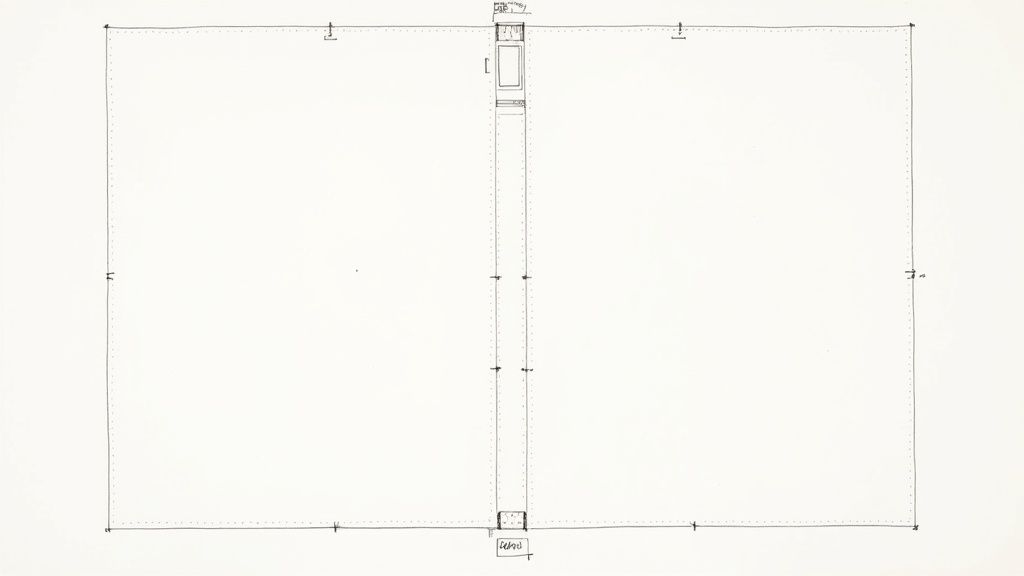
Design Your Cover as One Continuous Piece
This is one of the most common slip-ups we see: designing the cover as three separate files for the front, back, and spine. For perfect binding, your cover must be supplied as one single, continuous artwork file.
This single piece of artwork needs to be laid out like a jacket, with the elements in this order:
- Back Cover: Positioned on the left side of your canvas.
- Spine: Slotted right in the middle, set to the exact width your printer gives you.
- Front Cover: Placed on the right-hand side of your canvas.
And don’t forget to add a 3mm bleed around the entire edge of this combined artwork. The spine width is calculated based on your final page count and the thickness (GSM) of the paper you’ve chosen, so you absolutely must get this measurement from your printer before you finalise the cover design.
Final Technical Artwork Checks
Before you hit send, give your files one last check-up. These small technical details make a massive difference to the finished quality of your perfect bound book.
- Image Resolution: Make sure every image is set to at least 300dpi (dots per inch) at the size it will be printed. Anything less will look fuzzy or pixelated.
- Colour Mode: Your design files must be in CMYK (Cyan, Magenta, Yellow, Key/Black), not RGB. RGB is for screens; CMYK is the four-colour process used in professional printing.
- File Format: The gold standard for submitting artwork is a print-ready PDF. This format locks in all your fonts, images, and layout elements, so nothing can shift or go missing when we open it.
Follow these steps, and you can be confident that your artwork is properly set up for a professional, high-quality finish. Taking a few extra minutes to get these details right ensures your books will look every bit as good as you imagined.
Common Questions About Perfect Binding
As you get ready to send your project to print, it’s completely normal for a few last-minute questions to pop up. Perfect binding is a brilliant process, but knowing the finer details will help you make every decision with complete confidence.
Think of this as your final checklist. We’ve pulled together the most common queries we get from clients to make sure there are no surprises when your beautiful new books arrive.
What Is The Ideal Page Count For Perfect Binding?
This is a big one. Perfect binding really shines on documents that fall between 40 and 400 pages. This page range gives you a spine that’s thick enough for the adhesive to get a strong, durable grip, but not so thick that it puts too much strain on the binding itself.
If your document is under 40 pages, the spine is just too thin for the glue to work its magic. For those, a saddle-stitched finish is a much safer and more practical choice. On the flip side, if you're creating a massive volume pushing past 400 pages, it’s worth having a chat with your printer about using a more robust PUR adhesive instead of standard EVA glue.
Will A Perfect Bound Book Lie Completely Flat?
The short answer is no, and that’s actually a good thing. The whole point of a strong, glued spine is that it doesn’t open completely flat. Instead, the adhesive holds the pages in a gentle, elegant arch that creates a professional reading experience.
This is precisely why perfect binding is the top choice for novels, company reports, magazines, and catalogues. The book holds its shape, is easy to handle, and looks fantastic on a shelf.
If your project absolutely has to lie flat—think cookbooks, music books, or training manuals that people need to write in—you’ll want to look at other options. Binding styles like spiral or wire-o are designed specifically for that purpose, letting the pages turn a full 360 degrees.
How Does The Cost Compare To Other Methods?
Perfect binding hits that sweet spot between premium quality and great value, making it one of the most cost-effective binding solutions out there. It’s significantly cheaper than a hardcover (case binding) and is usually more budget-friendly than PUR binding, simply because the standard EVA adhesive costs less.
Its real economic advantage comes into play on print runs of 50 copies or more. While it might be a fraction more expensive per copy than saddle-stitching, it can handle a much larger page count and gives you that premium, squared-off spine you can print a title on. That professional finish adds a perceived value that far outweighs the small difference in cost. Many businesses find that the professional appearance of perfect binding is an excellent complement to other marketing materials, such as high-quality glued presentation folders for sales meetings and events.
What Is The Real Difference Between EVA And PUR Glue?
While both glues give you that classic perfect bound look, the difference really comes down to two things: durability and flexibility.
Most standard perfect binding uses EVA (Ethylene Vinyl Acetate), a hot-melt glue that’s quick, reliable, and very economical. It’s the industry workhorse for a reason and is more than capable for the vast majority of paperback books, magazines, and reports.
PUR (Polyurethane Reactive) adhesive is the heavy-duty upgrade. It forms an incredibly strong chemical bond with the moisture in the paper, creating a spine that is much stronger and more flexible than EVA.
Here’s a quick way to decide:
- Choose EVA for: Standard paperbacks, corporate reports, catalogues, and projects on uncoated paper where extreme longevity isn't the number one priority.
- Choose PUR for: High-use manuals, books printed on heavy or glossy coated papers, projects that might face extreme temperatures, or any document you want to last a very, very long time.
Ultimately, PUR-bound books are exceptionally resistant to pages falling out and offer superior performance, making them the clear winner for any project that demands the absolute best.
Ready to create your own professional, high-quality books? At The Print Warehouse Ltd, we make the process simple. Upload your artwork today and let us bring your vision to life with our expert perfect binding services!

